Creating End-to-End MLOps pipelines using Azure ML and Azure Pipelines
In this 7-part series of posts we’ll be creating a minimal, repeatable MLOps Pipeline using Azure ML and Azure Pipelines.
The git repository that accompanies these posts can be found here.
In this series we’ll be covering:
- Part 1 – Introduction
- Part 2 – Resource Set Up
- Part 3 – Data Pipeline
- Part 4 – Environment Pipeline
- Part 5 – Model Training Pipeline
- Part 6 – Model Deployment Pipeline
- Part 7 – Continuous Integration (CI) Pipeline
Quick disclaimer: At the time of writing, I am currently a Microsoft Employee
Part 7 – Continuous Integration Pipeline
In this post we’ll be setting up a CI pipeline – in which any changes we would like to make to our code will have to withstand scrutiny from static code analysis and automated unit testing:
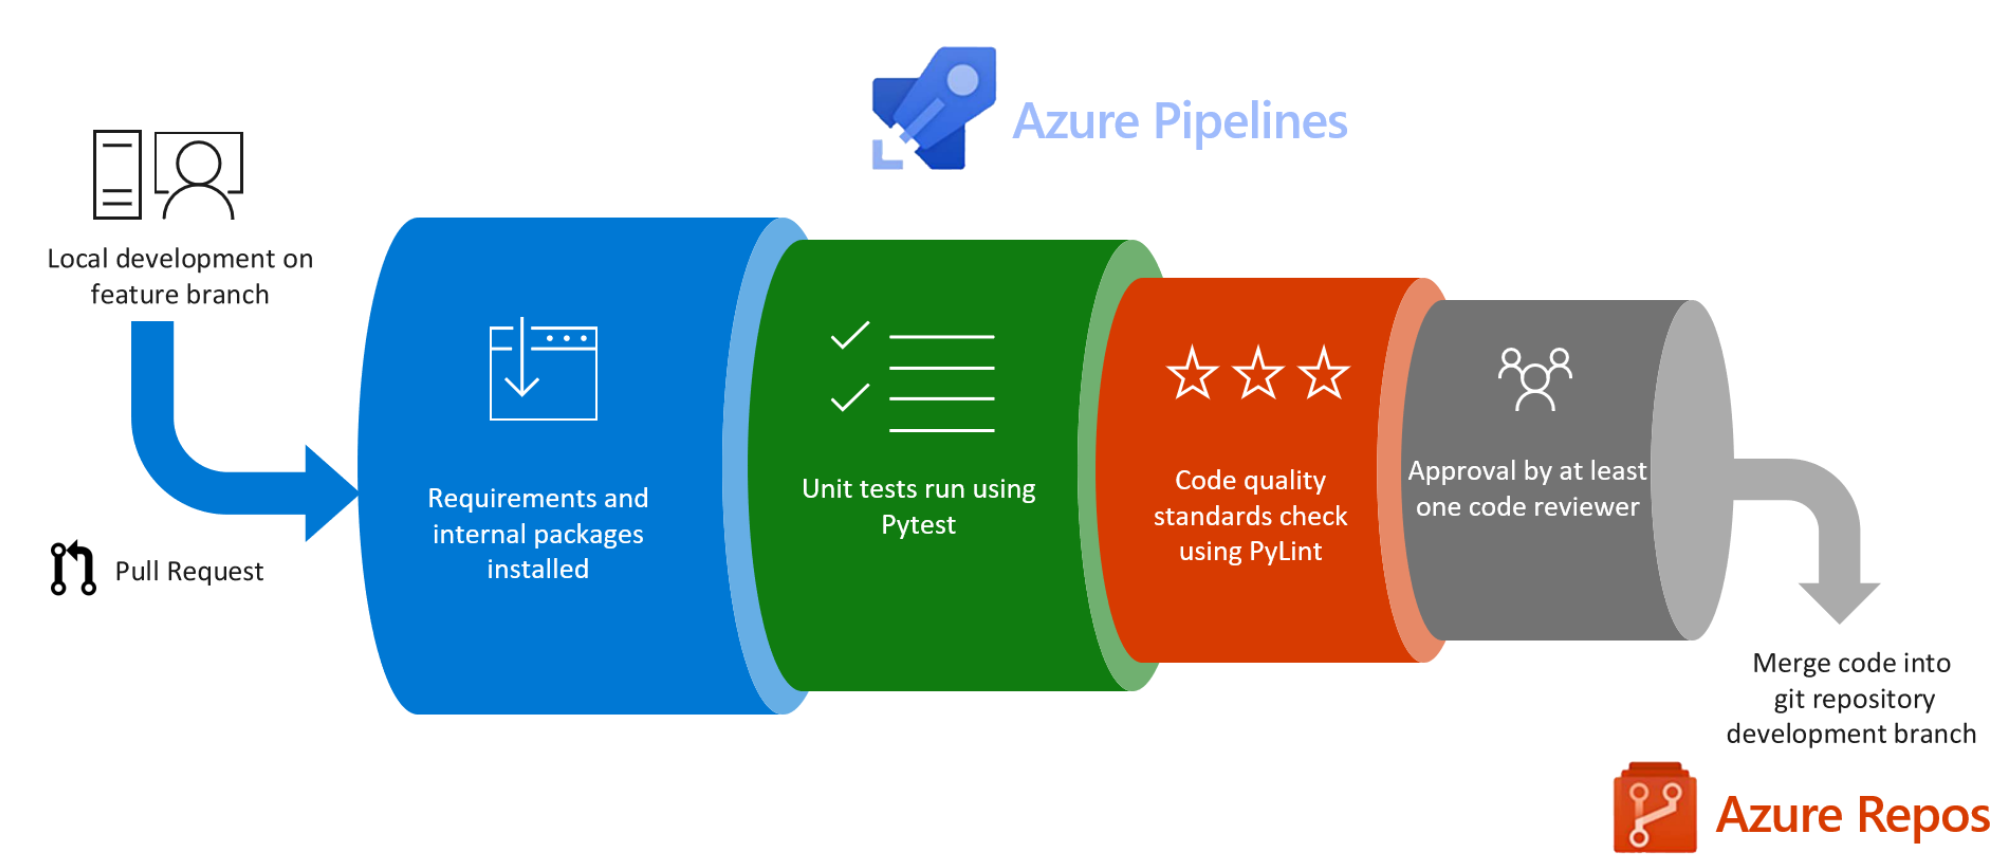
This would ordinarily be the first pipeline you set up to ensure code quality standards from the start. However, because the focus of these posts was Azure ML and MLOps, it’s been left until last.
This CI pipeline will:
- Run unit tests using pytest
- Run static code analysis using pylint
- Publish test results to Azure DevOps
- Publish test code coverage to Azure DevOps
The pipeline will be triggered to run on pull request to the master branch and we will set up a build policy to ensure that no code that is merged into the master branch has not undergone the relevent code checks.
Pipeline definition
Just as our other pipelines so far, our Azure Pipeline will be set up as a yaml file.
In our git repository, this can be found in the root of the repository as ci_pipeline.yml.
First we’ll take a look at the yaml file then explain each of the steps in a little more detail afterwards:
pr:
  branches:
    include:
      - 'master'

name: 'ci_pipeline'
jobs:
- job: 'ci_pipeline_job'
  pool:
    vmImage: 'Ubuntu-latest'

  steps:
  - task: UsePythonVersion@0
    inputs:
      versionSpec: '3.7'
      architecture: 'x64'

  - script: |
      python -m pip install --upgrade pip
      pip install pytest mock codecov pydocstyle pytest-cov pylint pylint_junit
    displayName: 'Install testing dependencies'

  - script: |
      pip install -r requirements.txt
    displayName: 'Install project requirements'

  - script: |
      pytest -v src/my_custom_package/test/ --doctest-modules --junitxml=unit-testresults.xml --cov=src/my_custom_package/ --cov-append --cov-report=xml:coverage.xml --cov-report=html:htmlcov
    displayName: 'Run all unit tests'

  - script: |
      pylint --output-format=pylint_junit.JUnitReporter --disable=C0114,C0115,C0116,E0110,E1101,E1123,R0801 src/my_custom_package/ > linting-testresults.xml
    displayName: 'Run code quality tests (Pylint)'

  - task: PublishTestResults@2
    inputs:
      testResultsFormat: 'JUnit'
      testResultsFiles: '**/*-testresults.xml'
      testRunTitle: '$(Agent.OS) - $(Build.BuildNumber)[$(Agent.JobName)] - Python $(python.version) - Linting and Unit Test results'
    condition: succeededOrFailed()
    displayName: 'Publish unit test results'

  - task: PublishCodeCoverageResults@1
    inputs:
      codeCoverageTool: Cobertura
      summaryFileLocation: 'coverage.xml'
      reportDirectory: 'htmlcov'
    displayName: 'Publish Coverage Results'
The top of the file defines our trigger – pull requests to the master branch.
Following this is similar to the pipelines – the definition of which base VM image and python version to use, before defining the rest of the steps in our pipeline job.
Install testing dependencies
pip install pytest mock codecov pydocstyle pytest-cov pylint pylint_junit
The testing dependencies are installed initially. These are packages only required for testing, not for our Azure ML training or scoring pipeline deployment, so they are not included in the requirements.txt file.
Install project requirements
pip install -r requirements.txt
Next, the rest of the project requirements are installed, as we’ll need to import modules from our package as well as external dependencies for our unit testing purposes.
Run unit tests
pytest -v src/my_custom_package/test/ --doctest-modules --junitxml=unit-testresults.xml --cov=src/my_custom_package/ --cov-append --cov-report=xml:coverage.xml --cov-report=html:htmlcov
The pytest package is used to run the unit tests from the src/my_custom_package/test/ directory. We will take a look at one such example of a unit test below.
The unit test results are output as an XML file to unit-testresults.xml. Additionally, a code coverage report is exported in XML format to coverage.xml
Run static code analysis and linting checks
pylint --output-format=pylint_junit.JUnitReporter --disable=C0114,C0115,C0116,E0110,E1101,E1123,R0801 src/my_custom_package/ > linting-testresults.xml
Static code analysis and linting checks are carried out by the pylint package.
Just as with our testing, the output of these linting checks are output in XML format to linting-testresults.xml.
There are a number of code checks that are disabled here, which you may want to enable in your own projects. I will explain here which checks have been disabled and why:
- C0114, C0115, C0116
- These 3 pylint codes check whether all modules, classes and functions have docstrings. I generally turn these off as code should be, for the most part, self-documenting and docstrings should be placed where the functionality of code is not immediately obvious
- E0110, E1101, E1123
- These 2 pylint checks are for checking whether an abstract class has been instantiated, non-defined methods called, and unexpected keyword arguments supplied. These have been included as a result of the implementation of the Azure ML SDK
ComputeTargetclass. These checks could just as easily be enabled and the offending lines be disabled individually through inline comments.
- These 2 pylint checks are for checking whether an abstract class has been instantiated, non-defined methods called, and unexpected keyword arguments supplied. These have been included as a result of the implementation of the Azure ML SDK
- R0801
- This is a duplicate code check. The reason that this has been included is that there are a number of files in which we access the same environment variables and instantiate an
AMLInterfaceobject. This has been kept for easier readibility for this tutorial but accessing these variables and instantiating the object could be refactored and moved to a utility function, with this check re-enabled.
- This is a duplicate code check. The reason that this has been included is that there are a number of files in which we access the same environment variables and instantiate an
Publish Test Results
Test results files that are in the format '**/*-testresults.xml', which includes unit-testresults.xml and linting-testresults.xml are published to Azure DevOps.
The condition succeededOrFailed() is passed so that whether the unit and linting tests passed or failed, these test results are still published.
We will see below how we can view these test results once we’ve published this pipeline.
Publish Test Code Coverage Results
The code coverage files is also published to Azure DevOps. Again, we’ll see below how we can view these code coverage results once we’ve published this pipeline.
Unit Testing our Code
Unit tests are carried out with the help of the unittest builtin python package. We’ll take a look at an example unit test.
Inside src/my_custom_package/utils/transform_data.py is the function remove_collinear_cols as below:
def remove_collinear_cols(x_data):
    return x_data.drop(['D', 'I'], axis=1)
The file src/my_custom_package/test/test_transform_data.py is shown below. This file unit tests the transform_data.py file:
from unittest import TestCase

import pandas as pd

from my_custom_package.utils.transform_data import remove_collinear_cols


class TestTransformData(TestCase):
    def test_remove_collinear_cols(self):
        test_data_column_names = [
            'A', 'B', 'C', 'D', 'E',
            'F', 'G', 'H', 'I', 'J'
        ]
        test_X_data = pd.DataFrame([
            [
                -0.25, -0.90, 0.11, -0.12, -0.04,
                0.21, -0.41, -0.69, -0.13, -0.06
            ],
            [
                0.79, 0.13, -0.1, 0.87, -2.2,
                0.4,1.38, -0.78, -1.98, 0.5
            ]
        ], columns=test_data_column_names)

        self.assertIn('D', test_X_data.columns)
        self.assertIn('I', test_X_data.columns)

        X_data_transformed = remove_collinear_cols(test_X_data)

        self.assertIsInstance(X_data_transformed, pd.DataFrame)
        self.assertNotIn('D', X_data_transformed.columns)
        self.assertNotIn('I', X_data_transformed.columns)
        self.assertIn('A', X_data_transformed.columns)
        self.assertIn('E', X_data_transformed.columns)
        self.assertIn('J', X_data_transformed.columns)
        self.assertEqual(X_data_transformed.loc[0, 'C'], 0.11)
        self.assertEqual(X_data_transformed.loc[1, 'E'], -2.2)
The test method test_remove_collinear_cols of the unittest.TestCase child class TestTransformData unit tests remove_collinear_cols.
We first create a pandas DataFrame to simulate x_data with column names A-J. remove_collinear_cols removes columns D and I so we check that those columns are in our test data to start with, and then are removed afterwards. We also check that other columns are unaffected.
Additionally, we check that a couple of the expected values in the dataframe remain the same.
There are a number of other test files in the repository within src/my_custom_package/test/ that test the other modules in our package. The files are:
test_aml_interface.pytest_blob_storage_interface.pytest_create_aml_env.pytest_create_aml_experiment.pytest_create_data.pytest_deploy_aml_model.pytest_score.pytest_train.py
It is left as an exercise for the reader to take a look through these test files to understand a little more around unit testing the other files if interested.
Set Up Pipeline on Azure DevOps
We’ll set up the pipeline on Azure DevOps in the exact same manner as we did in part 3 of this series of posts for the data pipeline. For screenshots, refer to that post.
As a recap:
- Go to your Azure DevOps Project
- Select Pipelines from the left hand blade
- Click the button for “New Pipeline”
- Select the “Azure Repos Git” option
- Select your repository
- On the configure tab, select “Existing Azure Pipelines YAML File”
- Select “/deploy_pipeline.yml” as the path to your yaml file and click “Continue”
- After reviewing, click “Run”
You may need to accept the provision of permissions for this pipeline, afterwards you should see an output similar to below:
Rename your pipeline to “CI-Pipeline” by selecting the ellipsis next to the pipeline and choosing “Rename/move”.
Set Up Branch Policy
We’ll now set up a branch policy to enforce the CI pipeline being run on pull request to Master, to ensure that no code is merged without review and code quality checks being run.
This will run the CI pipeline both on PR and upon the code being merged to Master.
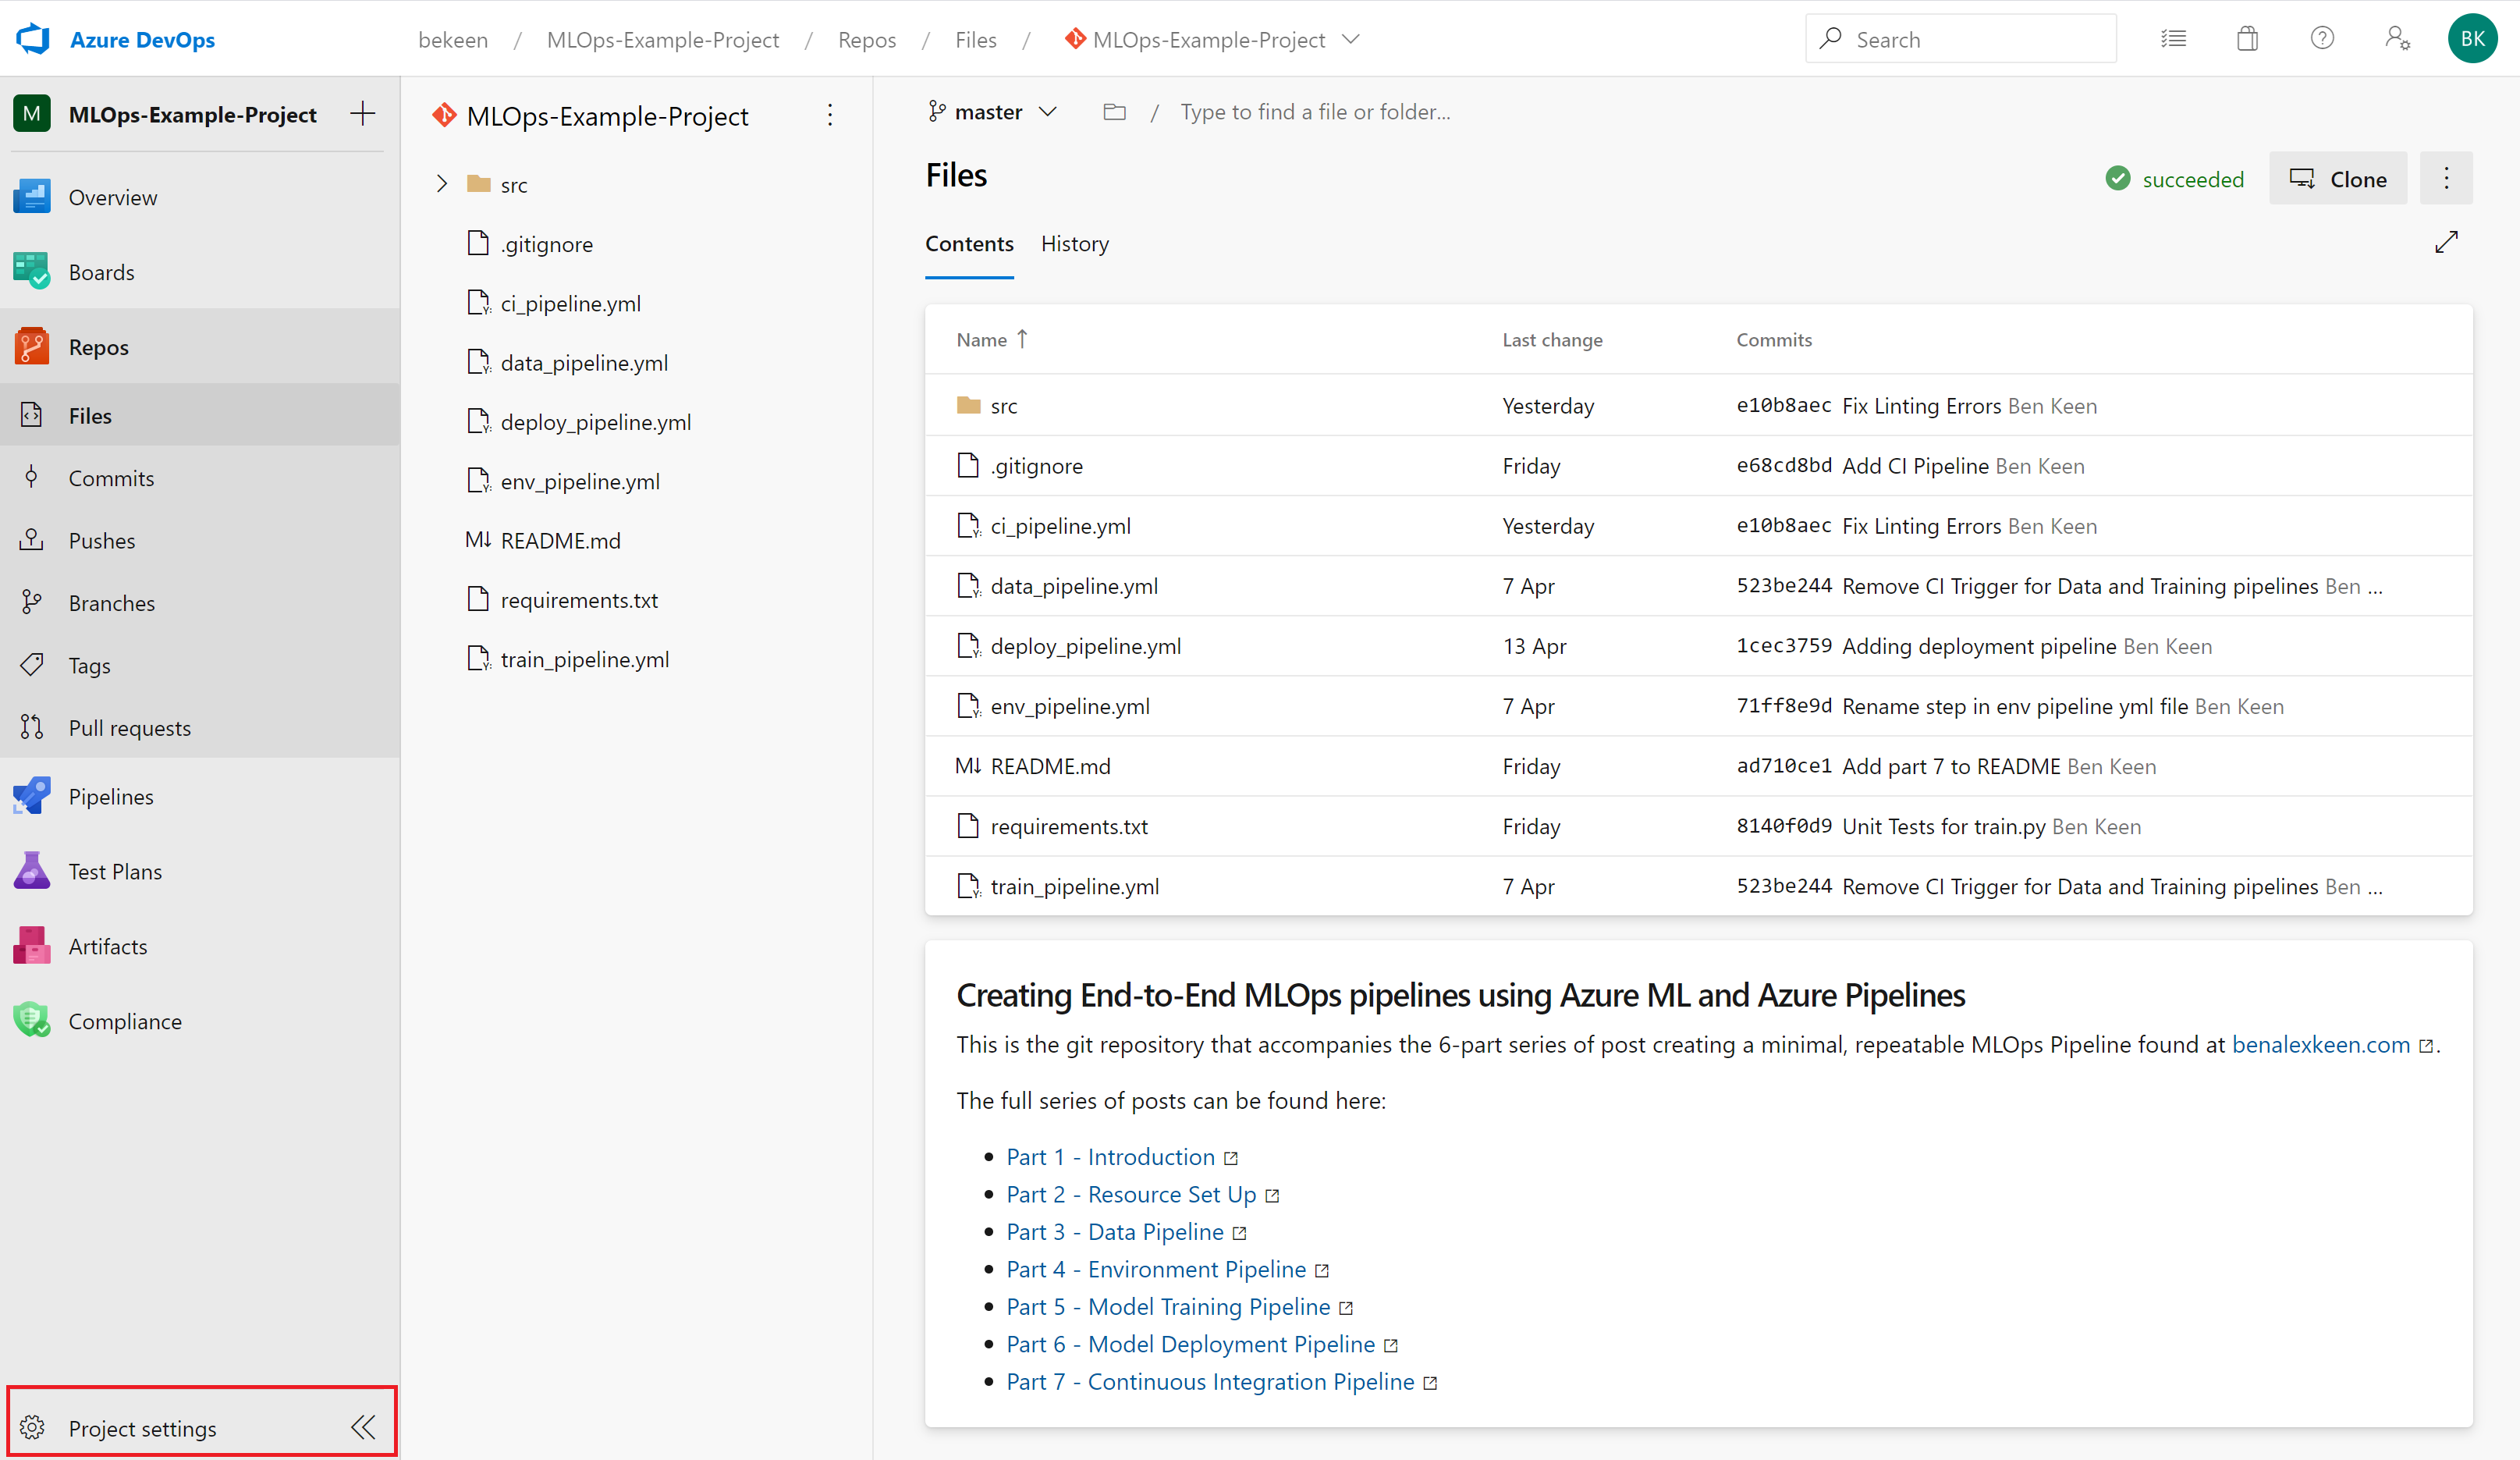
To do this, click on Project Settings in the bottom left corner of Azure DevOps as shown by the red rectangle below:
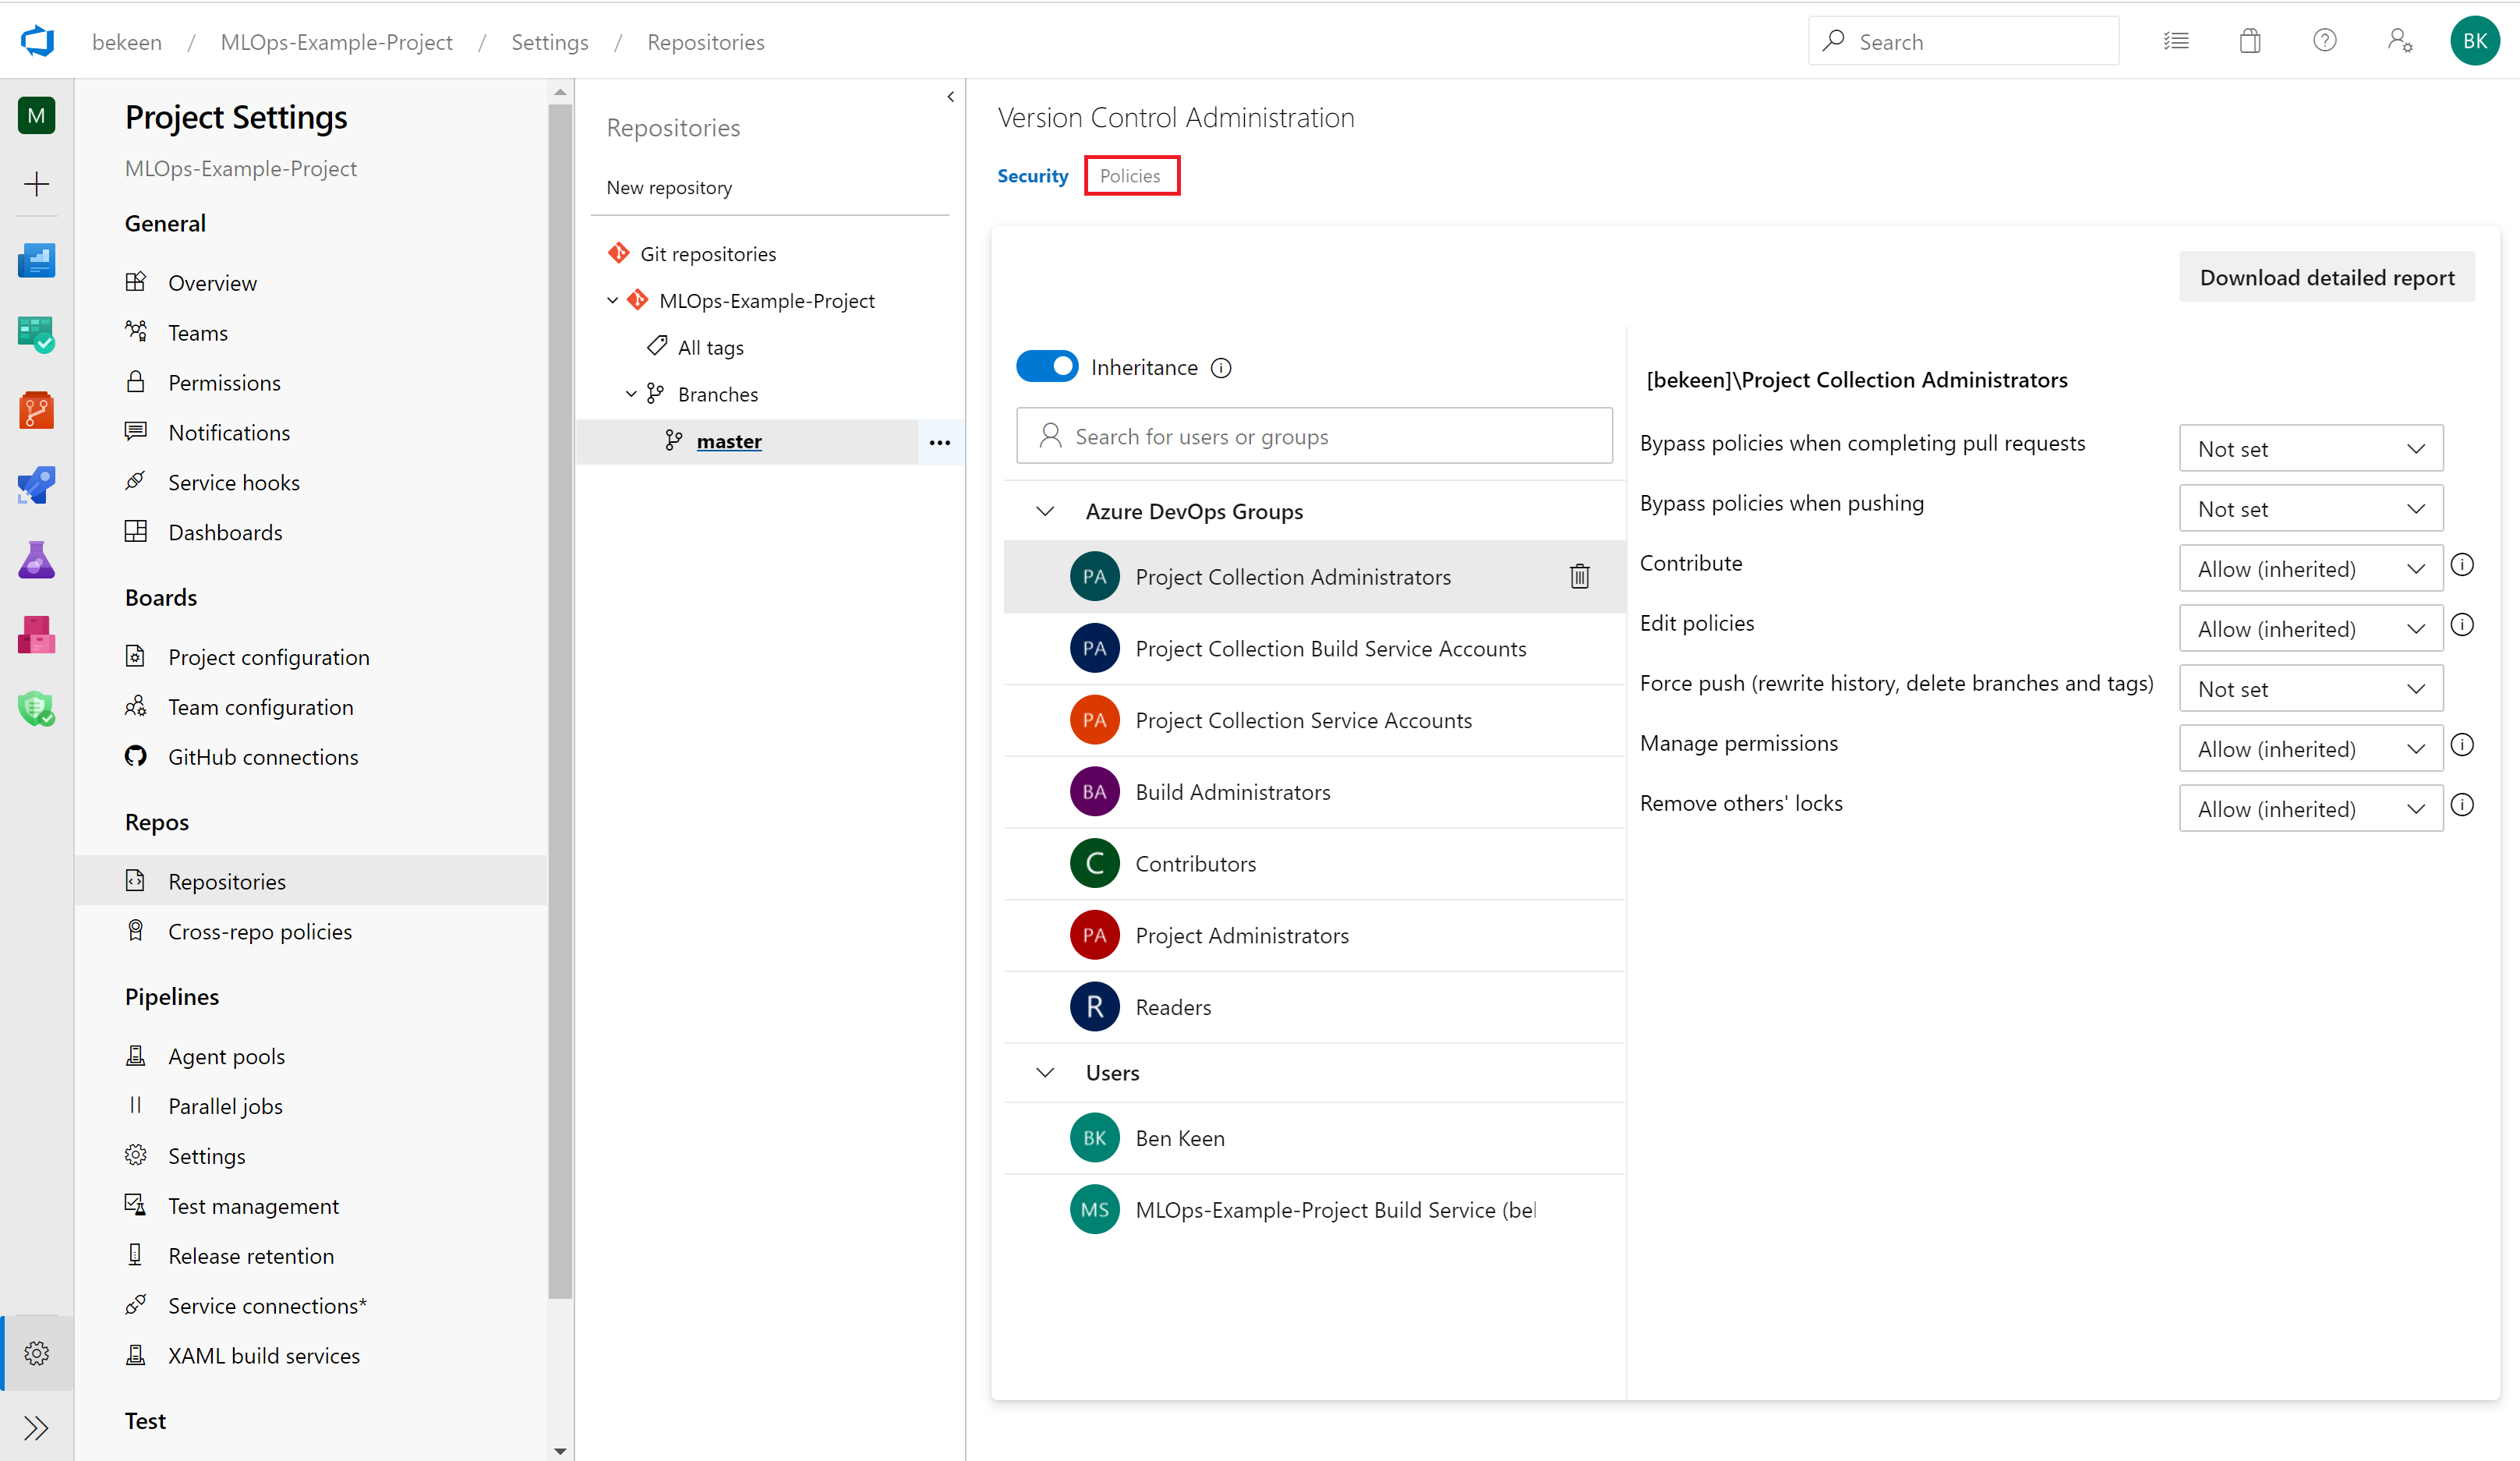
Inside the project settings blade, click on “Repositories”, then choose your repository and expand the “Branches” section, and click on the “Master” branch.
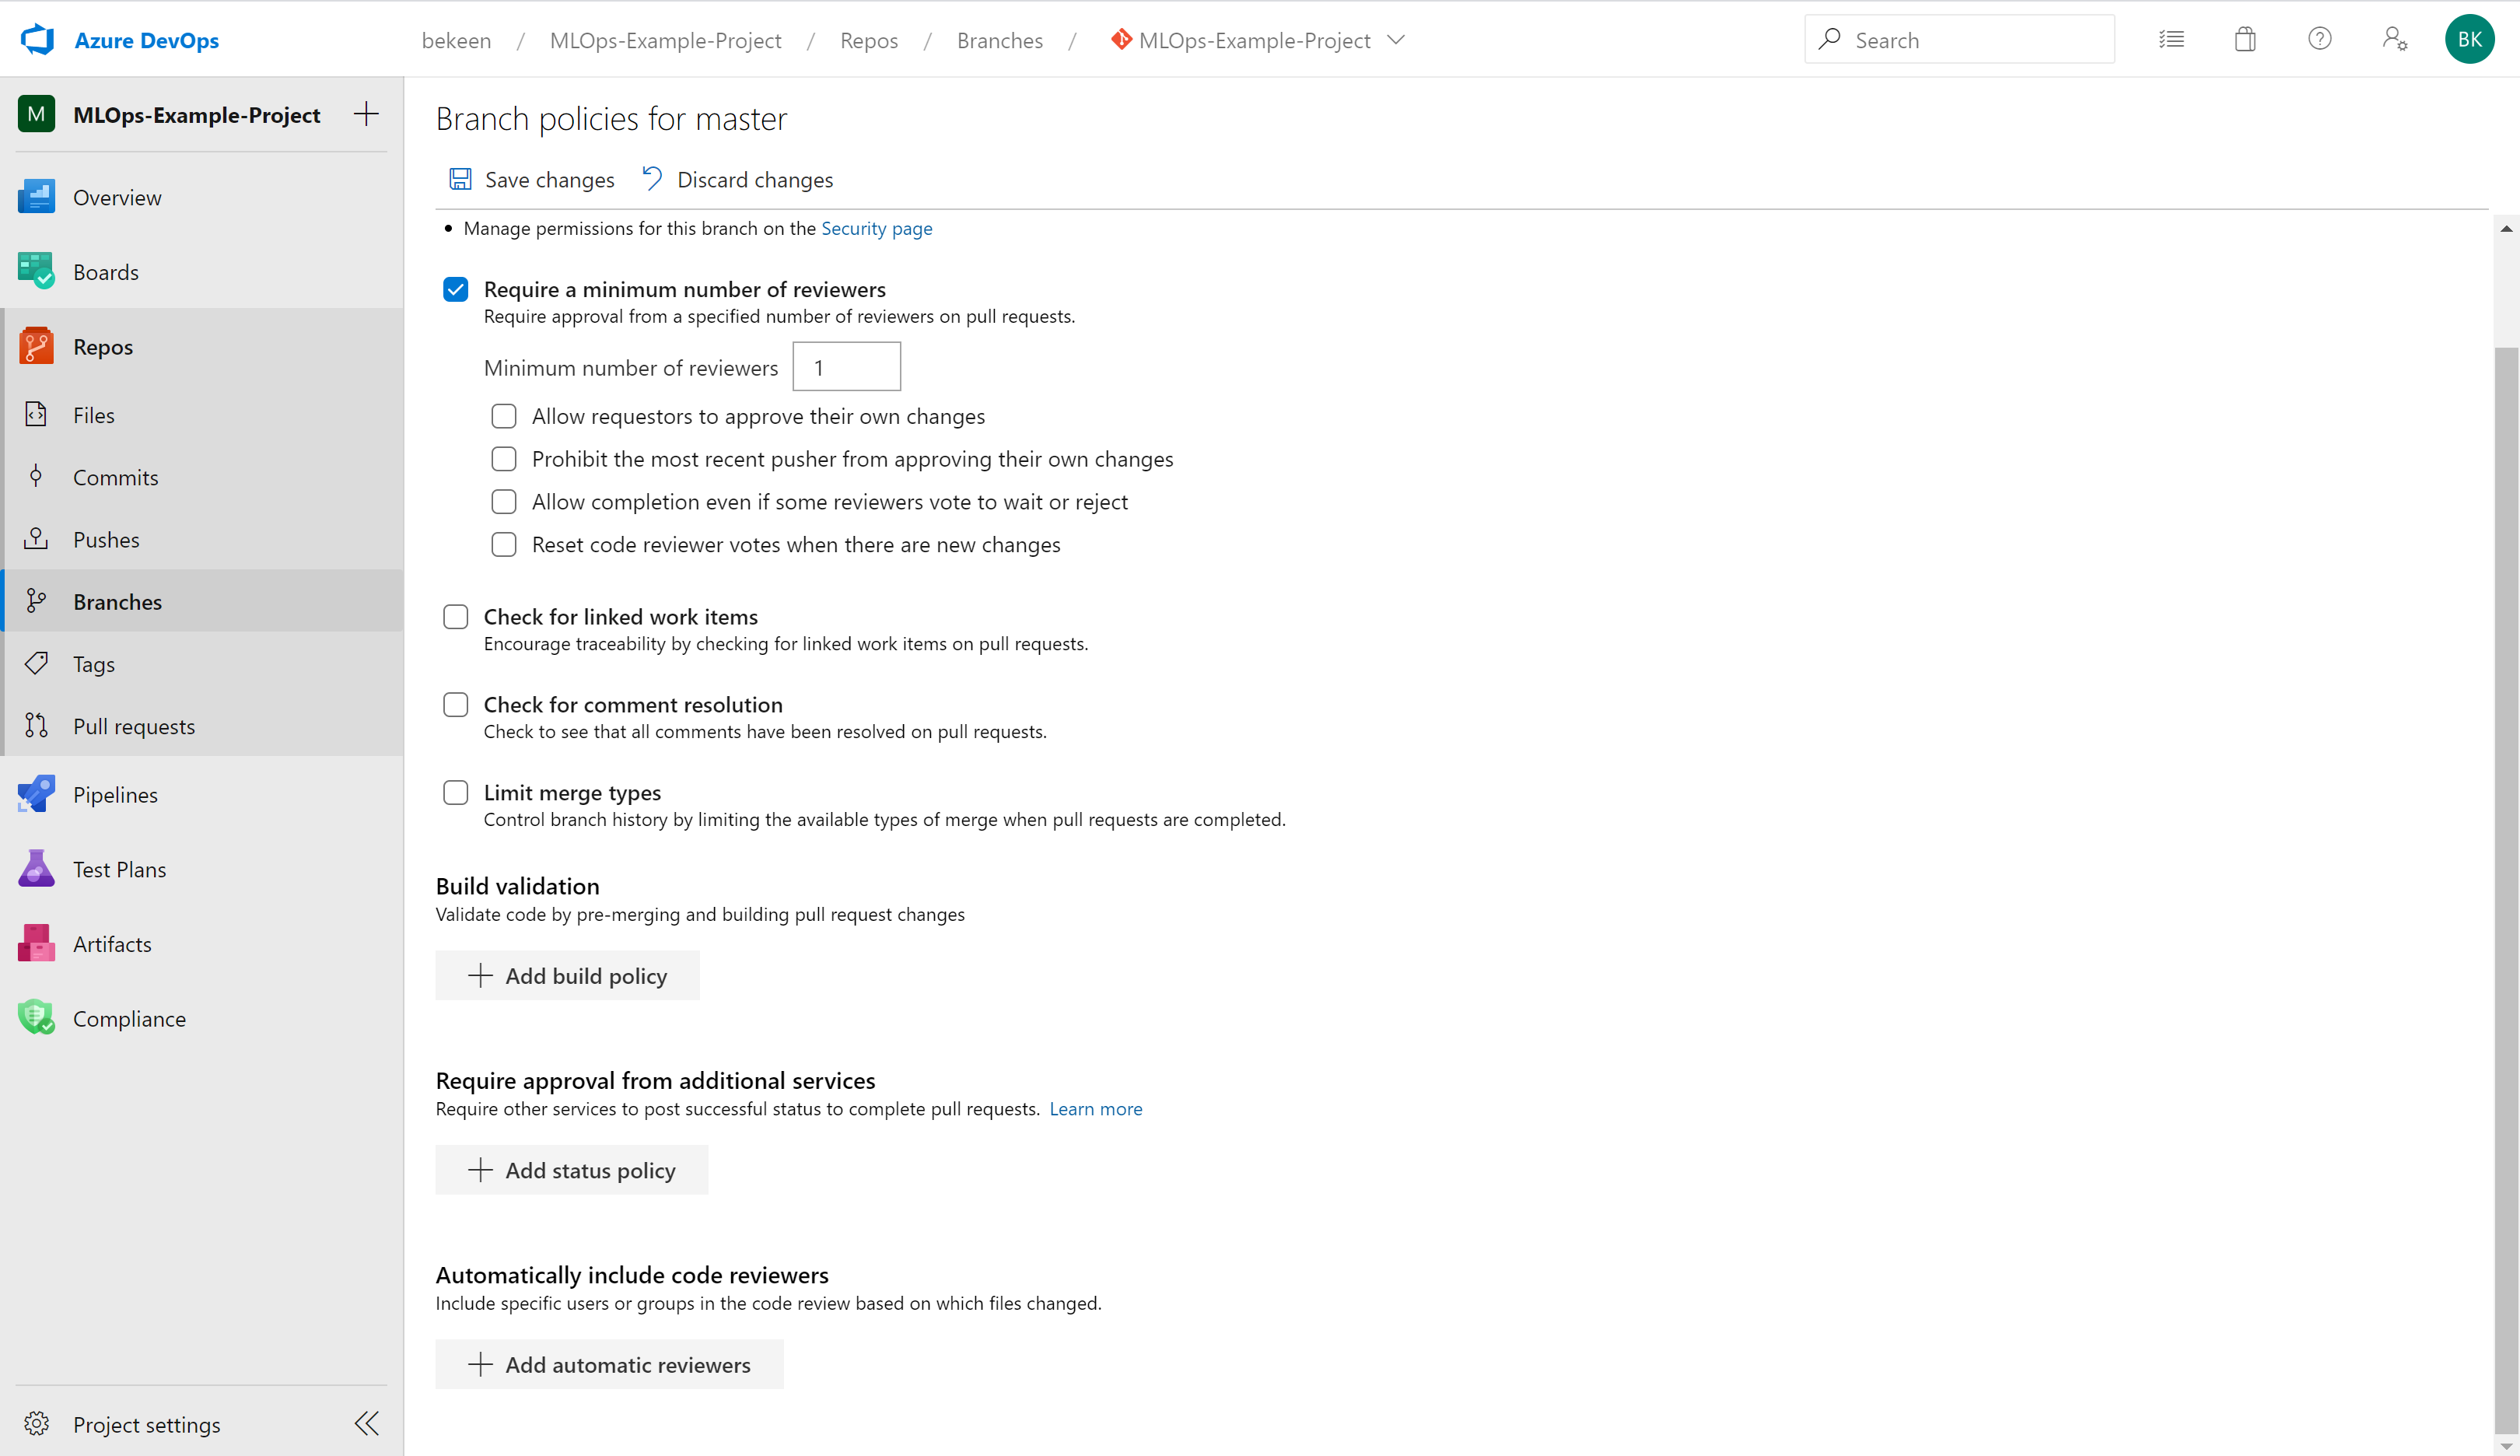
There will be two tabs, click on the “Policies” tab as indicated below:
Here, you can check the box to enforce a number of reviewers. We have set up a requirement here for one reviewer in order to accept pull requests.
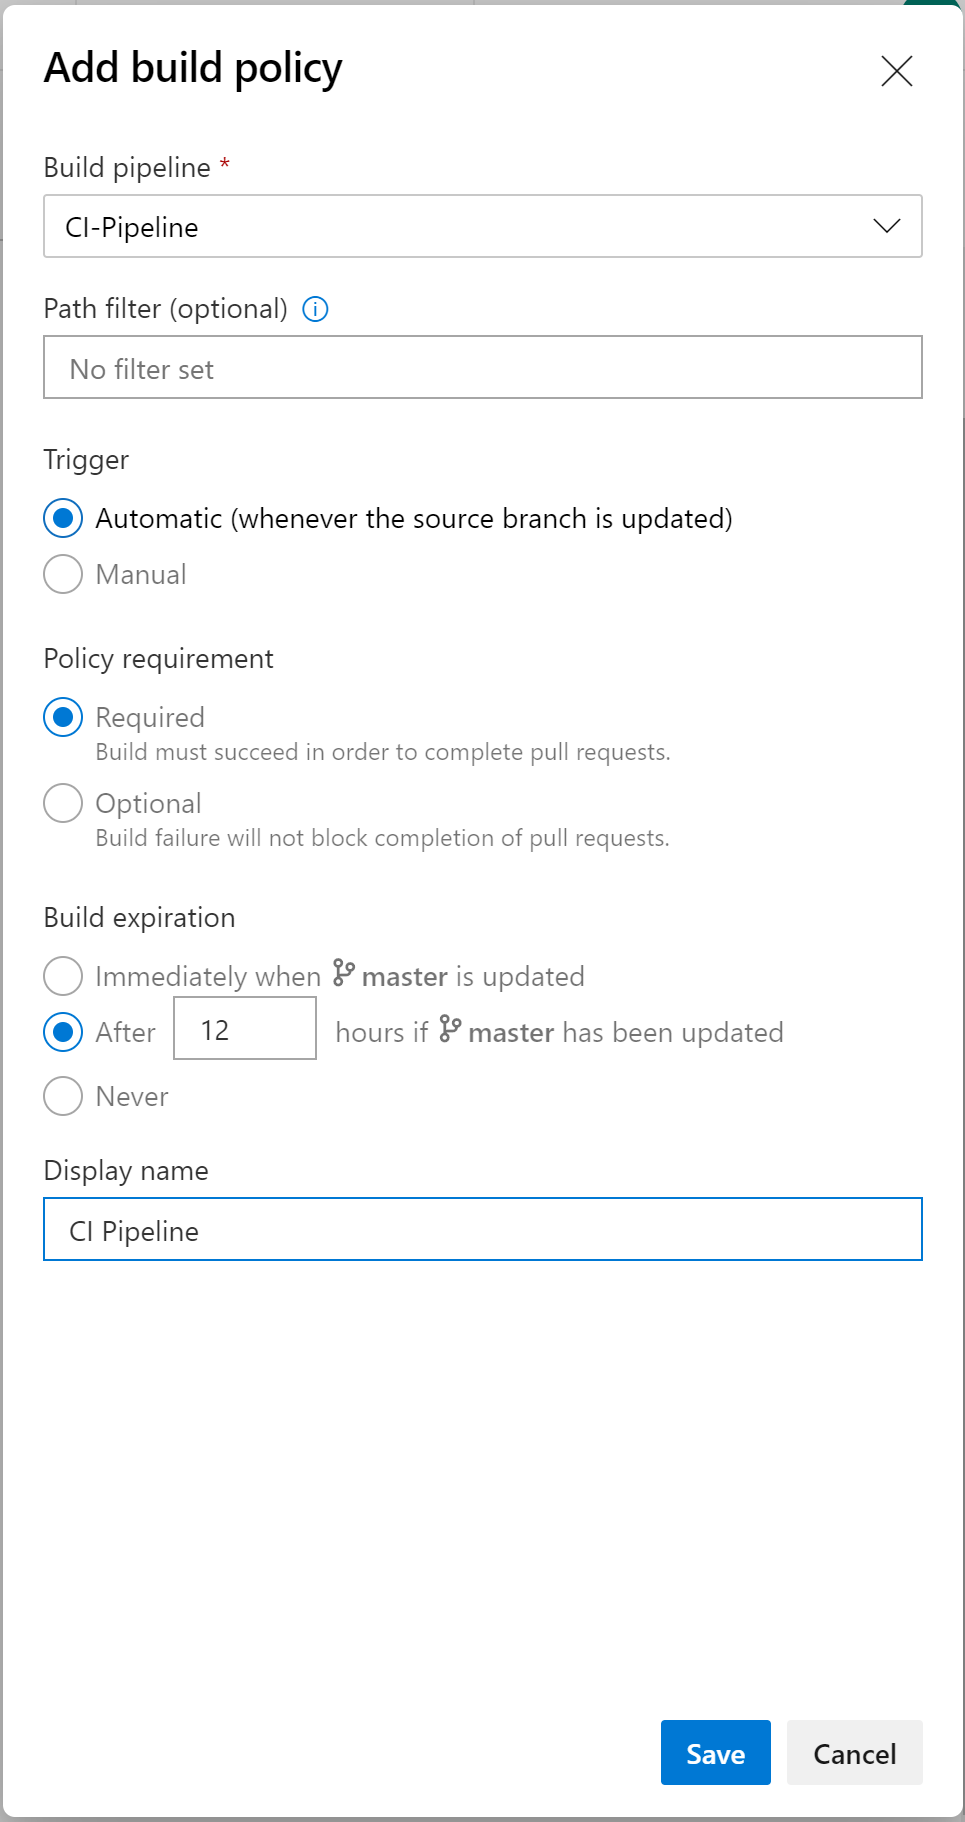
Now click on “Add build policy”
In the blade that comes up, choose the CI-Pipeline pipeline to be run on pull requests to Master:
Now, when a pull request is made, you can see on the right the branch policies that have been set up and the CI pipeline is run prior to merging the code to Master:
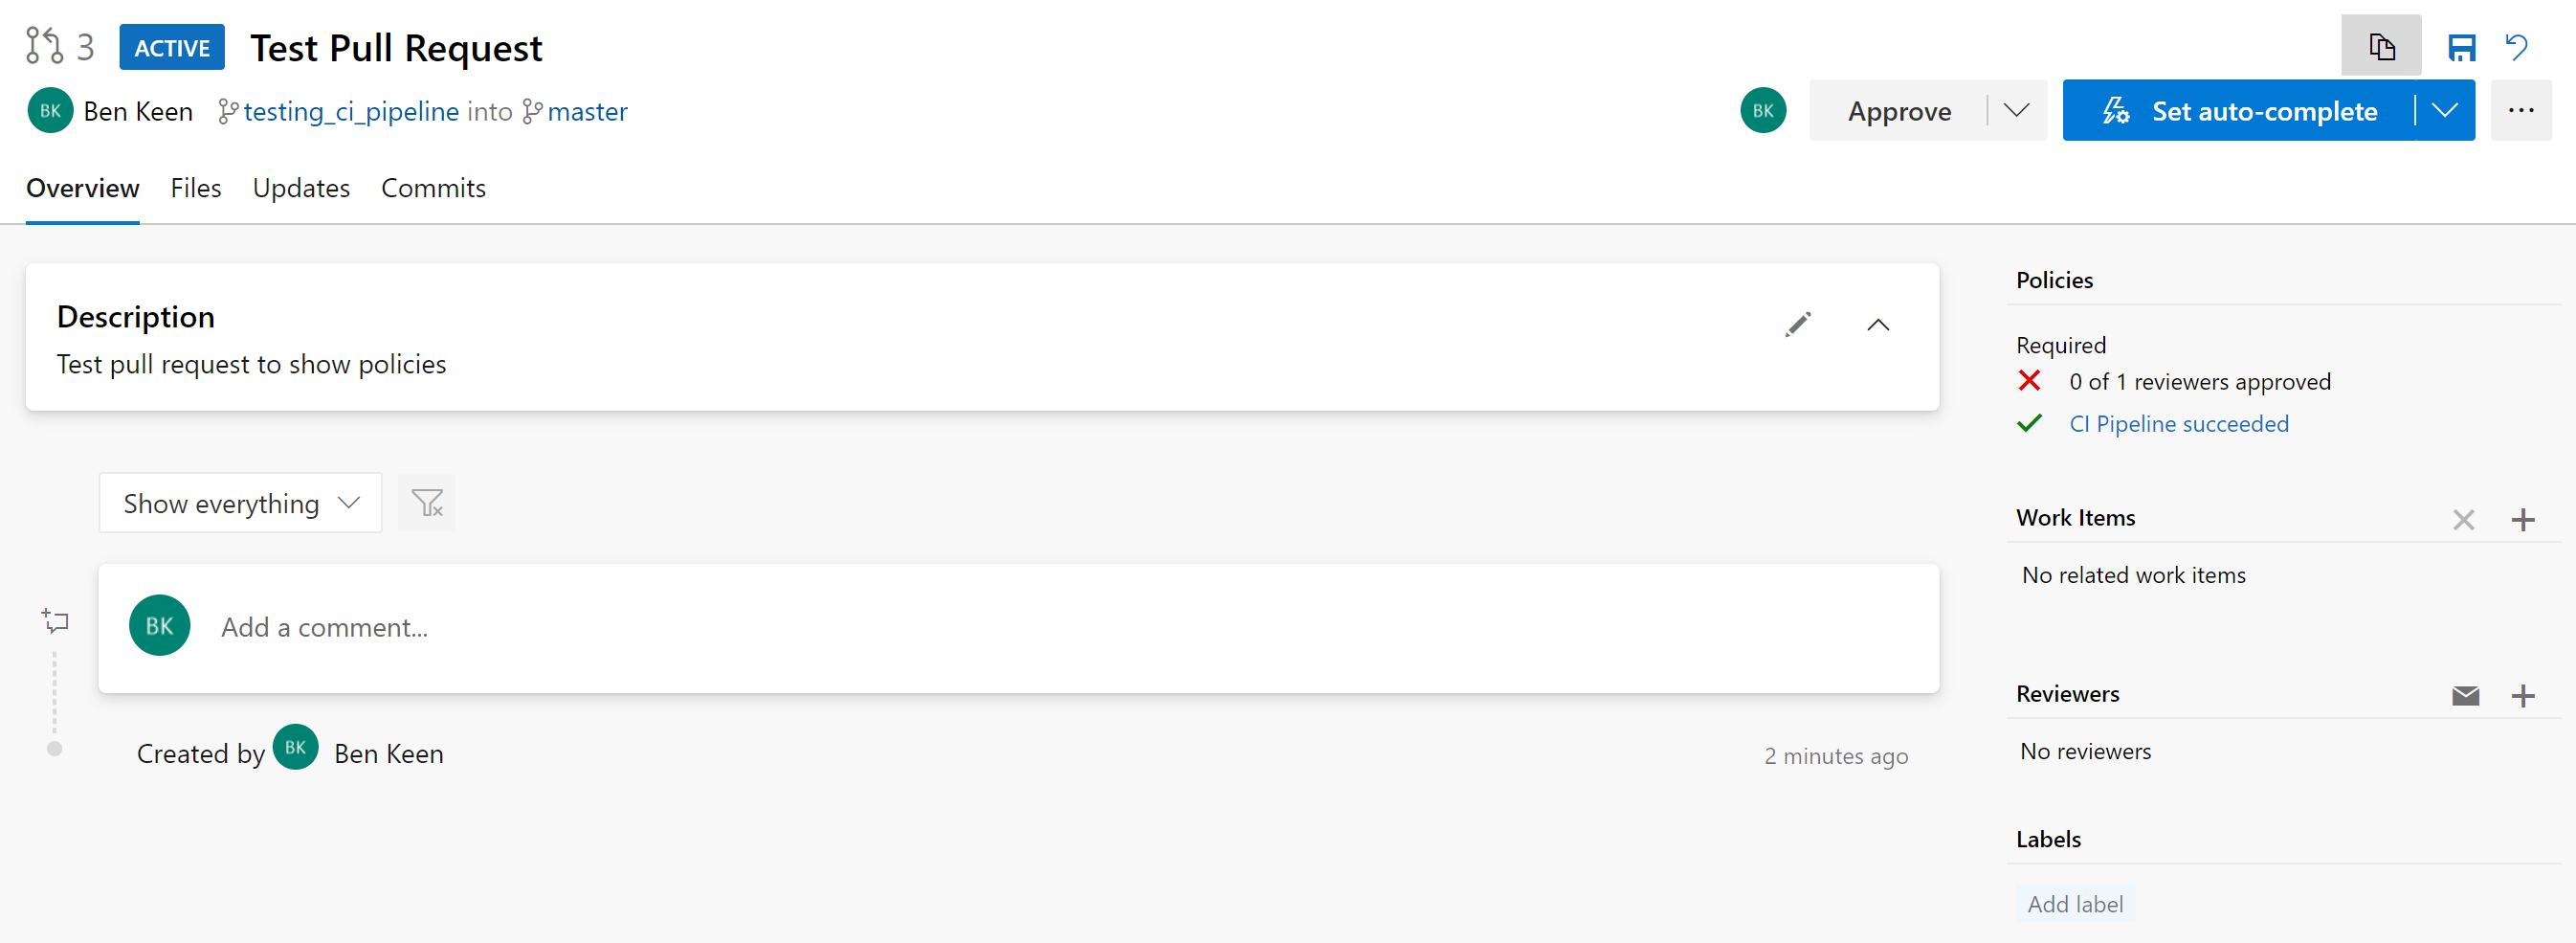
View Test and Coverage Reports
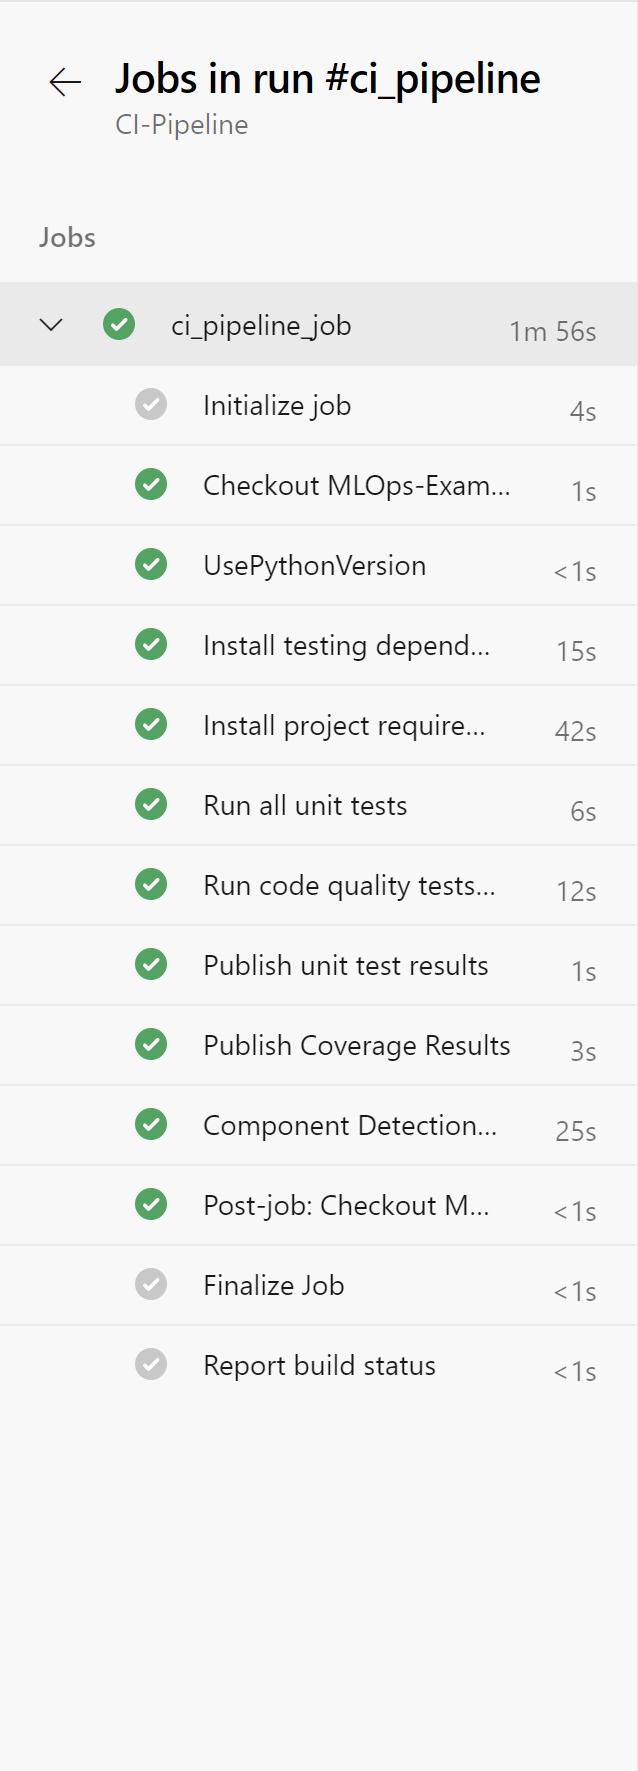
If you click through onto the pipeline status on the right in the screenshot above, you will be taken to the pipeline run showing it has succeeded:
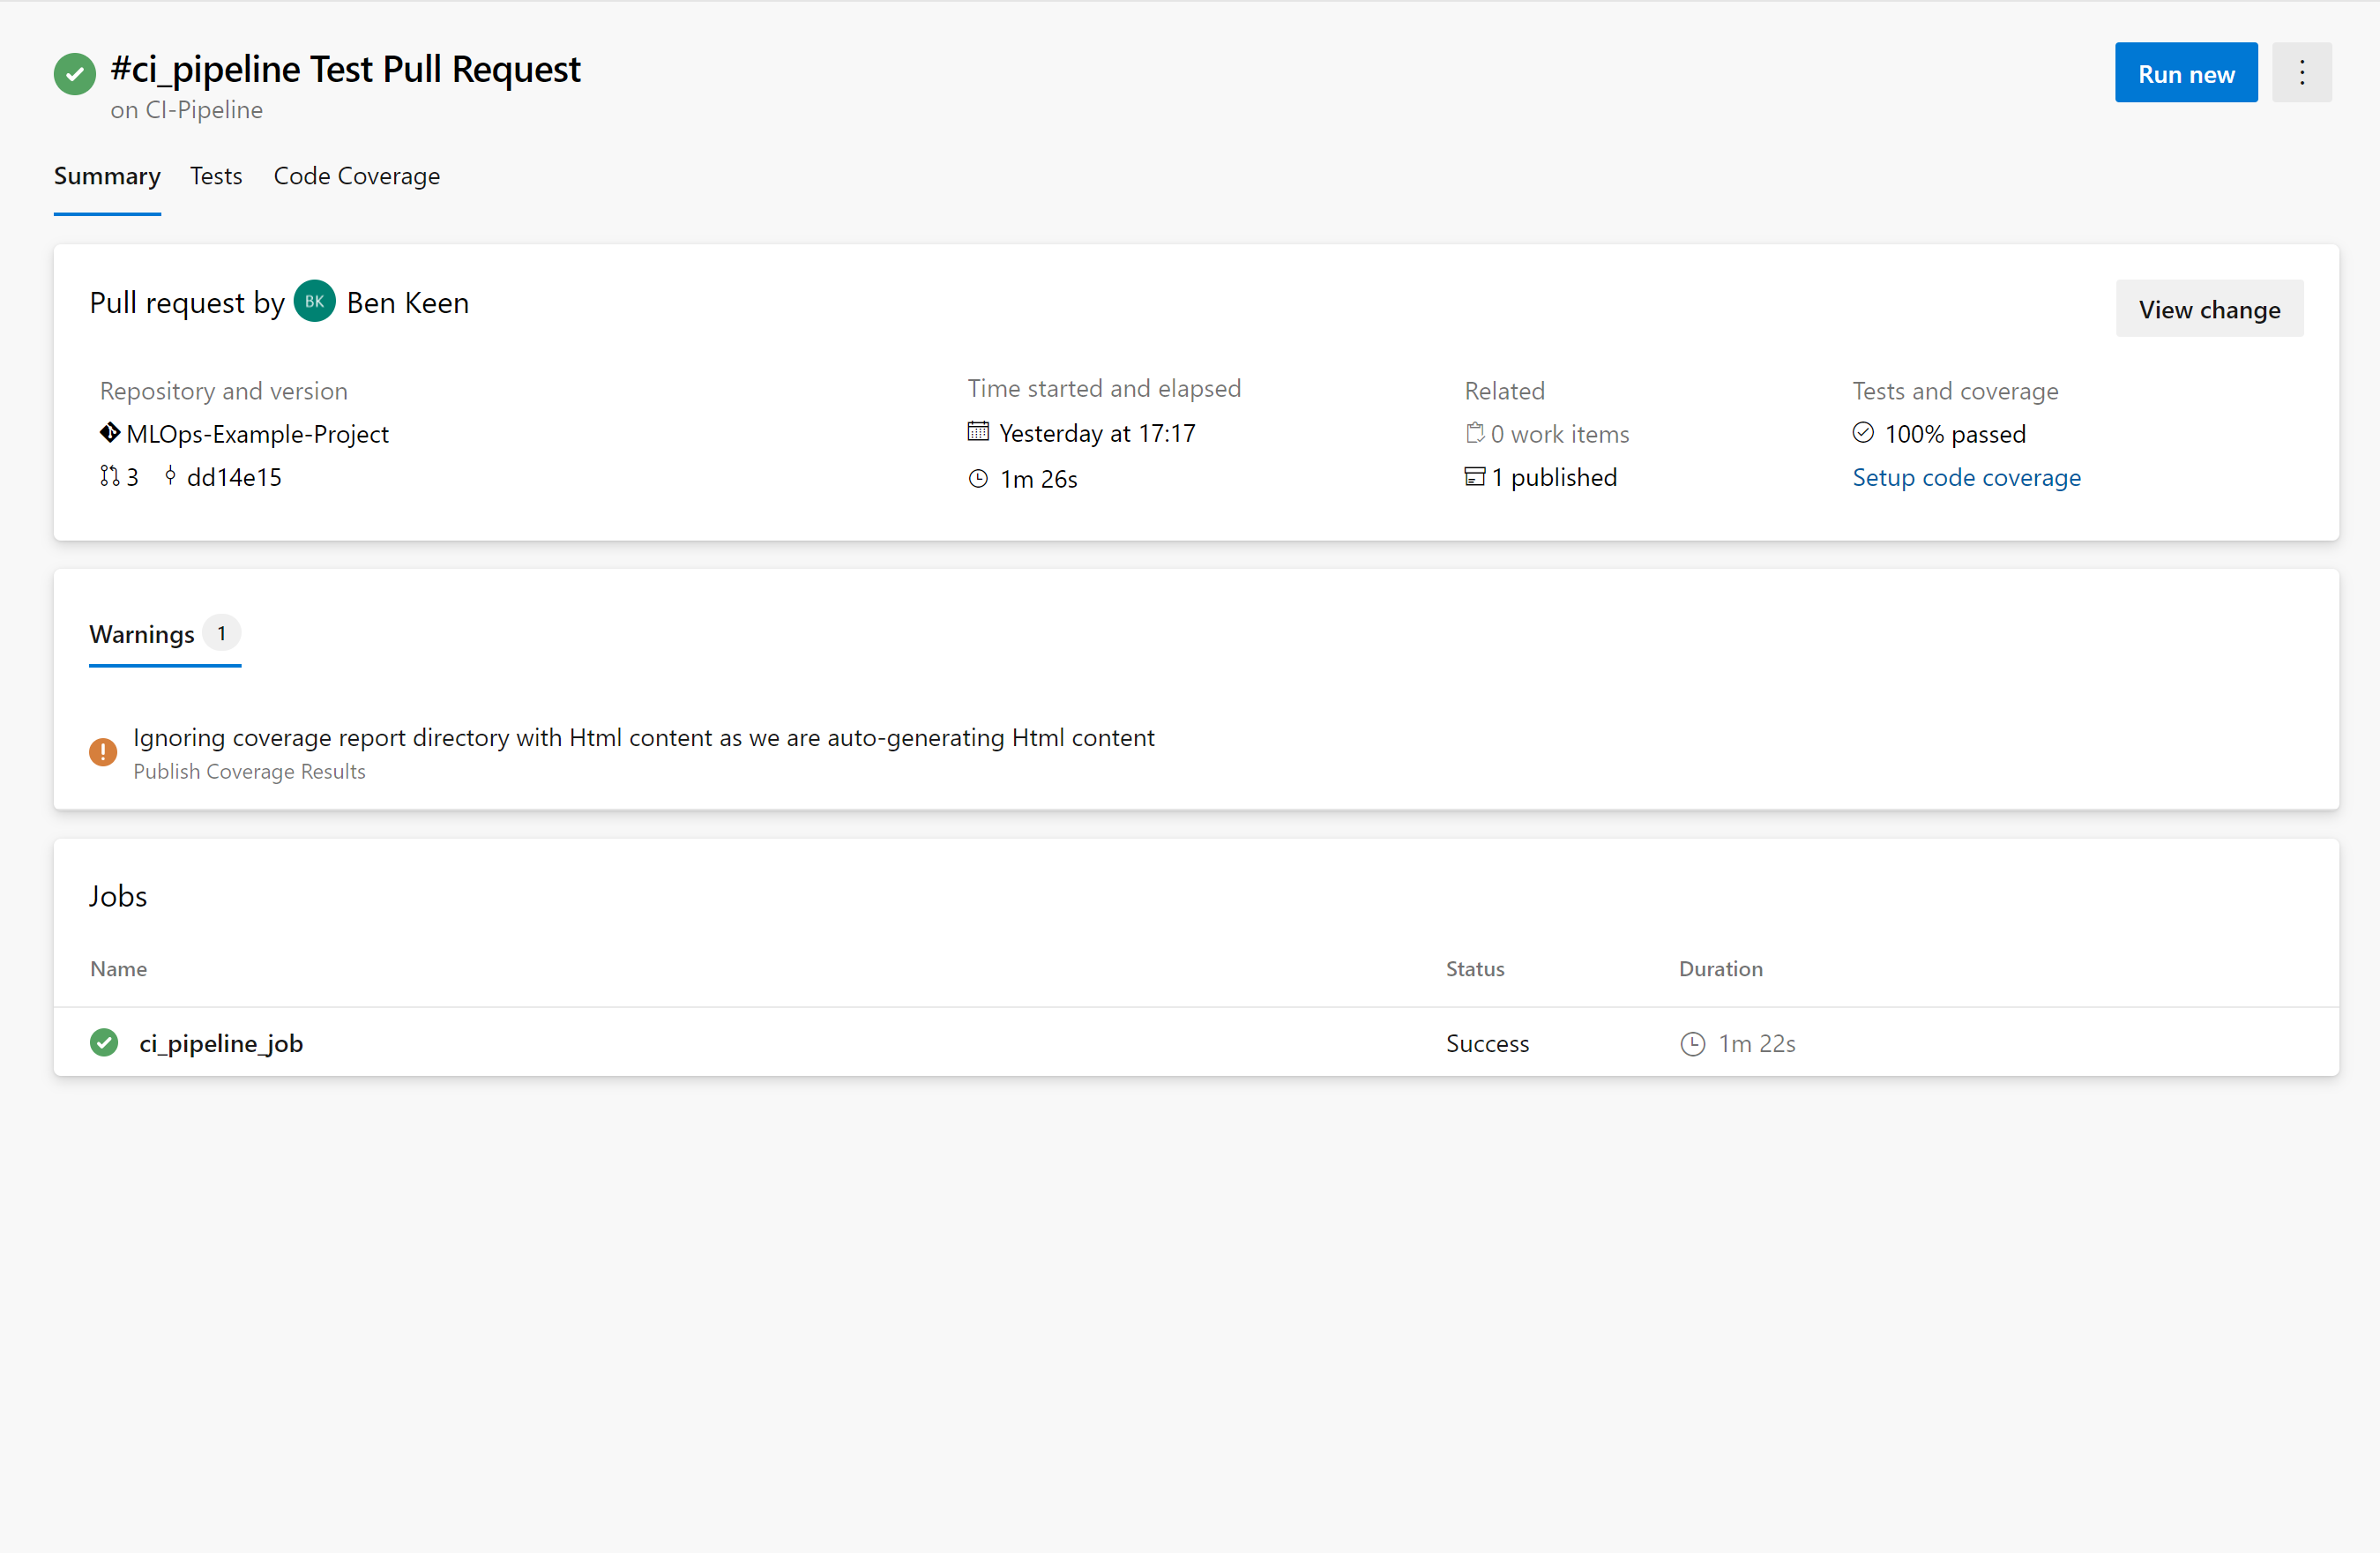
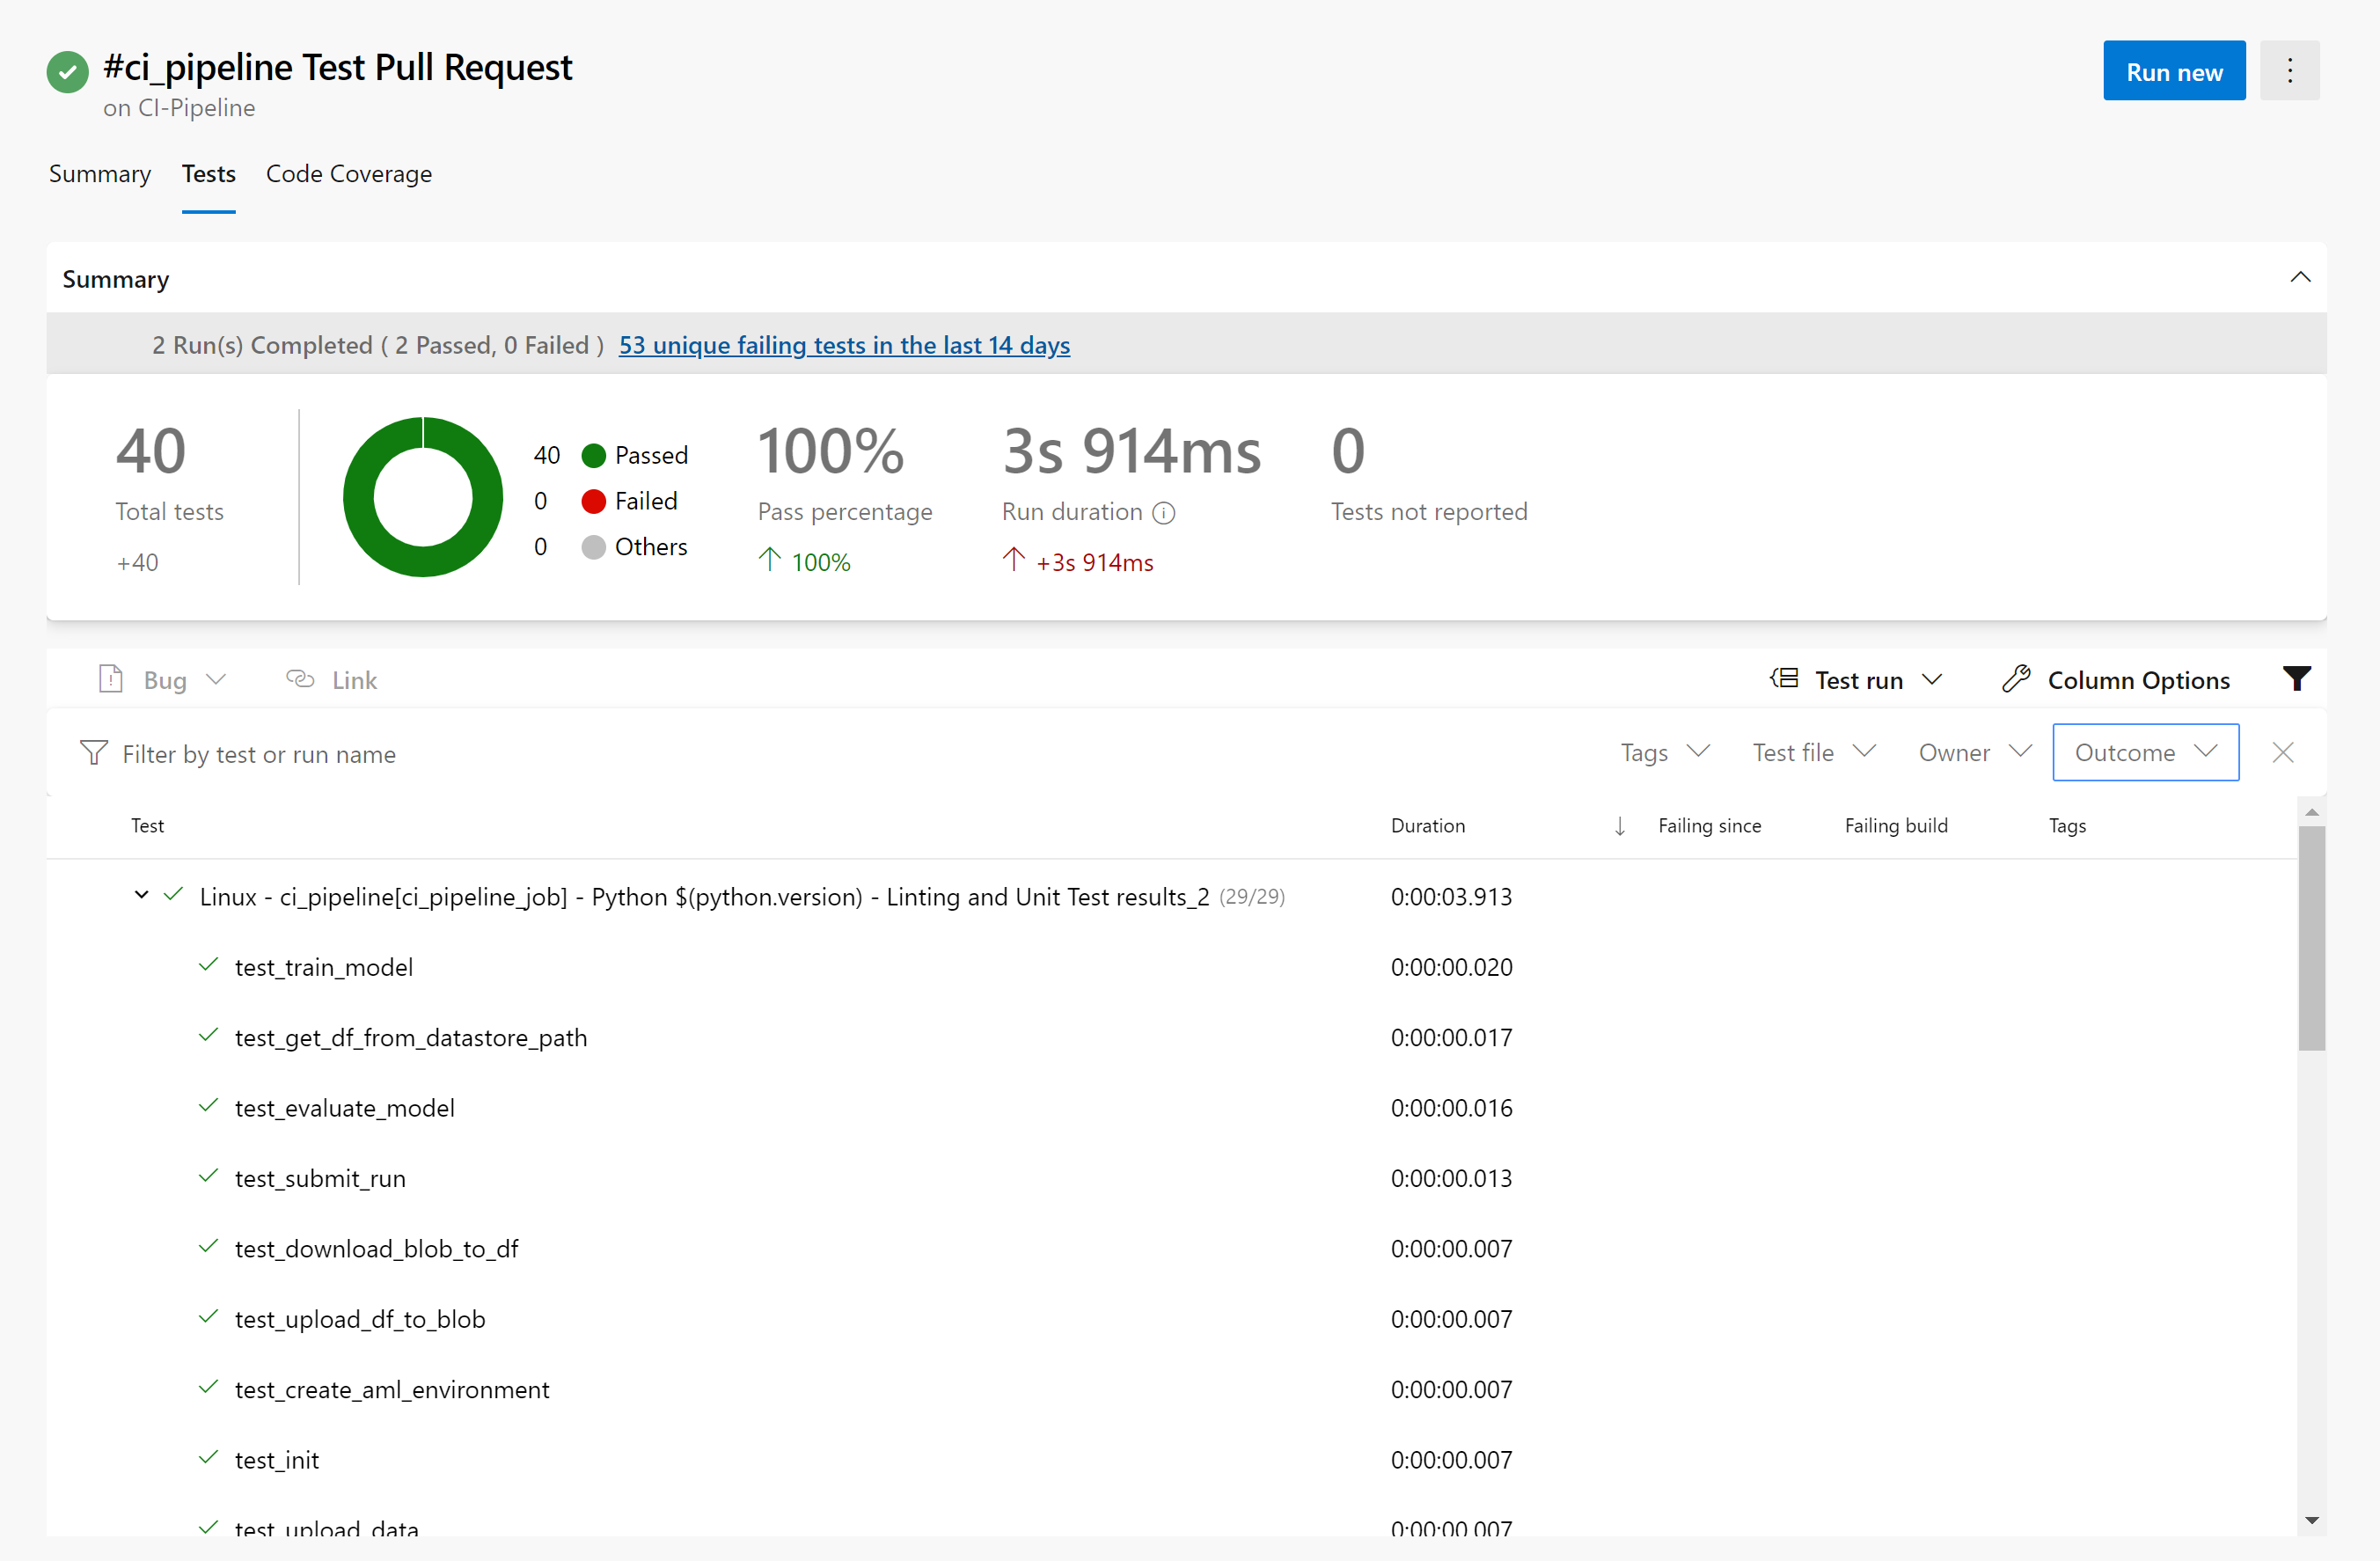
You’ll see two additional tabs that say “Tests” and “Code Coverage” – click on the tab that says “Tests” and you’ll get a test report. By default, only failed and aborted test are shown as a breakdown but if you remove that filter, you can see all the tests that were run:
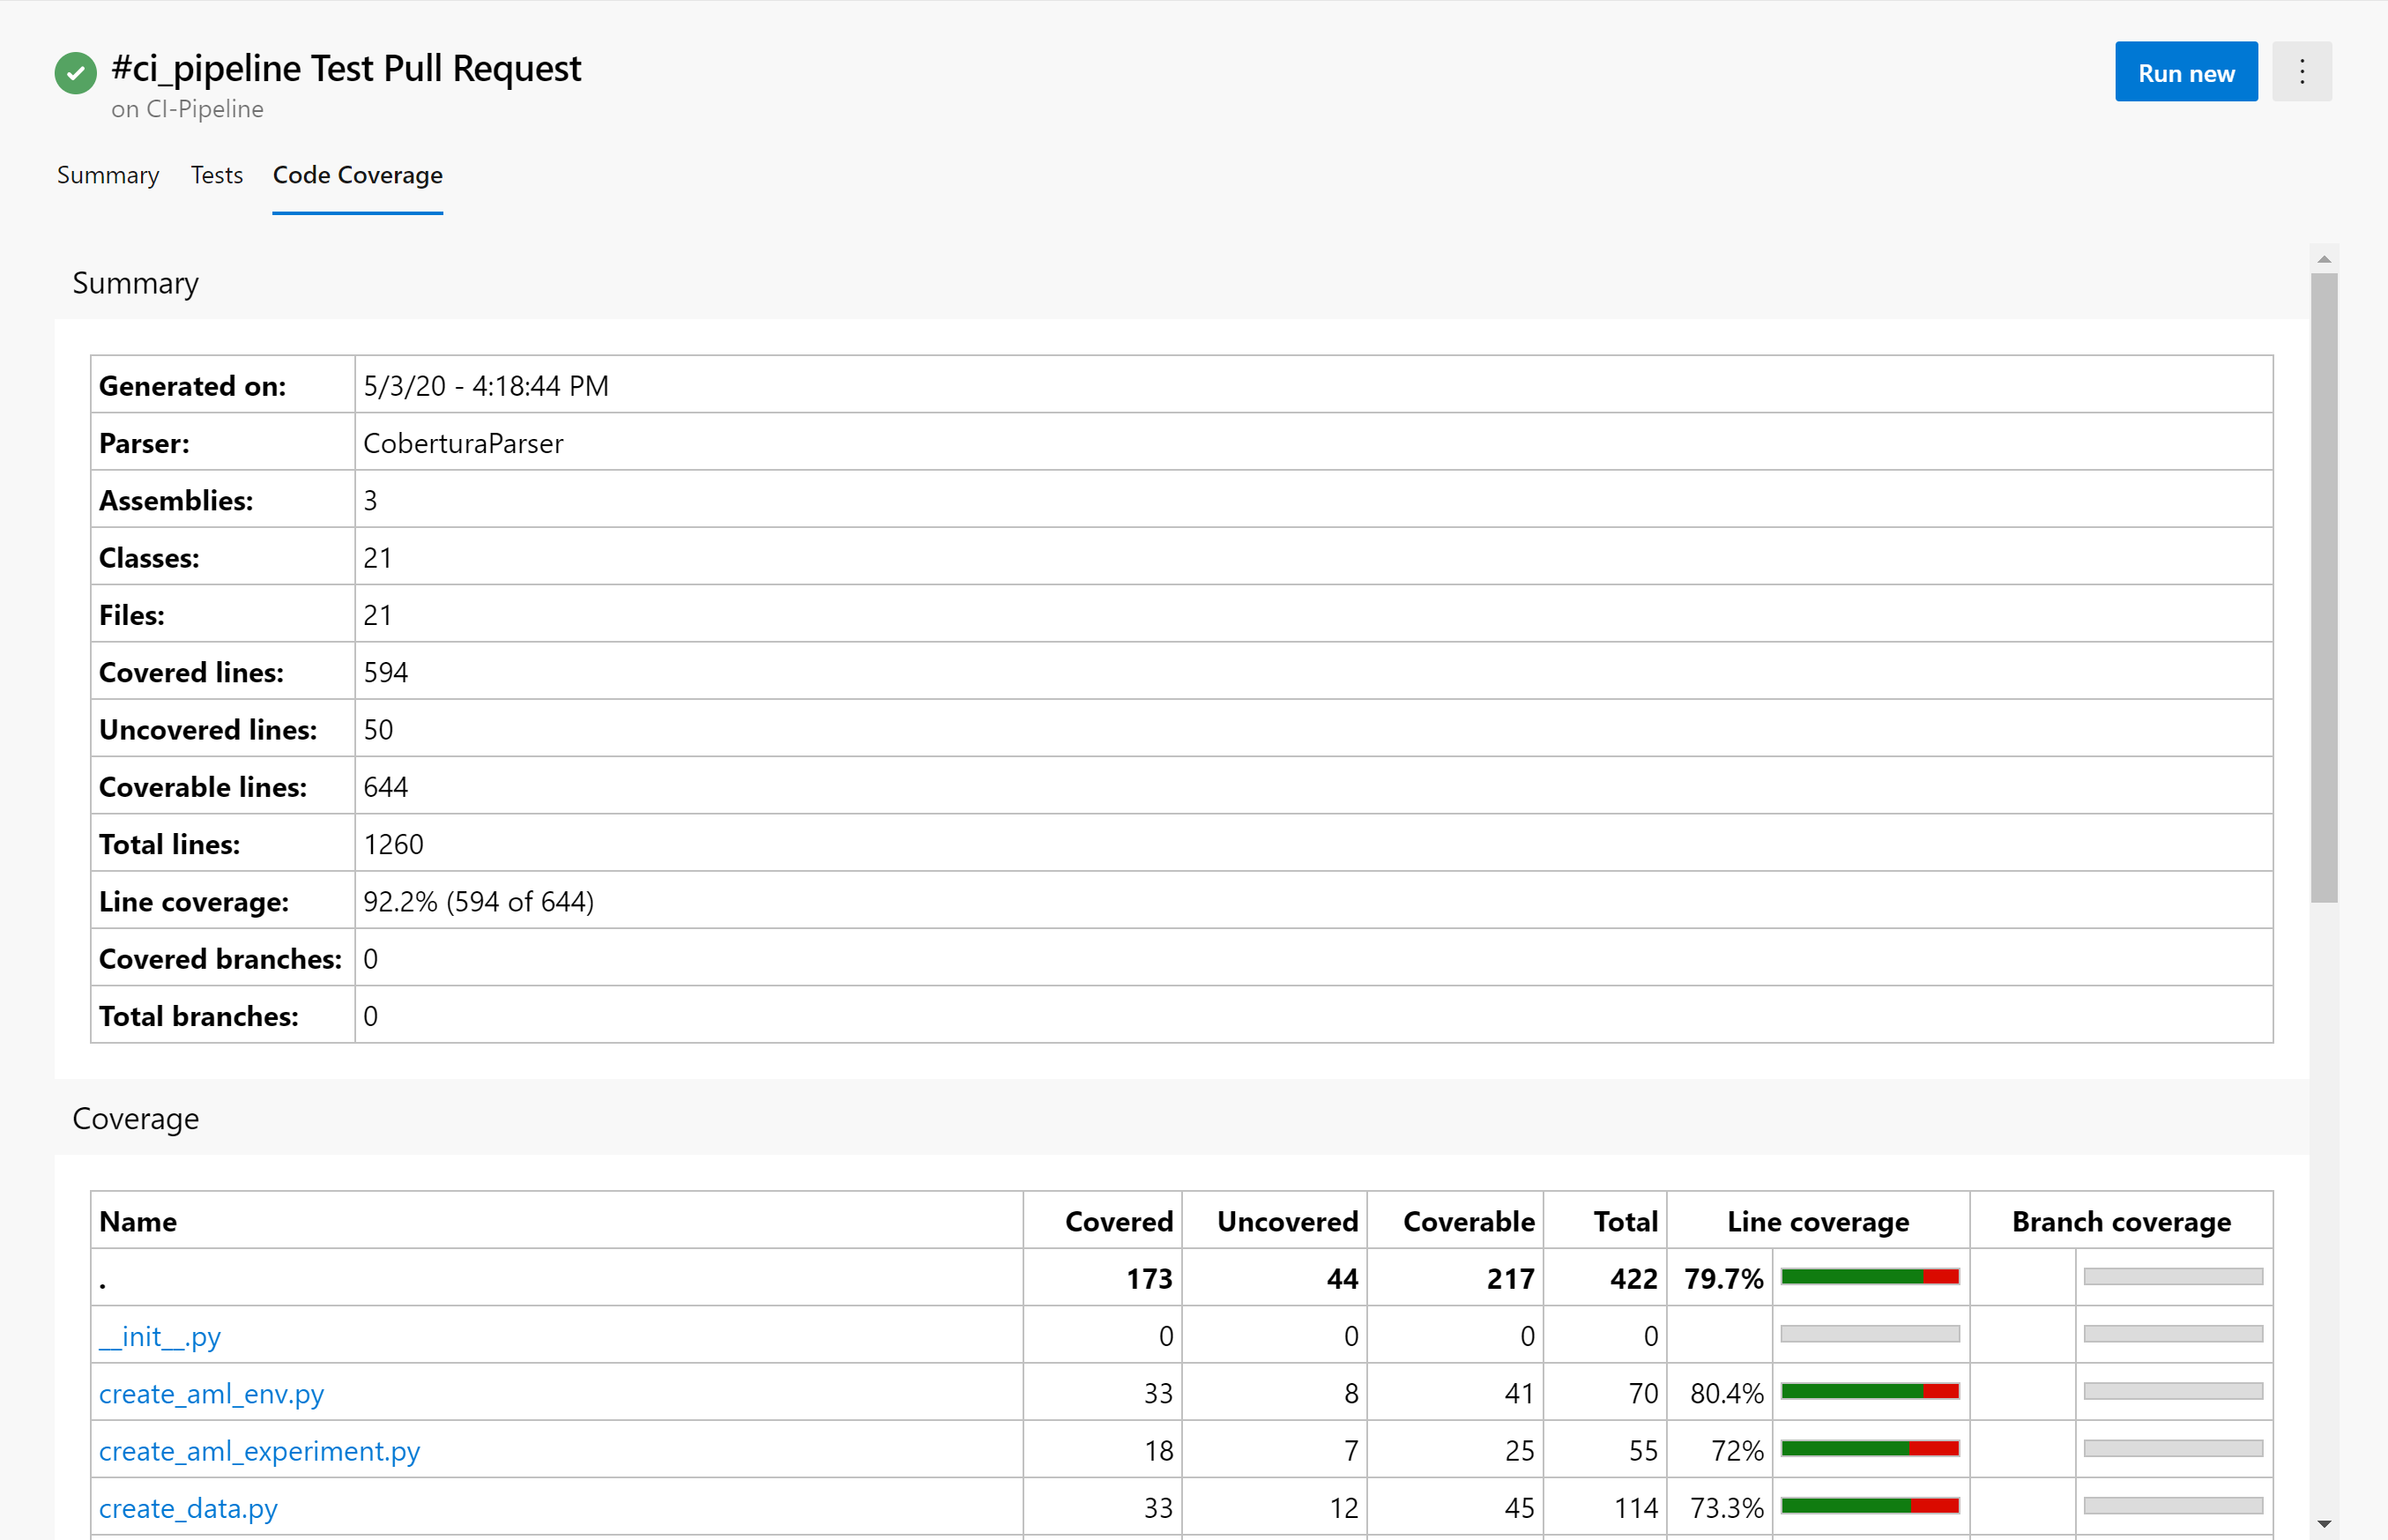
Now click on the tab that says “Code Coverage”, we can see that 92% of the lines of code that could be covered are covered by our tests:
Conclusion
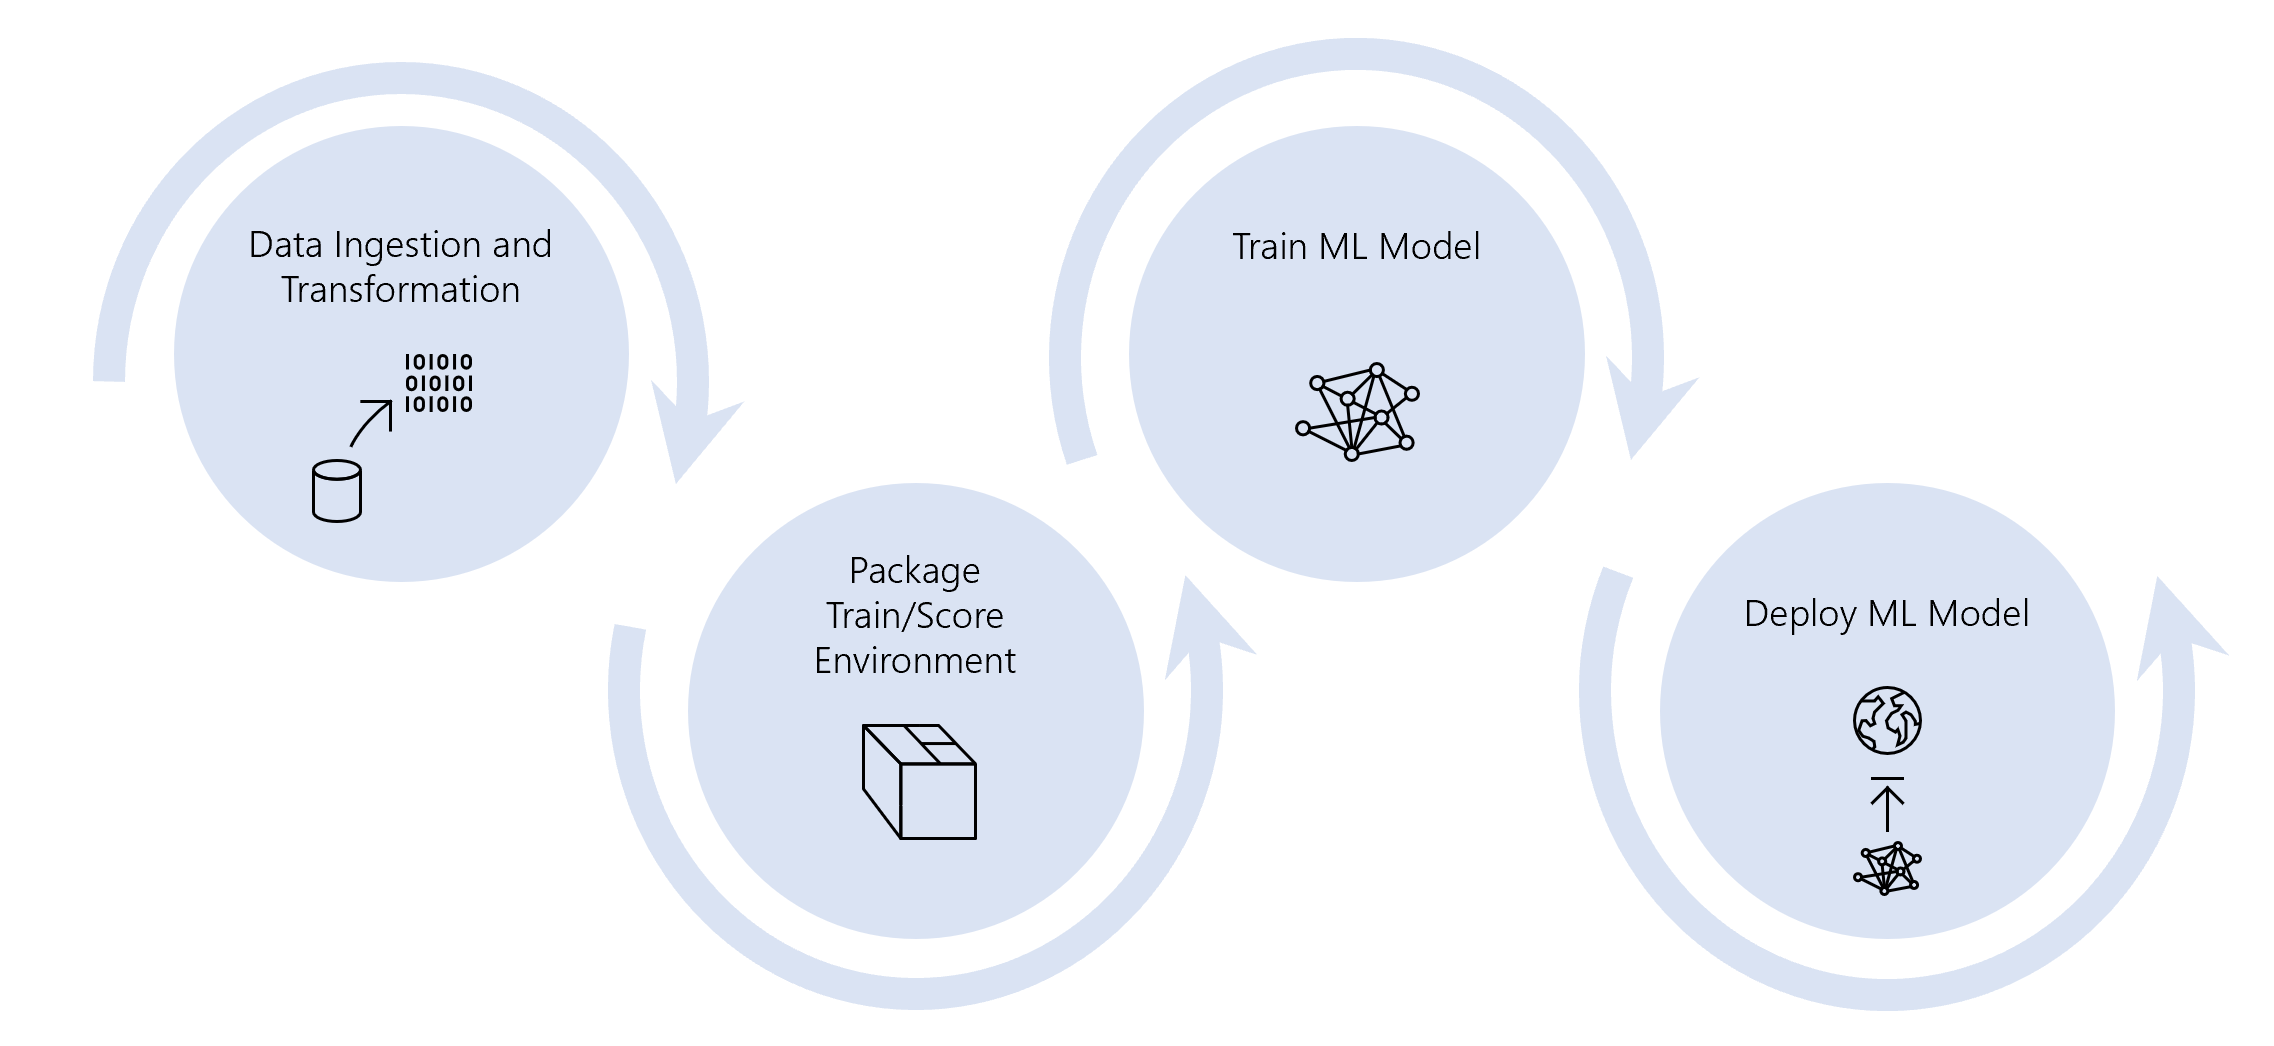
Over this series of posts, we’ve set up an end-to-end pipeline for storing data, creating an environment, training a ML model and deploying a ML model, all on either time, code change or pull request triggers:
Now that we’ve got this set up, it’s time to expand and enrich these pipelines to meet the needs of your use case, some things to consider might be:
- Expand your data pipeline to bring in data from more and varied data sources
- Expand the environment to include more data pre-processing and feature engineering steps
- Expand the model pipeline to train a number of models or do a grid search of hyperparameters and pick the best model
- Expand the deployment pipeline to perhaps use kubernetes to automatically scale your web service to meet requirements
- Expand the unit tests to test any additional files you create in the above steps