Creating End-to-End MLOps pipelines using Azure ML and Azure Pipelines
In this 7-part series of posts we’ll be creating a minimal, repeatable MLOps Pipeline using Azure ML and Azure Pipelines.
The git repository that accompanies these posts can be found here.
In this series we’ll be covering:
- Part 1 – Introduction
- Part 2 – Resource Set Up
- Part 3 – Data Pipeline
- Part 4 – Environment Pipeline
- Part 5 – Model Training Pipeline
- Part 6 – Model Deployment Pipeline
- Part 7 – Continuous Integration (CI) Pipeline
Quick disclaimer: At the time of writing, I am currently a Microsoft Employee
Part 4 – Environment Pipeline
In this post we’ll create an Azure ML Environment using a custom python package. The custom python package we’ll use is in our Azure Repos git repository.

Often we’ll have one or more internal packages that will be used for sharing code for repeatable tasks that we’ll want to share across workloads.
As much as possible, code should be modularised and re-used.
This is particularly true for model training and model scoring workloads where we want to ensure any data pre-processing we do to our data for training, we also do in the same manner to our data for scoring. If we were to handle the model scoring data any different, we will almost certainly end up with incorrect predictions and left scratching our heads as to how our error metrics look fine but our model in production is performing so much worse.
In addition to our internal custom package, we’ll also install any external packages we’ll need into this environment.
We’ll want to use this python package in our model training and model deployment, so each time we merge our code into our master branch, we’ll update the Azure ML Environment with our custom python package.
We’re using an Azure ML Environment in this case, but we may just as easily package our code into a docker image and store this on Azure Container Registry.
Custom Python Package
Our code repository has a custom python package.
The custom package, imaginatively named my_custom_package can be found in the git repository in src/my_custom_package and has a very minimalist setup.py file in the src directory.
This is installed in our pipelines from our requirements.txt file but can also be installed from the command line as follows:
pip install -e src
Here we only have a single python package for our project but some projects grow to be quite complex with multiple python packages that all have functionality required for model training.
Data Preprocessing
Our code repository has a number of utility files inside the src/my_custom_package/utils/ directory that contain functionality for interacting with Azure services (aml_interface.py and blob_storage_interface.py), for storing constants (const.py) and for transforming data (transform_data.py).
As we’ve discussed above, any pre-processing we do to our training data, we’ll want to do to the data we’ll be using for predictions in our deployed service.
Our function for transforming data will be imported in both our training and the script we’ll be using to call our model. Depending on the nature of the data transformation, we might have included the data transformation in our scoring script itself.
![]()
So what data pre-processing do we need to do? If we take a correlation plot for the input data, we see that there are some highly correlated values.
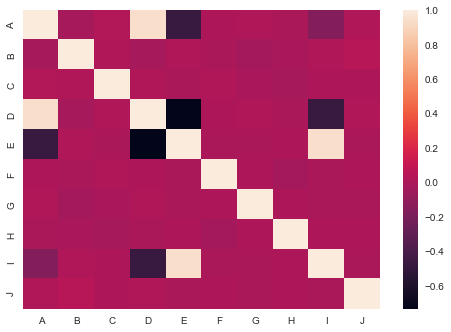
You can detect high-multi-collinearity by inspecting the eigen values of correlation matrix. A very low eigen value shows that the data are collinear, and the corresponding eigen vector shows which variables are collinear.
If there is no collinearity in the data, you would expect that none of the eigen values are close to zero.
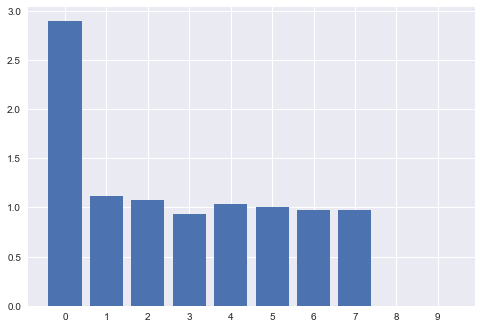
If we take a look at the eigen values, there are 2 eigen vectors that are clearly close to zero.
Upon inspecting the eigen vectors, as well as our correlation plot above, we see that the source of the collinearity is columns "D" and "I". So let’s remove these.
Our function remove_collinear_cols in transform_data.py is shown below.
def remove_collinear_cols(X_data):
    return X_data.drop(['D', 'I'], axis=1)
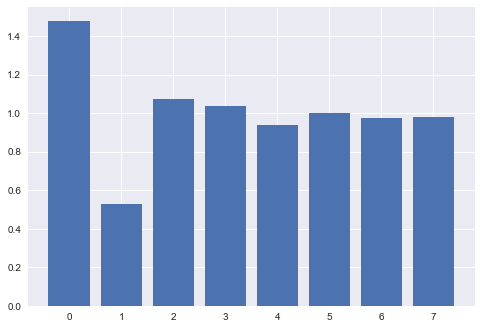
Upon removing the columns, our eigen values now show no values close to zero.
Pipeline Definition
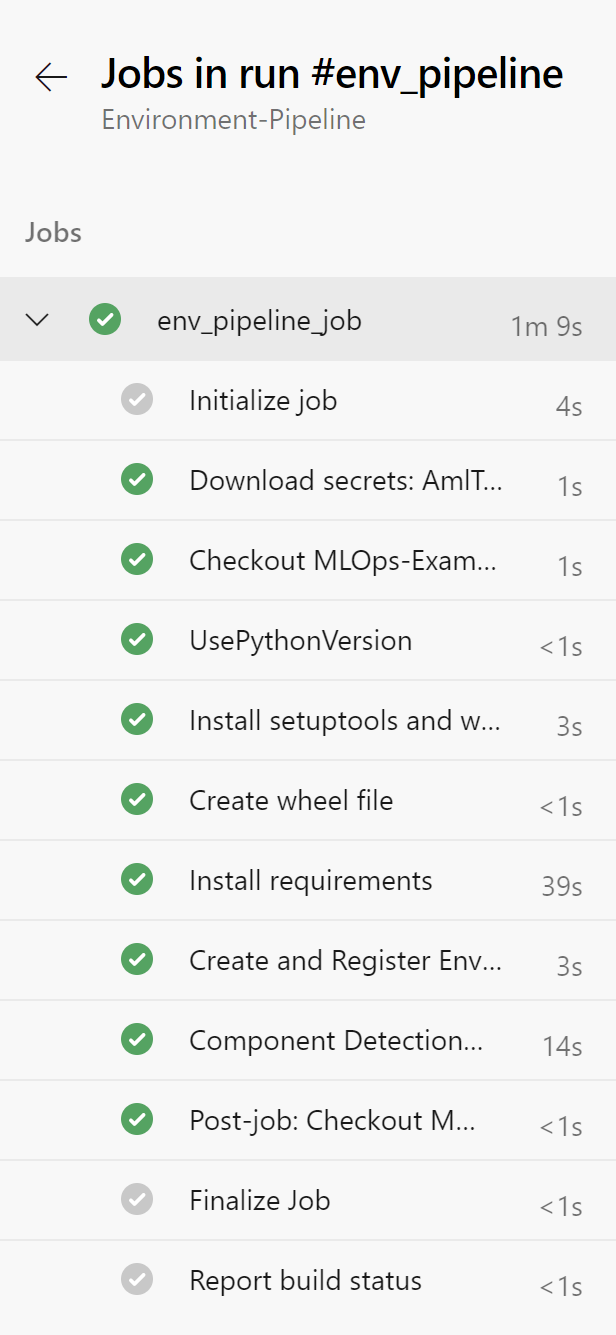
So let’s take a look at the pipeline definition, just as with our data pipeline, this environment Azure Pipeline will be set up as a yaml file. It can be found in the root of the repository as env_pipeline.yml.
Just as we did for the data pipeline, let’s take a look at this yaml file, then inspect what’s happening at each step.
trigger:
  branches:
    include:
      - 'master'

name: 'env_pipeline'
jobs:
  - job: 'env_pipeline_job'
    pool:
      vmImage: 'ubuntu-latest'
    variables:
      - group: KeyVault
      - group: ProductionEnvVars
    steps:
      - task: UsePythonVersion@0
        inputs:
          versionSpec: '3.7'
          architecture: 'x64'

      - script: |
          python -m pip install --upgrade pip
          pip install --upgrade setuptools wheel
        displayName: 'Install setuptools and wheel'

      - script: |
          cd src/
          python setup.py bdist_wheel
        displayName: 'Create wheel file'

      - script: |
          pip install -r requirements.txt
        displayName: 'Install requirements'

      - script: |
          python src/my_custom_package/create_aml_env.py
        displayName: 'Create and Register Environment'
        env:
          TENANT_ID: $(TenantID)
          SPN_ID: $(SpnID)
          SPN_PASSWORD: $(SpnPassword)
          AML_WORKSPACE_NAME: $(AmlWorkspaceName)
          RESOURCE_GROUP: $(ResourceGroup)
          SUBSCRIPTION_ID: $(SubscriptionID)
Trigger
Unlike our data pipeline that used a daily schedule, we’ll trigger this pipeline upon changes to the master branch as we’ll want to keep our environment up to date given changes to the master branch.
Jobs
This pipeline also has a single stage, with a single job.
The VM image being used to run this pipeline is an Ubuntu 16.04 image.
Variables are extracted from the variable groups we set up in our resource set up in Azure DevOps.
Steps
Step 1 – Use python version
This step defines which python version for the pipeline to use.
Step 2 – Install setuptools and wheel
We’ll need to install the setuptools and wheel python packages in order to create a distributable wheel file for our custom python package. The wheel file is required to include our pip installable package in our environment.
Step 3 – Create wheel file
We change our working directory to the src/ folder and then create the wheel file using:
python setup.py bdist_wheel
Step 4 – Install requirements
We install the project’s requirements in the machine the Azure pipeline is running on.
Step 5 – Create and Register Environment
We use the python script in src/my_custom_package/create_aml_env.py to create and register the environment. We’ll take a deeper look at the functionality of this file below.
Note at this last step that we are extracting variables from our variable groups and assigning them as environment variables for this script to use.
Create AML Environment
The file src/my_custom_package/create_aml_env.py is used to create and register the environment.
Let’s take a look at the create_aml_environment function to see what’s happening here:
def create_aml_environment(aml_interface):
    aml_env = Environment(name=AML_ENV_NAME)
    conda_dep = CondaDependencies()
    conda_dep.add_pip_package("numpy==1.18.2")
    conda_dep.add_pip_package("pandas==1.0.3")
    conda_dep.add_pip_package("scikit-learn==0.22.2.post1")
    conda_dep.add_pip_package("joblib==0.14.1")
    whl_filepath = retrieve_whl_filepath()
    whl_url = Environment.add_private_pip_wheel(
        workspace=aml_interface.workspace,
        file_path=whl_filepath,
        exist_ok=True
    )
    conda_dep.add_pip_package(whl_url)
    aml_env.python.conda_dependencies = conda_dep
    aml_env.docker.enabled = True
    return aml_env
We first instantiate an azureml.core.environment.Environment object.
We then instantiate a azureml.core.conda_dependencies.CondaDependencies object, to which we can add conda and pip dependencies.
In the next few lines, we add external pip packages we’ll need in our training/scoring environment, these include numpy and pandas for data transformation, scikit-learn for machine learning model training and evaluation and joblib for model serialisation/deserialisation. This could be done by reading from a requirements.txt file but, for simplicity’s sake in this example, we add them individually manually.
Next we get our wheel filepath using a custom function retrieve_whl_filepath, which is shown below:
def retrieve_whl_filepath():
    __here__ = os.path.dirname(__file__)
    dist_dir = os.path.join(__here__, '..', 'dist')
    if not os.path.isdir(dist_dir):
        raise FileNotFoundError("Couldn't find dist directory")
    dist_files = os.listdir(dist_dir)
    whl_file = [
        f for f in dist_files
        if f.startswith('my_custom_package')
        and f.endswith('whl')
    ]
    if not len(whl_file):
        raise FileNotFoundError("Couldn't find wheel file")
    return os.path.join(dist_dir, whl_file[0])
This file uses a relative path to find the wheel file for our custom package my_custom_package – the use of relative paths is best practice as each user will have a different absolute path to files on their own system. Once we’ve got the path to the wheel file, we can add that as a private pip wheel, which will return us a URL to our wheel.
Important Note Here: The environment will only update if the version number in your setup.py has changed. This is because, if it is not changed, the wheel file will have the same name, and the private pip wheel is only changed if the filename has changed.
The wheel file is then added to our pip dependencies using this wheel URL.
These depedencies are then added to the environment and docker is enabled.
The environment is then registered to the Azure Machine Learning Workspace in our main function.
Set Up Pipeline on Azure DevOps
We’ll set up the pipeline on Azure DevOps in the exact same manner as we did in part 3 of this series of posts for the data pipeline. For screenshots, refer to that post.
As a recap:
- Go to your Azure DevOps Project
- Select Pipelines from the left hand blade
- Click the button for “New Pipeline”
- Select the “Azure Repos Git” option
- Select your repository
- On the configure tab, select “Existing Azure Pipelines YAML File”
- Select “/env_pipeline.yml” as the path to your yaml file and click “Continue”
- After reviewing, click “Run”
You may need to accept the provision of permissions for this pipeline, afterwards you should see an output similar to below:
Rename your pipeline to “Environment-Pipeline” by selecting the ellipsis next to the pipeline and choosing “Rename/move”.
Now that our environment pipeline is all set up, we can move on to our next pipeline – the model training pipeline.