Creating End-to-End MLOps pipelines using Azure ML and Azure Pipelines
In this 7-part series of posts we’ll be creating a minimal, repeatable MLOps Pipeline using Azure ML and Azure Pipelines.
The git repository that accompanies these posts can be found here.
In this series we’ll be covering:
- Part 1 – Introduction
- Part 2 – Resource Set Up
- Part 3 – Data Pipeline
- Part 4 – Environment Pipeline
- Part 5 – Model Training Pipeline
- Part 6 – Model Deployment Pipeline
- Part 7 – Continuous Integration (CI) Pipeline
Quick disclaimer: At the time of writing, I am currently a Microsoft Employee
Part 5 – Model Training Pipeline
Now that we have our data and environment set up, we can start to train our model.
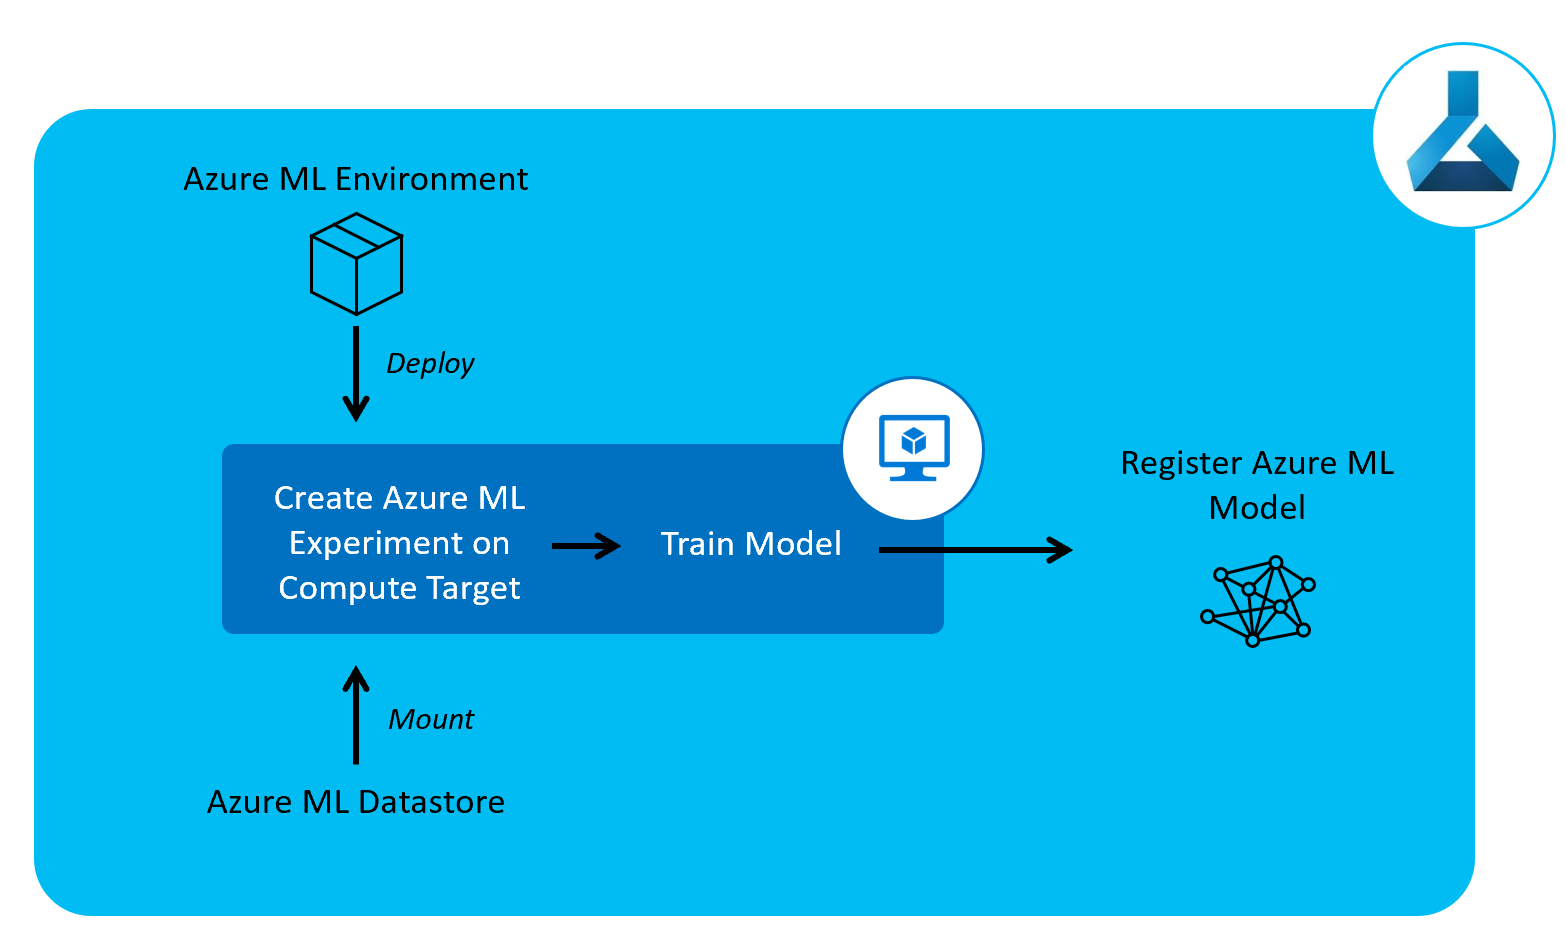
To do this, we’ll now create a model training pipeline to train our machine learning model and register it to Azure ML Models.
In this pipeline we set up the compute node we’ll be using for training and, on this compute node, we pull in the environment we set up in the previous pipeline. We also mount the datastore we registered in our data pipeline for training our model.
For simplicity’s sake, we’ll be training a logistic regression model. After training the model, we’ll register it to Azure Machine Learning.
Although our data isn’t changing in this case, in a real-life scenario, we’ll likely be having new data coming in that we can use for retraining the model to ensure the model keeps up with any changes in the underlying data.
As such, we’ll have this pipeline on a schedule to retrain the model once per week.
Pipeline definition
Just as our other pipelines so far, our Azure Pipeline will be set up as a yaml file.
In our git repository, this can be found in the root of the repository as train_pipeline.yml.
Let’s take a look at this yaml file and then we’ll explain what’s happening at each step, it’ll be following the same template as our last two pipelines:
trigger: none

schedules:
  - cron: "0 12 * * 0"
    displayName: "Weekly Sunday training pipeline run"
    branches:
      include:
      - master
    always: true

name: 'training_pipeline'
jobs:
  - job: 'training_pipeline_job'
    pool:
      vmImage: 'ubuntu-latest'
    variables:
      - group: KeyVault
      - group: ProductionEnvVars
    steps:
      - task: UsePythonVersion@0
        inputs:
          versionSpec: '3.7'
          architecture: 'x64'

      - script: |
          python -m pip install --upgrade pip
          pip install -r requirements.txt
        displayName: 'Install requirements'

      - script: |
          python src/my_custom_package/create_aml_experiment.py
        displayName: 'Run AML Experiment and Register Model'
        env:
          TENANT_ID: $(TenantID)
          SPN_ID: $(SpnID)
          SPN_PASSWORD: $(SpnPassword)
          AML_WORKSPACE_NAME: $(AmlWorkspaceName)
          RESOURCE_GROUP: $(ResourceGroup)
          SUBSCRIPTION_ID: $(SubscriptionID)
So if we take a dive into at what’s happening here:
Schedules
First, the CI trigger is turned off, so that this Pipeline isn’t run every time the code is updated.
There is a cron schedule that runs at 00:00 every Sunday on the master branch. Just as with the data pipeline this pipeline is always run, regardless of whether there are code changes, as the data may have changed.
Jobs
As with our previous pipelines, we have set up a pipeline with a single stage, with a single job on an Ubuntu 16.04 base image.
Variables are extracted from the variable groups we set up in our resource set up in Azure DevOps.
Steps
After setting the python version, there are only two steps here.
First we install the python package requirements on our pipeline compute.
After we’ve installed the requirements, we run src/my_custom_package/create_aml_experiment.py, this will submit an Azure ML experiment run. Upon submitting the run, a training script is run on a training compute node and this will train the model and register the resulting model on Azure Machine Learning.
Run Azure ML Experiment
In the main function of our create_aml_experiment.py python script, we run submit_run.
This will submit an experiment run, the code for this is below.
def submit_run(aml_interface):
    experiment = Experiment(aml_interface.workspace, AML_EXPERIMENT_NAME)
    src_dir = __here__
    run_config = ScriptRunConfig(
        source_directory=src_dir,
        script='train.py'
    )
    run_config.run_config.target = aml_interface.get_compute_target(
        AML_COMPUTE_NAME,
        'STANDARD_D2_V2'
    )
    aml_run_env = Environment.get(
        aml_interface.workspace,
        AML_ENV_NAME
    )
    run_config.run_config.environment = aml_run_env
    print("Submitting Run")
    run = experiment.submit(config=run_config)
    run.wait_for_completion(show_output=True)
    print(run.get_metrics())
First we instantiate an Azure ML Experiment object, providing our Azure ML Workspace object and experiment name.
We then define a run configuration. We will be running a script on our AML training compute node. The script we’ll be running is train.py, which we will examine below, and the source directory for which this script is held is the same directory as create_aml_experiment.py.
As part of this run configuration, we also define a compute node, we’ve chosen a standard D2_V2 machine here. The full range of virtual machines available on can be viewed here, including GPU-enabled machines.
We then retrieve the environment we created in our Environment Pipeline, with our custom package installed by providing the Workspace object and the environment name.
Now we’re ready to submit the run, so we submit the experiment run and wait for it to complete. The console output will be displayed as the run waits for completion. Any metrics from the run are then printed once the run is complete.
train.py
Our training script is a simple one, it can be found in the repository at src/my_custom_package/train.py.
In our main function, we can see that the script:
- Retrieves the data from the mounted datastore from our Azure ML Workspace
- Trains a simple classifier model (logistic regression)
- Logs the evaluation metrics to Azure Machine Learning (F1 score)
- Saves the model locally
- Uploads the model and registers it to Azure ML models.
Set Up Pipeline on Azure DevOps
We’ll set up the pipeline on Azure DevOps in the exact same manner as we did in part 3 of this series of posts for the data pipeline. For screenshots, refer to that post.
As a recap:
- Go to your Azure DevOps Project
- Select Pipelines from the left hand blade
- Click the button for “New Pipeline”
- Select the “Azure Repos Git” option
- Select your repository
- On the configure tab, select “Existing Azure Pipelines YAML File”
- Select “/train_pipeline.yml” as the path to your yaml file and click “Continue”
- After reviewing, click “Run”
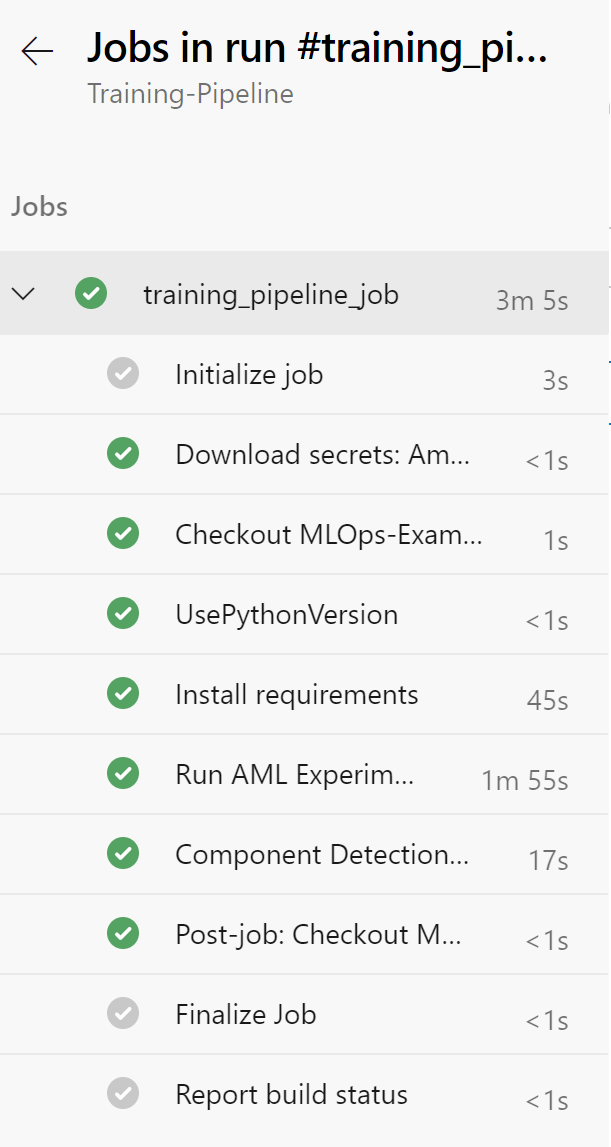
The first time you run this, it can take up to 15 minutes. You may need to accept the provision of permissions for this pipeline, afterwards you should see an output similar to below:
Rename your pipeline to “Training-Pipeline” by selecting the ellipsis next to the pipeline and choosing “Rename/move”.
Reviewing Experiment Runs
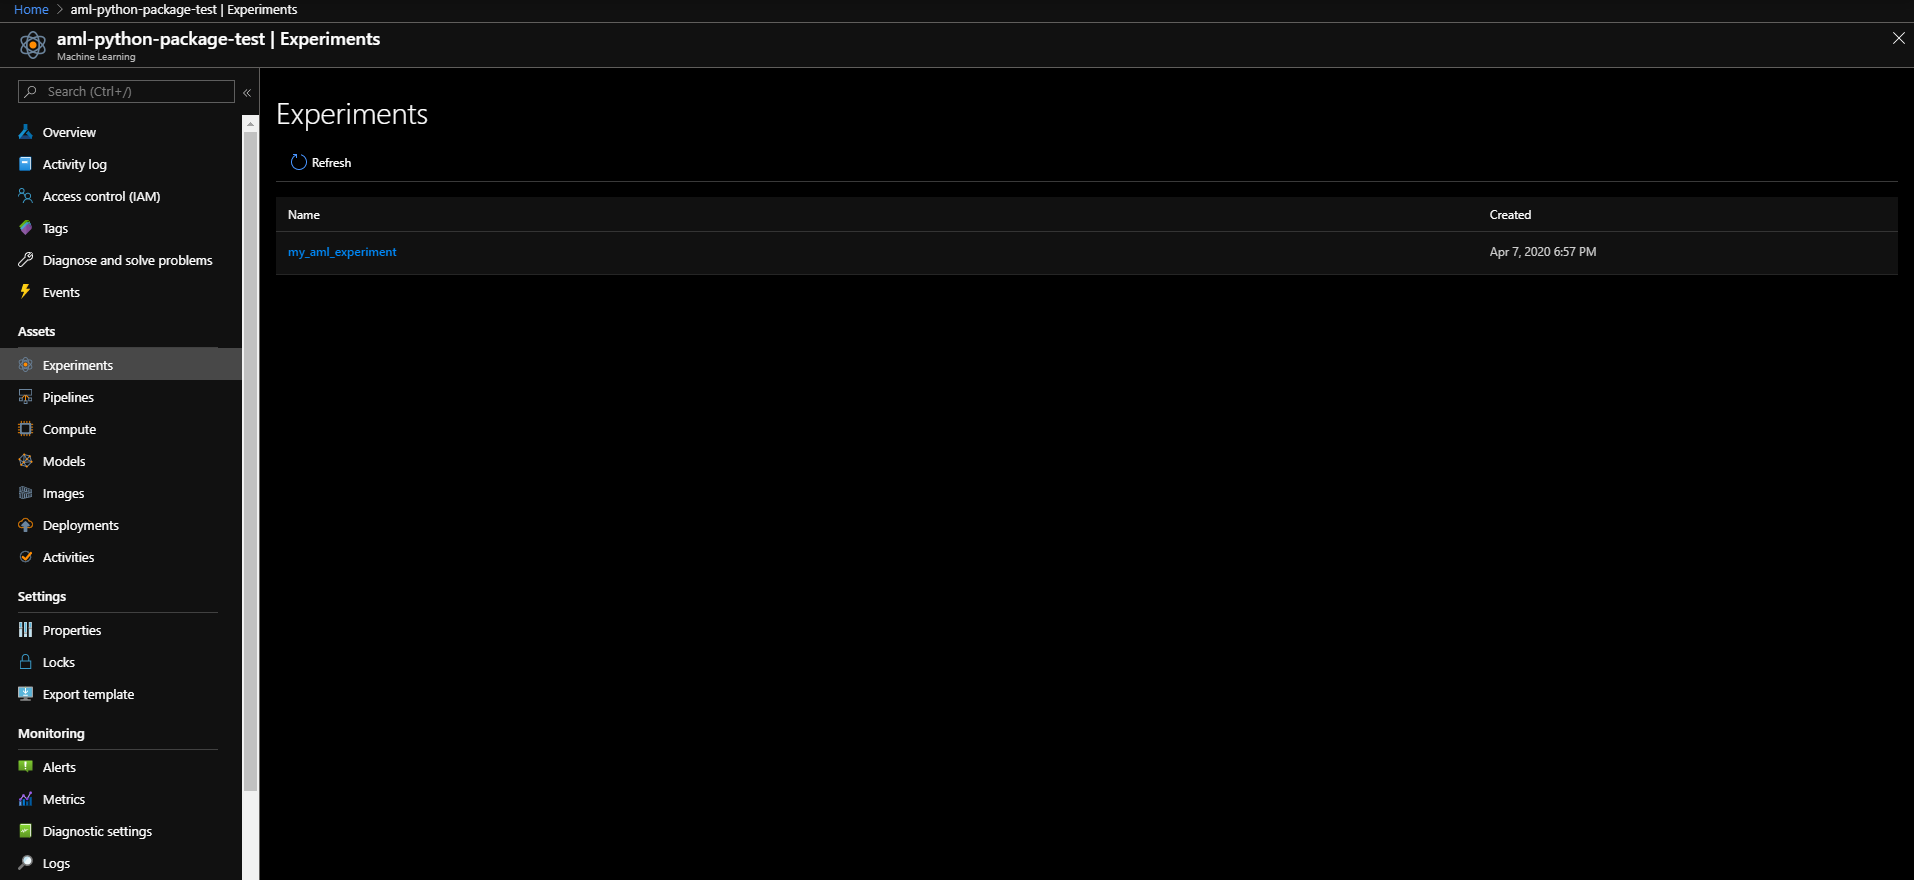
Experiment runs can be viewed in the Azure Portal, if you navigate to your Azure ML Workspace in the Azure Portal and click on Experiments, you should see the following page:
If you click on the experiment with the experiment name “my_aml_experiment”, you’ll be taken to a page with the status of all the model runs, including the different runs’ F1 scores and duration. It will also show the model id, complete with version number, of the registered model. This can be seen in the screenshot below:
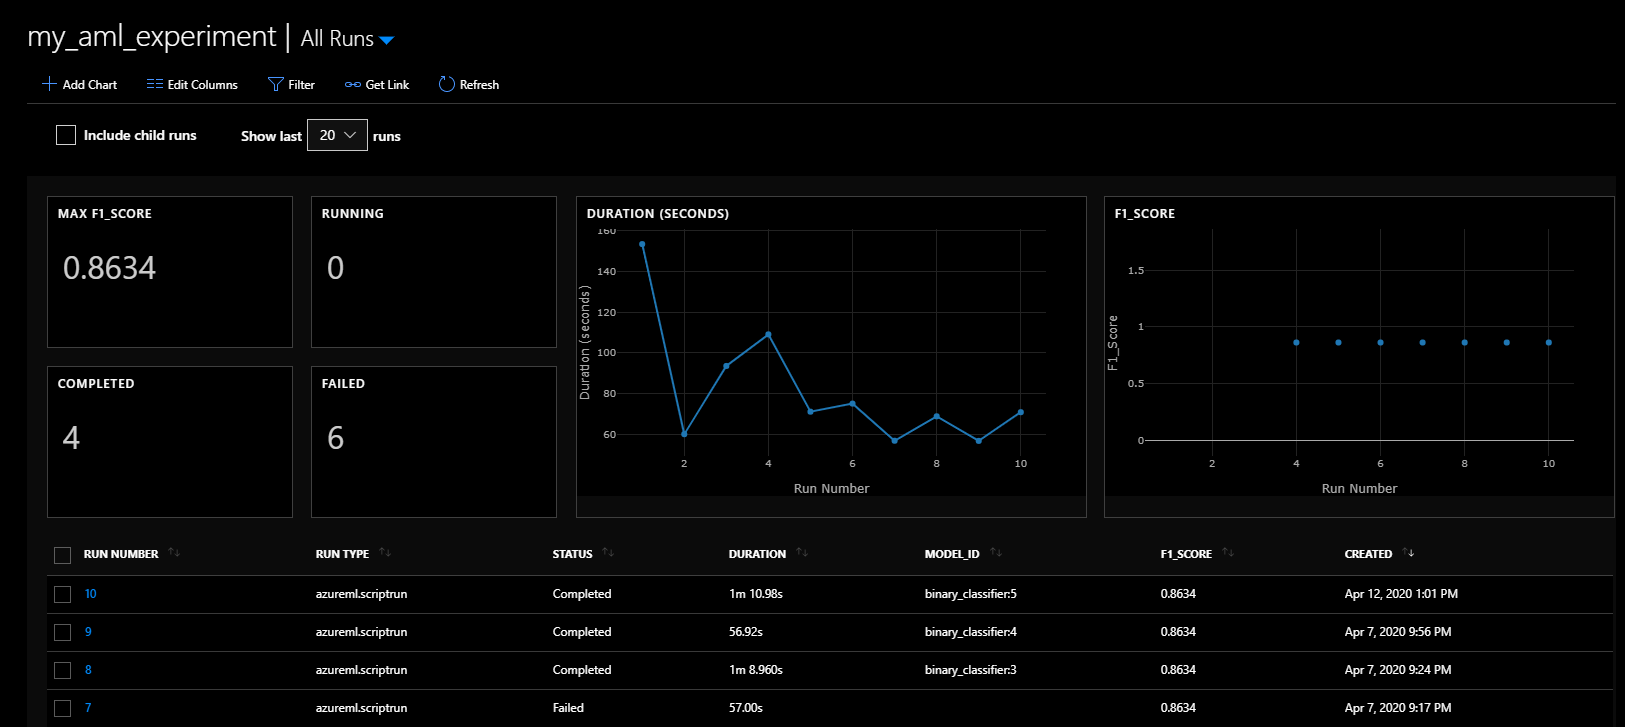
Because this project is designed for repeatability – the data created is the same each time and the model chosen is deterministic, so the F1 score is exactly the same each time. Of course, in real life your model metrics will change over time.
This brings us to an important concept: tracking your model metrics and model drift.
Tracking Model Metrics – A note on model drift
Model metrics can’t necessarily be compared directly for each training run as often different data will be used for re-training.
However, it’s a good idea to keep track of these metrics, perhaps in a Power BI dashboard, in order to track model drift.
If there is significant drift over time, it may be time to go back to business understanding or data sources. Perhaps something has changed in the process that you’re modelling that needs new features to be engineered.
Remember that data science is an iterative process and the deployment of the model is not the end of the process.
Now that our training pipeline is all set up, we can move on to our penultimate pipeline – the model deployment pipeline.