Creating End-to-End MLOps pipelines using Azure ML and Azure Pipelines
In this 7-part series of posts we’ll be creating a minimal, repeatable MLOps Pipeline using Azure ML and Azure Pipelines.
The git repository that accompanies these posts can be found here.
In this series we’ll be covering:
- Part 1 – Introduction
- Part 2 – Resource Set Up
- Part 3 – Data Pipeline
- Part 4 – Environment Pipeline
- Part 5 – Model Training Pipeline
- Part 6 – Model Deployment Pipeline
- Part 7 – Continuous Integration (CI) Pipeline
Quick disclaimer: At the time of writing, I am currently a Microsoft Employee
Part 6 – Model Deployment Pipeline
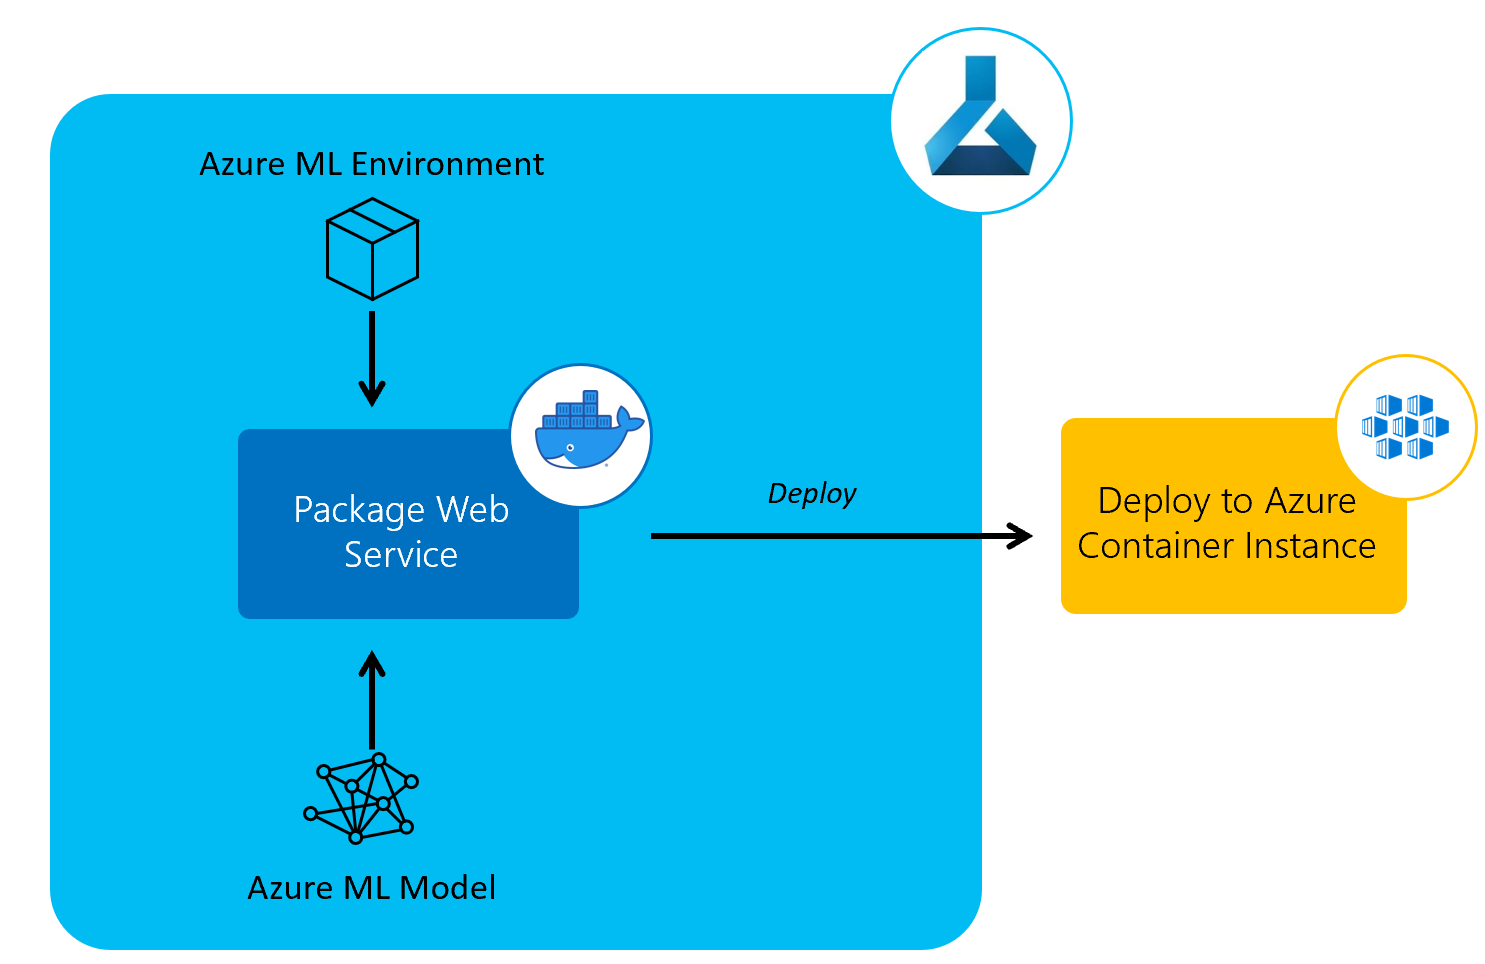
The next pipeline we’ll create is a model deployment Azure Pipeline to deploy the trained models to a web service using Azure Container Instances.
We’ll be deploying the model we registered in our training pipeline and using the environment we created in in our environment pipeline.
Deployment can be triggered each time a change to the model is detected using the Machine Learning plug-in for Azure DevOps as described here.
However, to keep the number of additional requirements down, we’ll deploying our model on a weekly basis after training has occurred.
Pipeline definition
Just as our other pipelines so far, our Azure Pipeline will be set up as a yaml file.
In our git repository, this can be found in the root of the repository as deploy_pipeline.yml.
Let’s take a look at this yaml file and then we’ll explain what’s happening at each step, it’ll be following the same template as our last two pipelines:
trigger: none

schedules:
  - cron: "0 13 * * 0"
    displayName: "Weekly Sunday deployment pipeline run"
    branches:
      include:
      - master
    always: true

name: 'deployment_pipeline'
jobs:
  - job: 'deployment_pipeline_job'
    pool:
      vmImage: 'ubuntu-latest'
    variables:
      - group: KeyVault
      - group: ProductionEnvVars
    steps:
      - task: UsePythonVersion@0
        inputs:
          versionSpec: '3.7'
          architecture: 'x64'

      - script: |
          python -m pip install --upgrade pip
          pip install -r requirements.txt
        displayName: 'Install requirements'

      - script: |
          python src/my_custom_package/deploy_aml_model.py
        displayName: 'Deploy AML Model to ACI Web Service'
        env:
          TENANT_ID: $(TenantID)
          SPN_ID: $(SpnID)
          SPN_PASSWORD: $(SpnPassword)
          AML_WORKSPACE_NAME: $(AmlWorkspaceName)
          RESOURCE_GROUP: $(ResourceGroup)
          SUBSCRIPTION_ID: $(SubscriptionID)
This pipeline is very similar to our training pipeline but it will be triggered one hour later (13:00 UTC rather than 12:00) and runs src/my_custom_package/deploy_aml_model.py, which deploys the model we registered with Azure ML to an Azure Container Instances web service.
Deploying the Azure ML Model
In the main function of our deploy_aml_model.py python script, we check whether our web service exists already and, if so, we update the web service with the latest Azure ML model.
If the service doesn’t already exist, we run deploy_service:
def deploy_service(aml_interface):
    inference_config = get_inference_config(aml_interface)
    deployment_config = AciWebservice.deploy_configuration(
        cpu_cores=1,
        memory_gb=1
    )
    model = aml_interface.workspace.models.get(MODEL_NAME)
    service = Model.deploy(
        aml_interface.workspace,
        DEPLOYMENT_SERVICE_NAME,
        [model],
        inference_config,
        deployment_config)
    service.wait_for_deployment(show_output=True)
    print(service.scoring_uri)
When we get the inference configuration in the get_inference_config function we define an azureml.core.model.InferenceConfig object.
InferenceConfig(
    entry_script=scoring_script_path,
    environment=aml_env
)
When defining the inference configuration, the scoring script path is to score.py in the same directory as the deploy_aml_model.py and the environment Azure ML environment we created in the environment pipeline.
We then define an Azure Container Instances web service AciWebservice configuration with a minimal requirements of just a single CPU core, with 1 GB of memory.
The logistic regression model that we trained and registered in the model training pipeline is then retrieved from our workspace.
We use this model, the inference configuration, deployment configuration and workspace to deploy a web service. While deploying the web service, the output of the service deployment is logged to the console.
At the end of the deployment, we print the URI of this scoring web service.
If the service does already exist, we run update_service instead:
def update_service(aml_interface):
    inference_config = get_inference_config(aml_interface)
    service = Webservice(
        name=DEPLOYMENT_SERVICE_NAME,
        workspace=aml_interface.workspace
    )
    model = aml_interface.workspace.models.get(MODEL_NAME)
    service.update(models=[model], inference_config=inference_config)
    print(service.state)
    print(service.scoring_uri)
This will update the service with the latest model instead of creating a new service.
The script that’s run in the web service, is score.py.
score.py
Our scoring script is a particularly simple one, it can be found in the repository at src/my_custom_package/score.py.
The entire script is below:
import json

import joblib
import numpy as np
from azureml.core.model import Model

from my_custom_package.utils.const import MODEL_NAME


def init():
    global model
    model_path = Model.get_model_path(MODEL_NAME)
    model = joblib.load(model_path)


def run(data):
    try:
        data = json.loads(data)
        data = data['data']
        result = model.predict(np.array(data))
        return result.tolist()
    except Exception as e:
        error = str(e)
        return error
init
In the init function, the model is deserialised and stored as a global variable. The model storage is mounted to the scoring compute and the path to this model is retrieved in order to deserialise this model.
run
Each time the scoring web service is called, the run function is called with the data as a JSON-serialised string.
This data is then converted to a numpy array and passed to the model for a predictions. The predictions are converted to a list, as the output must be JSON serialisable, and returned from this function.
Set Up Pipeline on Azure DevOps
We’ll set up the pipeline on Azure DevOps in the exact same manner as we did in part 3 of this series of posts for the data pipeline. For screenshots, refer to that post.
As a recap:
- Go to your Azure DevOps Project
- Select Pipelines from the left hand blade
- Click the button for “New Pipeline”
- Select the “Azure Repos Git” option
- Select your repository
- On the configure tab, select “Existing Azure Pipelines YAML File”
- Select “/deploy_pipeline.yml” as the path to your yaml file and click “Continue”
- After reviewing, click “Run”
You may need to accept the provision of permissions for this pipeline, afterwards you should see an output similar to below:
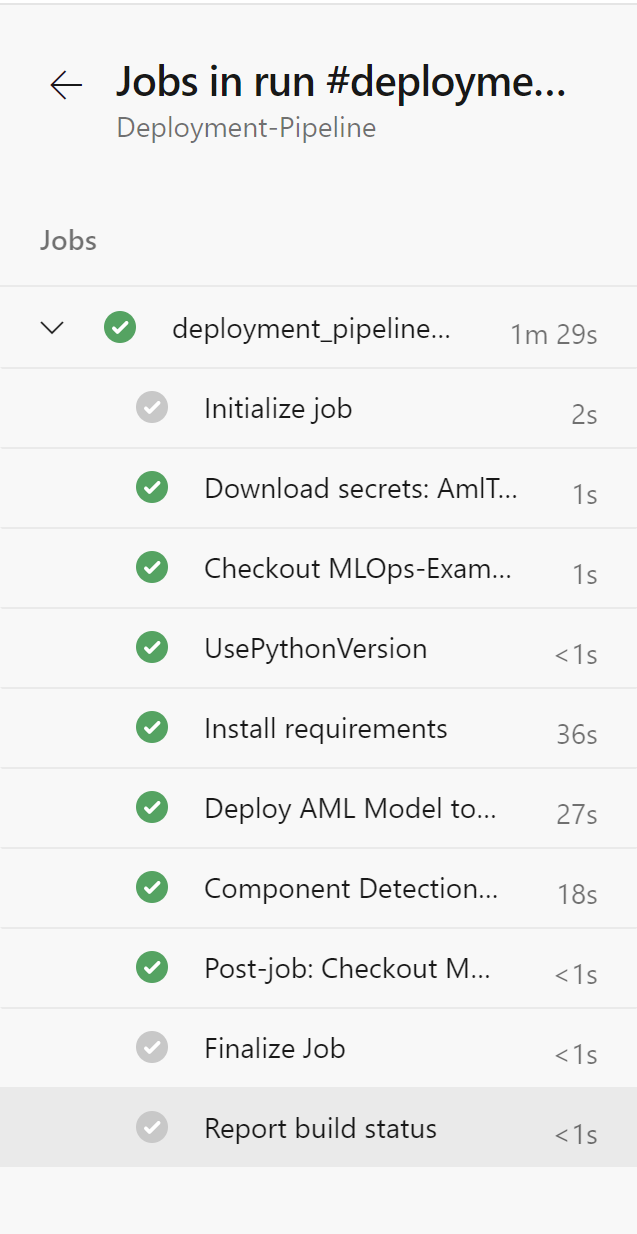
Rename your pipeline to “Deployment-Pipeline” by selecting the ellipsis next to the pipeline and choosing “Rename/move”.
Test the web service
There is a script in the repository to test the web service at src/my_custom_package/scripts/call_web_service.py.
To run this script, you will need to have python installed and the requirements in requirements.txt installed (by running pip install -r requirements.txt from the directory in which the requirements file resides).
A number of environment variables from the resource set up post will need to be set first to test the web service.
These environment variables are:
- Storage account name (
STORAGE_ACCT_NAME) - Storage account key (
STORAGE_ACCT_KEY) - Tenant ID (
TENANT_ID) - Service principal ID (
SPN_ID) - Service principal password (
SPN_PASSWORD) - Azure ML Workspace name (
AML_WORKSPACE_NAME) - Resource group name (
RESOURCE_GROUP) - Subscription ID (
SUBSCRIPTION_ID)
Running the call_web_service.py python script will:
- Retrieve the validation data set – in our data pipeline, the training, test and validation dataset is created and stored in Azure Storage
- Transform validation data set by removing the collinear columns
- Retrieve the scoring web service URI
- Make predictions based on the validation data set
- Calculate the F1 score for these predictions
With our data creation, environment creation, model training and model scoring pipelines all set up, our end-to-end MLOps pipeline is operational. There is one pipeline left to create – our Continuous Integration pipeline.