Automated Deployment of Serverless Python Web APIs using Azure Functions and Azure DevOps
In this post we’re going to go through the end-to-end automated deployment of a web API created in python using Azure Functions and Azure DevOps. We’ll be covering:
- What is Azure Functions?
- Creating an Azure Function
- Creating an Azure Functions ARM Template
- Creating an Azure Pipelines yml file for continuous delivery
- Setting up the Azure Pipeline in Azure DevOps
- Creating a resource group in Azure
- Creating a service connection in Azure DevOps
- Creating a variable group in Azure DevOps
- Creating your pipeline in Azure DevOps
- Testing your deployed Azure Functions API
The focus will be more on deployment than the creation of the web app, though we will briefly cover that.
The repository to accompany this blog post can be found here.
You can follow along by forking this repository to your own Project and following the steps below. This tutorial assumes some familiarity with the Azure Public Cloud platform.
Quick disclaimer: At the time of writing, I am currently a Microsoft Employee
What is Azure Functions?
Azure Functions provides serverless compute for Azure.

You can use Functions to:
- build web APIs
- respond to database changes
- process IoT streams
- manage message queues
and more.
In this post we’ll be using Azure Functions to deploy a web API written in python.
Creating an Azure Function
The most straightforward way to create an Azure Function web app is to use the Azure Functions Visual Studio Code extension.
If you want to run the Azure function locally, you can clone the repository to your local directory and use the Visual Studio code extension to run the function locally. This is optional for this blog post though and you can run through the rest of this blog post having just forked the repository to your own Azure DevOps Project.
Microsoft provide a tutorial for this here. You’ll need to follow the instructions to “Configure your environment” and then “Run the function locally”.
When running, you’ll be able to make requests to the locally running Azure Functions API:
import requests

url = "http://localhost:7071/api/sample_azure_function"
response = requests.get(url, json={'name': 'Ben Keen'})

response.text
'Hello, Ben Keen. This HTTP triggered function executed successfully.'
Creating an Azure Functions ARM Template
To keep this simple, we’ll create an ARM (Azure Resource Manager) JSON template for the minimum requirements for hosting our Function on Azure.
ARM templates are used for the automated deployment of resources to your Azure Subscription using infrastructure as code (IaC), to help you rapidly iterate and deploy. For more information about ARM templates, see the documentation here.
That means we’ll be deploying:
- An Azure App Hosting Plan
- An Azure Web App
- An Azure Storage Account
Microsoft recommend also including Application Insights when deploying to Functions but I’ll leave that as an exercise for the reader.
This JSON template is below, this file can be found in the root of the repository as deployment_template.json:
{
    "$schema": "https://schema.management.azure.com/schemas/2019-08-01/managementGroupDeploymentTemplate.json#",
    "contentVersion": "1.0.0.0",
    "parameters": {
        "appName": {
            "type": "string",
            "metadata": {
                "description": "The name of the function web app to create."
            }
        },
        "storageAcctName": {
            "type": "string",
            "metadata": {
                "description": "The name of the Azure Storage Account to create."
            }
        },
        "hostingPlanName": {
            "type": "string",
            "metadata": {
                "description": "The name of the Hosting Plan to create."
            }
        }
    },
    "functions": [],
    "variables": {},
    "resources": [
        {
            "type": "Microsoft.Storage/storageAccounts",
            "name": "[parameters('storageAcctName')]",
            "apiVersion": "2019-06-01",
            "location": "[resourceGroup().location]",
            "kind": "StorageV2",
            "sku": {
                "name": "Standard_LRS",
                "tier": "Standard"
            }
        },
        {
            "type": "Microsoft.Web/serverfarms",
            "apiVersion": "2018-02-01",
            "name": "[parameters('hostingPlanName')]",
            "location": "[resourceGroup().location]",
            "kind": "Linux",
            "sku": {
                "name": "S1",
                "tier": "Standard",
                "size": "S1",
                "family": "S",
                "capacity": 1
            },
            "properties": {
                "reserved": true
            }
        },
        {
            "type": "Microsoft.Web/sites",
            "apiVersion": "2020-06-01",
            "name": "[parameters('appName')]",
            "location": "[resourceGroup().location]",
            "kind": "functionapp,linux",
            "dependsOn": [
                "[resourceId('Microsoft.Web/serverfarms', parameters('hostingPlanName'))]",
                "[resourceId('Microsoft.Storage/storageAccounts', parameters('storageAcctName'))]"
            ],
            "properties": {
                "serverFarmId": "[resourceId('Microsoft.Web/serverfarms', parameters('hostingPlanName'))]",
                "siteConfig": {
                    "linuxFxVersion": "PYTHON|3.7",
                    "appSettings": [
                        {
                        "name": "AzureWebJobsStorage",
                        "value": "[concat('DefaultEndpointsProtocol=https;AccountName=', parameters('storageAcctName'), ';EndpointSuffix=', environment().suffixes.storage, ';AccountKey=',listKeys(resourceId('Microsoft.Storage/storageAccounts', parameters('storageAcctName')), '2019-06-01').keys[0].value)]"
                        },
                        {
                        "name": "WEBSITE_CONTENTAZUREFILECONNECTIONSTRING",
                        "value": "[concat('DefaultEndpointsProtocol=https;AccountName=', parameters('storageAcctName'), ';EndpointSuffix=', environment().suffixes.storage, ';AccountKey=',listKeys(resourceId('Microsoft.Storage/storageAccounts', parameters('storageAcctName')), '2019-06-01').keys[0].value)]"
                        },
                        {
                        "name": "WEBSITE_CONTENTSHARE",
                        "value": "[toLower(parameters('appName'))]"
                        },
                        {
                        "name": "FUNCTIONS_EXTENSION_VERSION",
                        "value": "~3"
                        },
                        {
                        "name": "WEBSITE_NODE_DEFAULT_VERSION",
                        "value": "~10"
                        },
                        {
                        "name": "FUNCTIONS_WORKER_RUNTIME",
                        "value": "python"
                        }
                    ]
                }
            }
        }
    ],
    "outputs": {}
}
Let’s take a look at some of the aspects of this ARM template.
Parameters
We define 3 parameters that we’ll provide when we deploy using our continuous deployment pipeline. They are:
appName- The name of the function web app to create
storageAcctName- The name of the Azure Storage Account to create.
hostingPlanName- The name of the Hosting Plan to create.
Resources
We create 3 resources in this ARM template:
- Microsoft.Storage/storageAccounts
- This is the Azure Storage Account
- We’ve gone for a standard tier V2 storage account here
- Microsoft.Web/serverfarms
- This is the App Hosting Account
- Python Web Apps are only supported by Azure Functions on Linux App Hosting Accounts
- We’ve gone for a standard tier app hosting account in this case, with reserved compute
- Microsoft.Web/sites
- This is our Web App itself
- Note again that it is a linux web app and the “linuxFxVersion” is set to “PYTHON|3.7”
- We provide the connection string to connect the app up to the storage account in the
appSettings
Creating an Azure Pipelines yml file for continuous delivery
Azure Pipelines are used for running continuous integration (CI) and continuous delivery (CD) to allow teams to rapidly iterate on their products in a robust manner. Here we’ll be focusing on deployment, but if you’re interested in a CI pipeline, see my related blog post here.
Azure Pipelines use yaml templates in your code repository to run a pipeline and our Azure Pipelines yaml file can be found in the root of the repository at azure-pipelines.yml.
Here we’ll be building our Azure Functions App, creating our resources using our ARM template, and deploying our application to Azure.
Let’s take a look at this yaml file as a whole first, then we’ll go through it step by step:
trigger:
  branches:
    include:
      - 'master'

variables:
  - group: 'AzFunctionsAppVariableGroup'

pool:
  vmImage: ubuntu-18.04

steps:
- task: UsePythonVersion@0
  displayName: "Setting python version to 3.7"
  inputs:
    versionSpec: '3.7'
    architecture: 'x64'

- bash: |
    pip install --target="./.python_packages/lib/site-packages" -r ./requirements.txt
  displayName: 'Install app requirements'

- task: ArchiveFiles@2
  displayName: "Archive files"
  inputs:
    rootFolderOrFile: "$(System.DefaultWorkingDirectory)"
    includeRootFolder: false
    archiveFile: "$(System.DefaultWorkingDirectory)/build$(Build.BuildId).zip"

- task: PublishBuildArtifacts@1
  inputs:
    PathtoPublish: '$(System.DefaultWorkingDirectory)/build$(Build.BuildId).zip'
    artifactName: 'drop'

- task: AzureResourceManagerTemplateDeployment@3
  displayName: 'ARM Template deployment: Resource Group scope'
  inputs:
    azureResourceManagerConnection: $(serviceConnectionName)
    subscriptionId: $(subscriptionId)
    resourceGroupName: $(resourceGroupName)
    location: $(resourceGroupLocation)
    csmFile: 'deployment_template.json'
    overrideParameters: '-appName $(appName) -storageAcctName $(storageAcctName) -hostingPlanName $(hostingPlanName)'

- task: AzureFunctionApp@1
  inputs:
    azureSubscription: $(serviceConnectionName)
    appType: functionAppLinux
    appName: $(appName)
    package: '$(System.DefaultWorkingDirectory)/build$(Build.BuildId).zip'
Let’s go through it step-by-step now.
Trigger
Every time code is merged into the master branch, this CD pipeline will run. when actively developing for production, you would likely have this automatically deploy to your development environment and deploy drops on-demand to your higher environments:
trigger:
  branches:
    include:
      - 'master'
Variables
In this template we’re going to be using some variables that we’ll store in a “Variable Group” in Azure DevOps named AzFunctionsAppVariableGroup. We’ll set this up in the next step.
variables:
  - group: 'AzFunctionsAppVariableGroup'
Pool
This pipeline will run on an Ubuntu 18.04 VM:
pool:
  vmImage: ubuntu-18.04
Steps
Our Azure Functions App runs on python 3.7, so we’ll need to set our python version to 3.7:
steps:
- task: UsePythonVersion@0
  displayName: "Setting python version to 3.7"
  inputs:
    versionSpec: '3.7'
    architecture: 'x64'
We then install the Azure Functions App requirements, which can be found in the requirements.txt file in the root of our repository. Due to the simplicity of this application, we’re only installing “azure-functions” but, for more complex applications, we might have many more requirements:
- bash: |
    pip install --target="./.python_packages/lib/site-packages" -r ./requirements.txt
  displayName: 'Install app requirements'
We then zip the files ready to be published as a build artifact and for deployment. We zip the entirety of our repository (a default variable named "$(System.DefaultWorkingDirectory) and the file is created with a unique build ID:
- task: ArchiveFiles@2
  displayName: "Archive files"
  inputs:
    rootFolderOrFile: "$(System.DefaultWorkingDirectory)"
    includeRootFolder: false
    archiveFile: "$(System.DefaultWorkingDirectory)/build$(Build.BuildId).zip"
We publish our build artifacts so that this build artifact can later be deployed to higher environments (test, UAT, production) if we’re happy with it in the development environment:
- task: PublishBuildArtifacts@1
  inputs:
    PathtoPublish: '$(System.DefaultWorkingDirectory)/build$(Build.BuildId).zip'
    artifactName: 'drop'
Next we create our resources in Azure using the ARM template we defined above. Nothing is created if the resources already exist. Note that a number of variables from our Variable Group are used here (e.g. $(subscriptionId)), we’ll show how to set the variable group up a bit later on:
- task: AzureResourceManagerTemplateDeployment@3
  displayName: 'ARM Template deployment: Resource Group scope'
  inputs:
    azureResourceManagerConnection: $(serviceConnectionName)
    subscriptionId: $(subscriptionId)
    resourceGroupName: $(resourceGroupName)
    location: $(resourceGroupLocation)
    csmFile: 'deployment_template.json'
    overrideParameters: '-appName $(appName) -storageAcctName $(storageAcctName) -hostingPlanName $(hostingPlanName)'
Finally we deploy our application to Azure Functions using our packaged Zip file:
- task: AzureFunctionApp@1
  inputs:
    azureSubscription: $(serviceConnectionName)
    appType: functionAppLinux
    appName: $(appName)
    package: '$(System.DefaultWorkingDirectory)/build$(Build.BuildId).zip'
You don’t need to do anything with this file yet, we’ll use it when we set up our Azure Pipeline in Azure DevOps.
Setting up the Azure Pipeline in Azure DevOps
A resource group is a logical grouping of resources in Azure. You’ll need to create one, if you don’t already have one you want to use, for this piece of work. For information on how to do this using the Azure Portal, see the documentation here. This can also be done in the Azure CLI by running:
az group create --location <location> --name <resource_group_name>
For this tutorial I have created one named testAzFunctionsRG.
Creating a service connection in Azure DevOps
The first thing we need to do in Azure DevOps is to create a service connection to our Azure Resource Group to allow us to deploy resources to our Azure Resource Group from Azure DevOps.
Navigate to Project Settings in the lower left hand corner of the page in your Azure DevOps Project:

Then under “Pipelines” in project settings blade, select “Service connections”
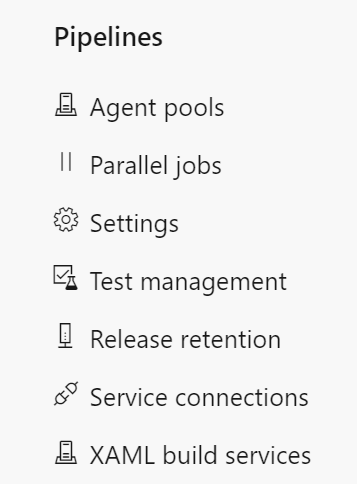
You’ll be greeted by the service connections page, create a new service connection by clicking on the button in the upper right:

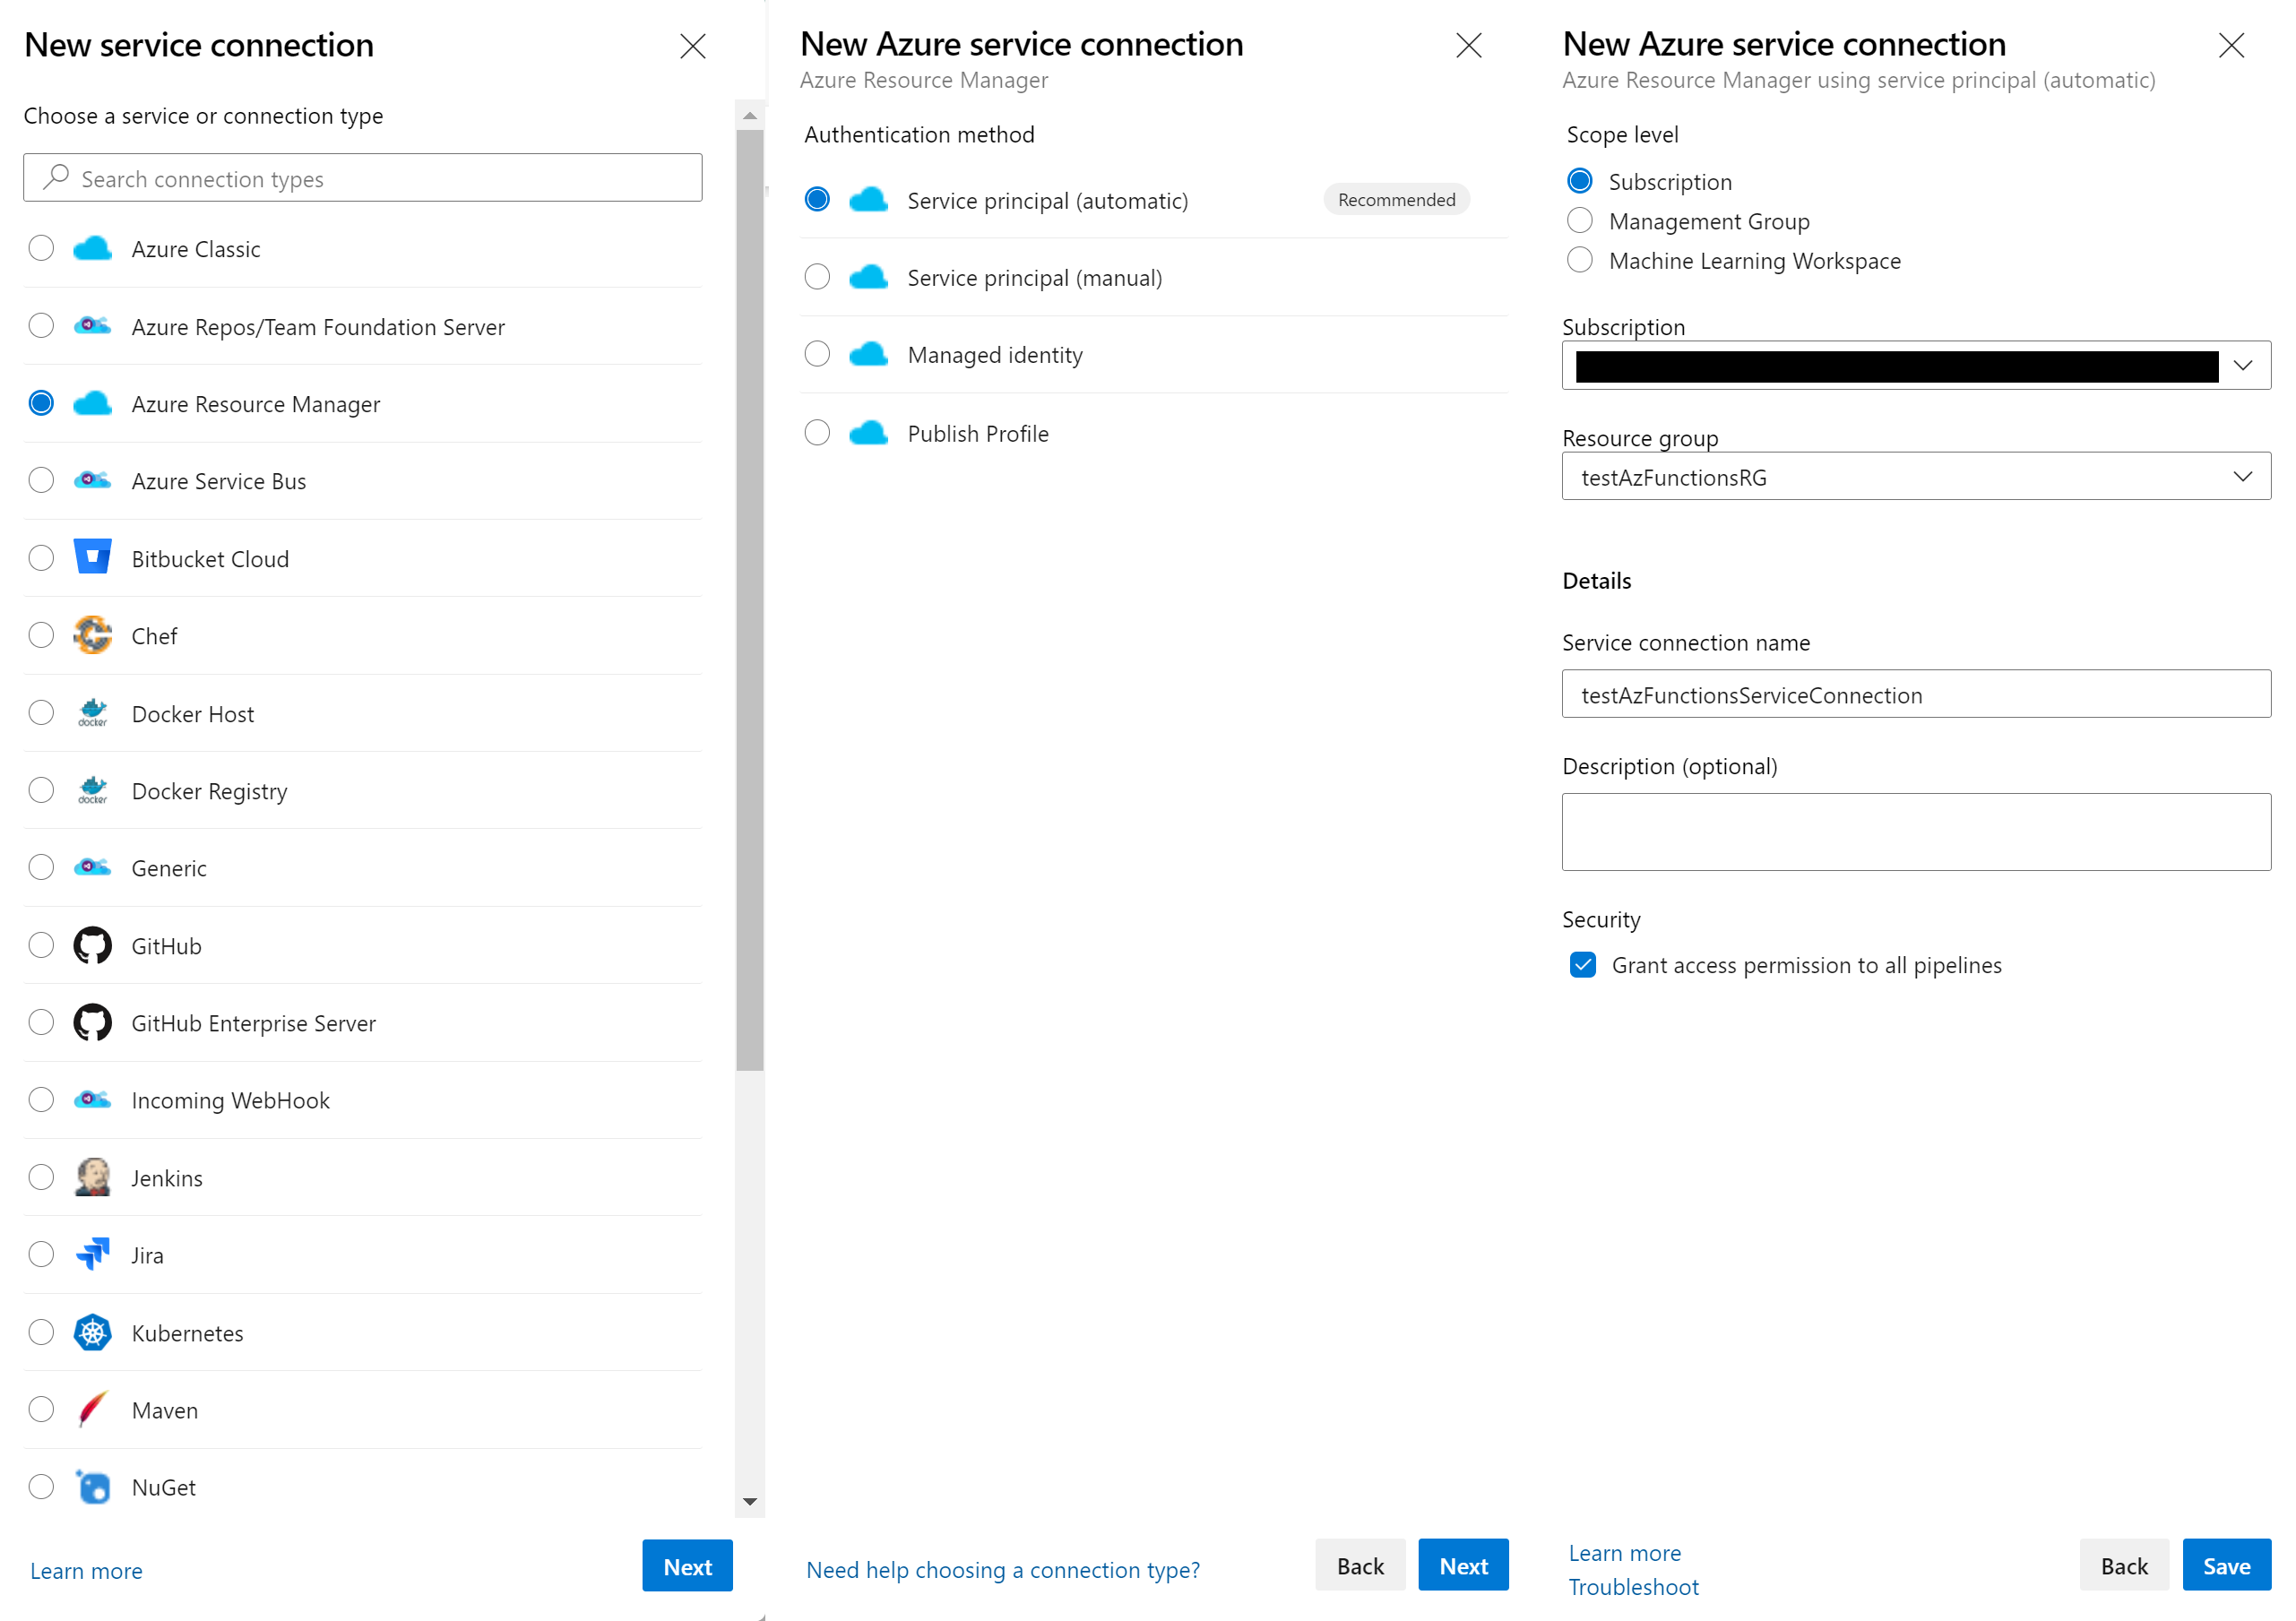
Then follow the workflow shown below – make sure you select “Azure Resource Manager” for your service connection. In the final step, select an Azure subscription you have access to, provide the name of your resource group and a name for your service connection – I have chosen testAzFunctionsServiceConnection.
Creating a variable group in Azure DevOps
Next we need to create the variable group in Azure DevOps to store the variables that we use in Azure Pipeline, as shown in our yaml file above.
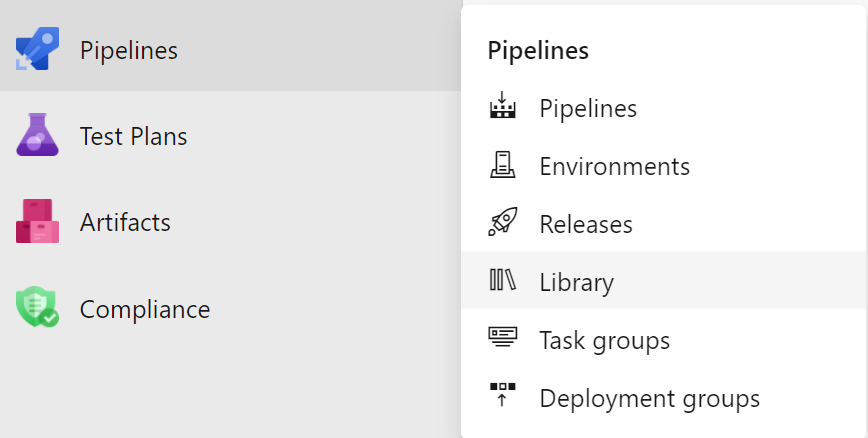
You can create a Variable group by using the left-hand navigation pane to click on “Library” under “Pipelines”:
Then select the button to “+ Variable group”.
You should name this variable group AzFunctionsAppVariableGroup to match the definition in the Azure Pipelines yaml file.
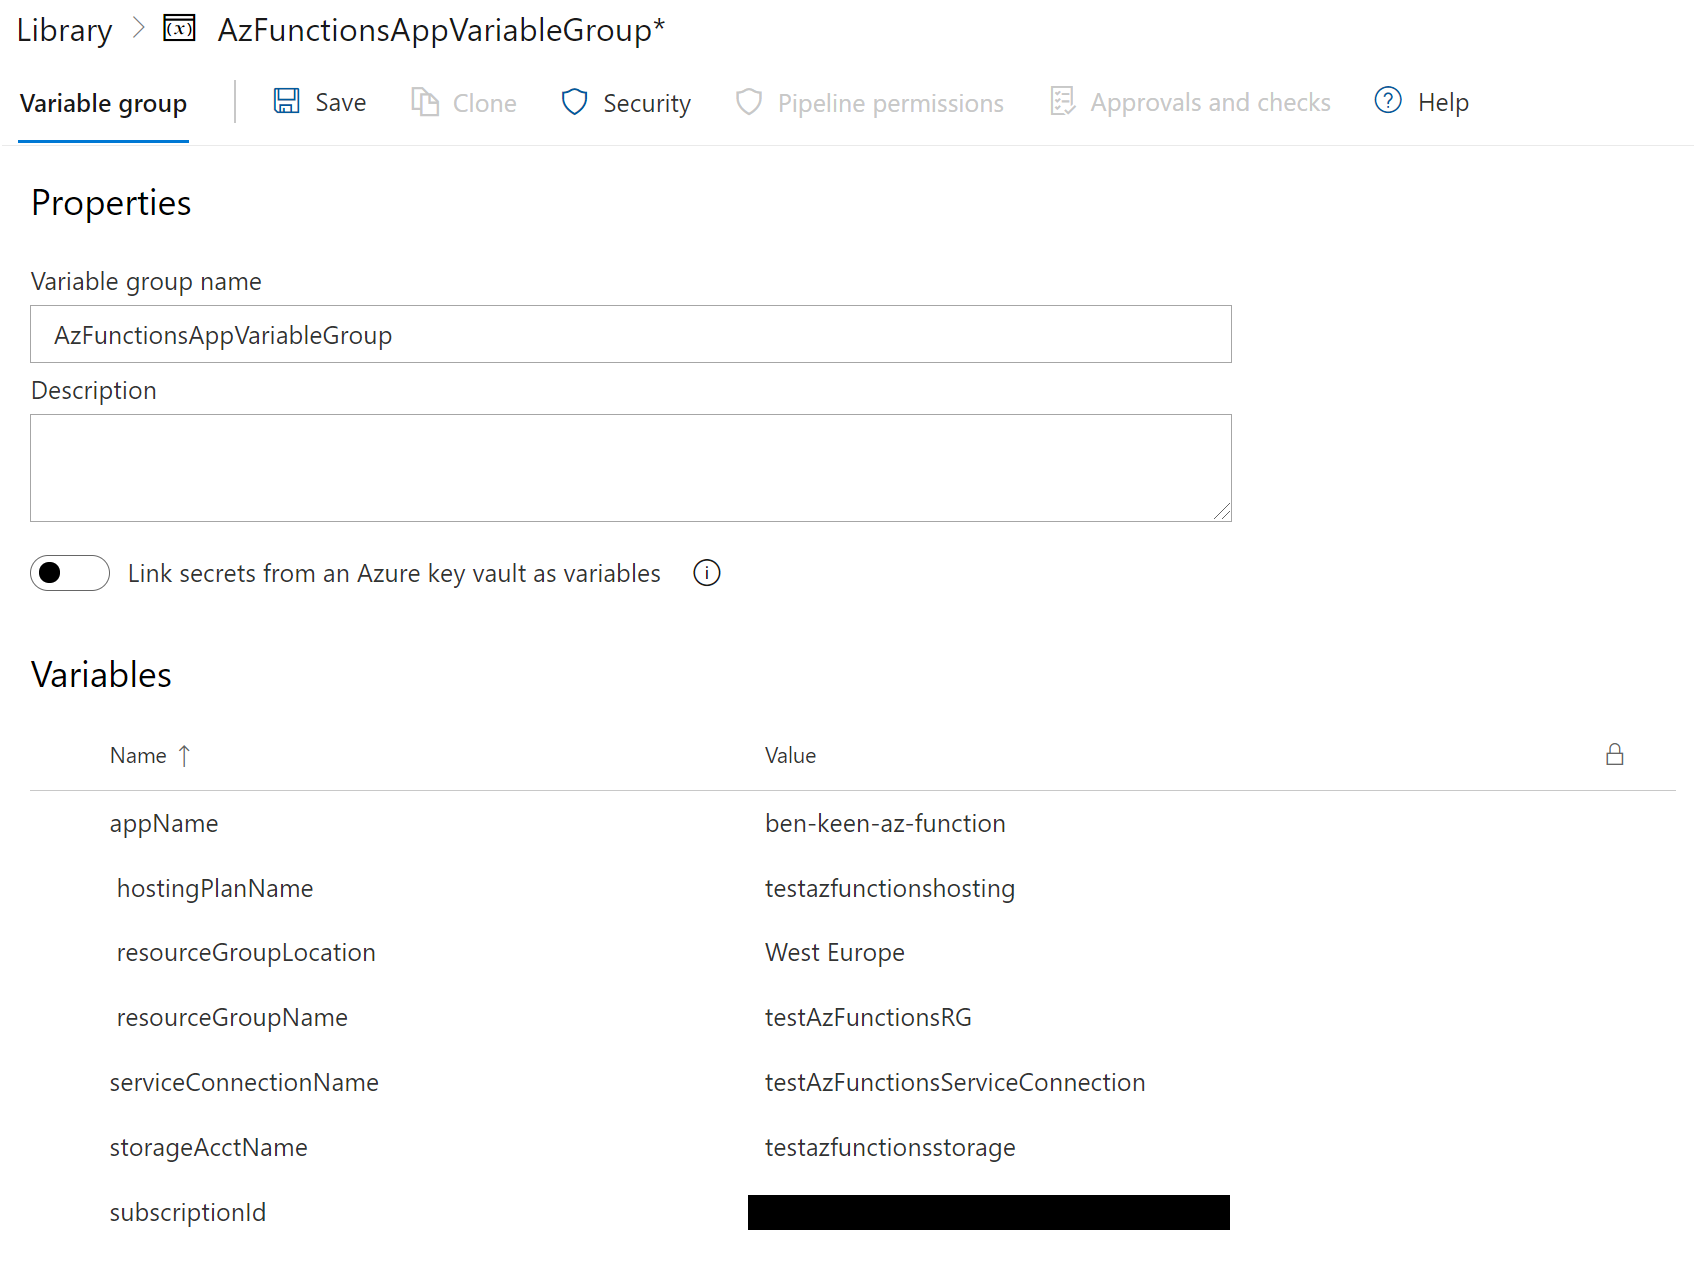
The variables you’ll need to provide are:
appName- The name of your Azure Functions App (Pick something unique)
hostingPlanName- The name of your Azure Functions Linux Hosting Plan
resourceGroupLocation- The location of your resource group
resourceGroupName- The name of your resource group
serviceConnectionName- The name of your service connection that was set up in the previous step
storageAcctName- The name of your storage account
subscriptionId- The name of the subscription to be used
It should look something like this:
Creating your pipeline in Azure DevOps
Now it’s time to create our deployment pipeline in Azure DevOps, we’ll be using the yaml file we looked at earlier in this post to do this.
Navigate to pipelines in the left hand blade on Azure DevOps and click on the New Pipeline button:

You’ll then be asked where your code is, click on Azure Repos Git (left image below). Then you’ll be asked to select a repository, select your forked repository.
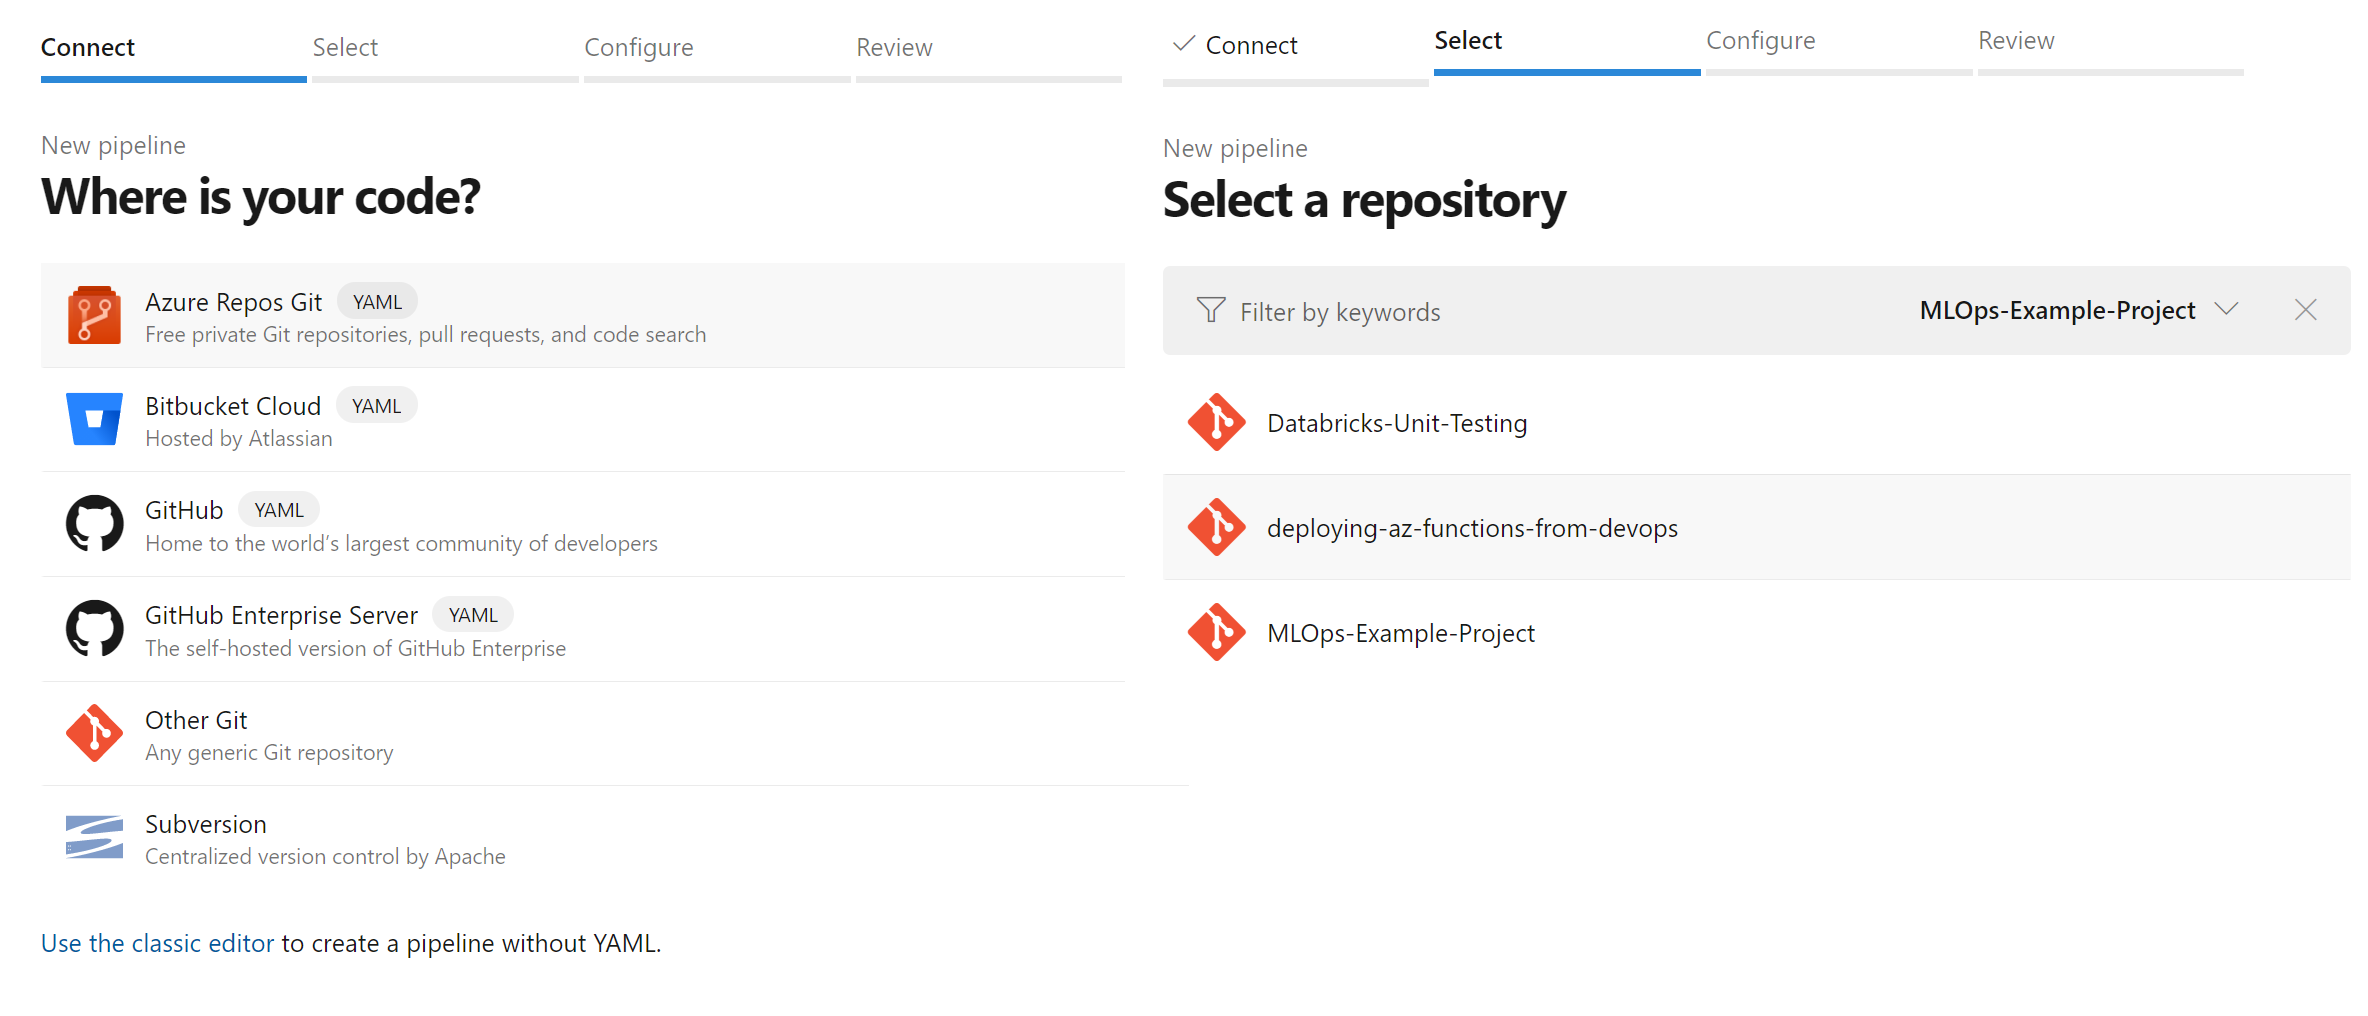
After this you’ll need to select “Existing Azure Pipelines YAML file” as we’ll be using the yaml file in the repository to define our pipeline and then select the "/azure-pipelines.yml" file in the master branch. You’ll then be taken to a page where you can review your pipeline and click on the “Run” button:
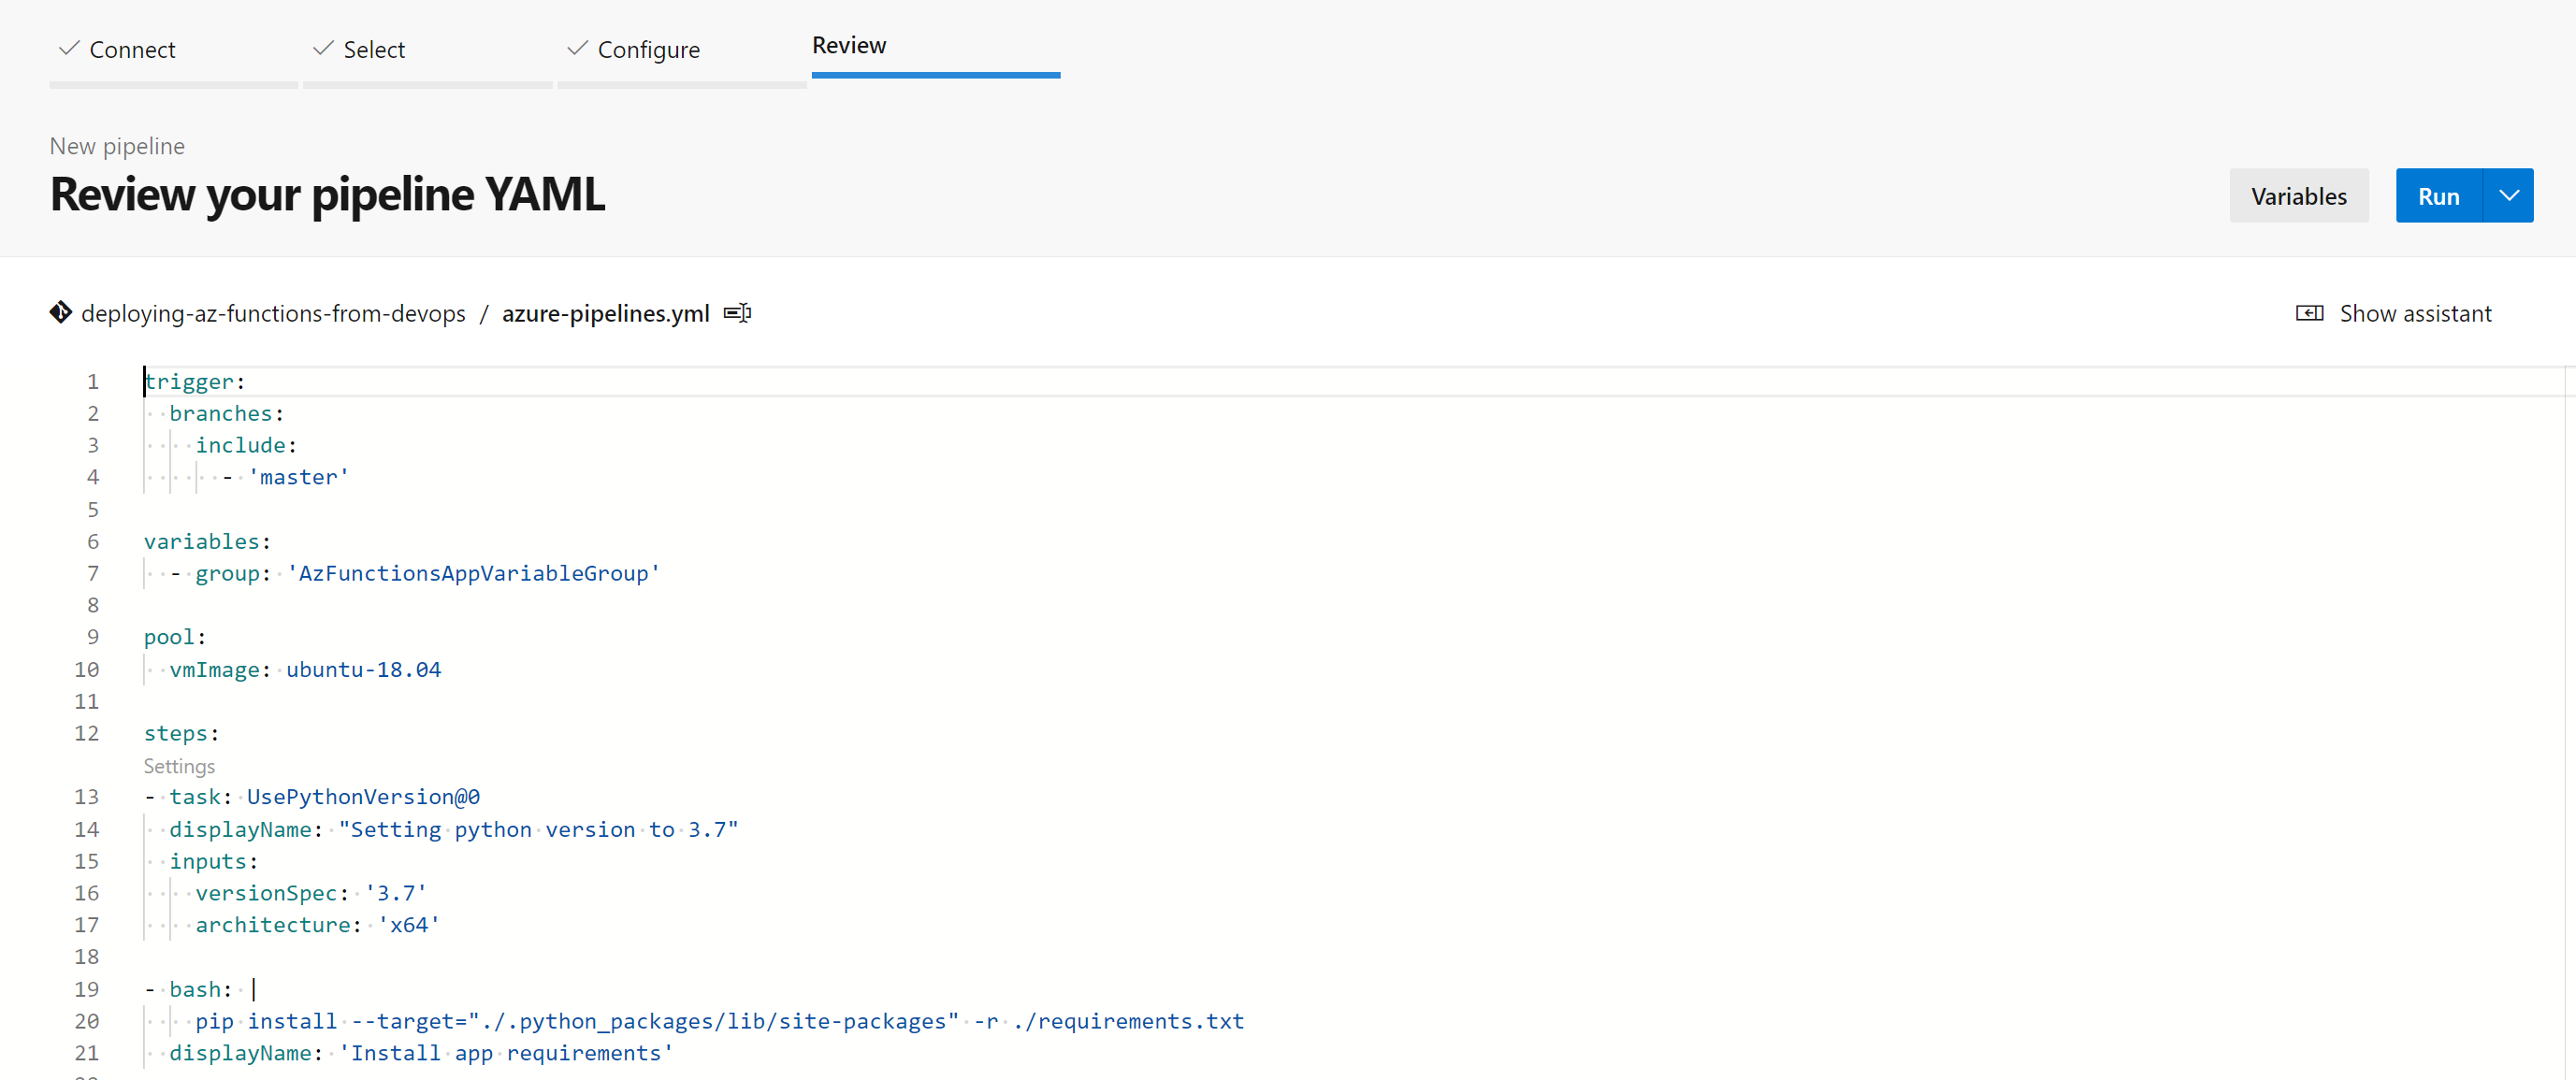
Pipeline Run
The pipeline will now be running and you can track its progress, at first the job will be queued:

Then it will be running:

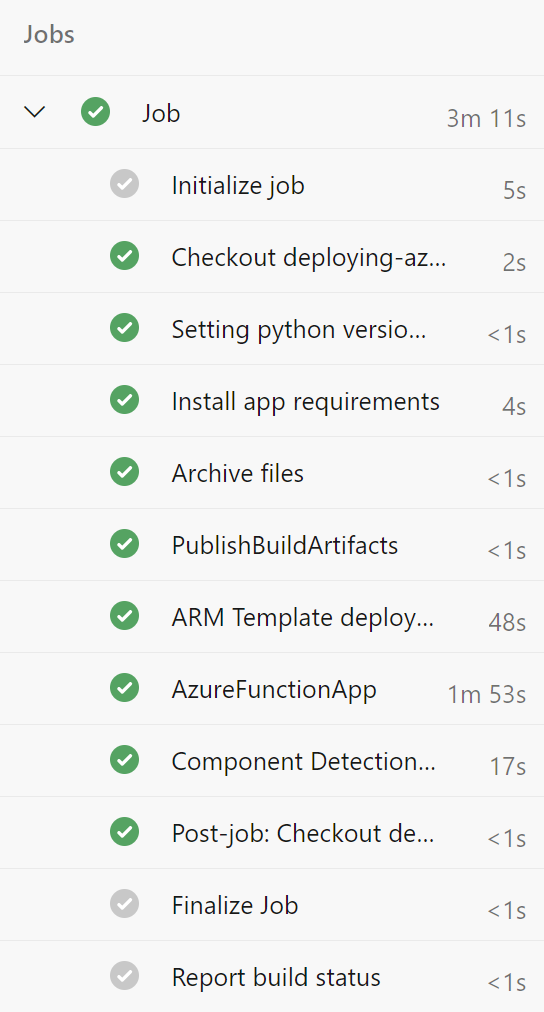
And, if all goes well, it will complete successfully:

You can click on the job and see each stage that was run. If your pipeline failed, you can also see at which point it failed:
Testing your deployed Azure Functions API
Your function is now deployed to Azure! So let’s test it out. First we need to go and get the URL. Navigate to your resource group in the Azure Portal and you should see the resources deployed:
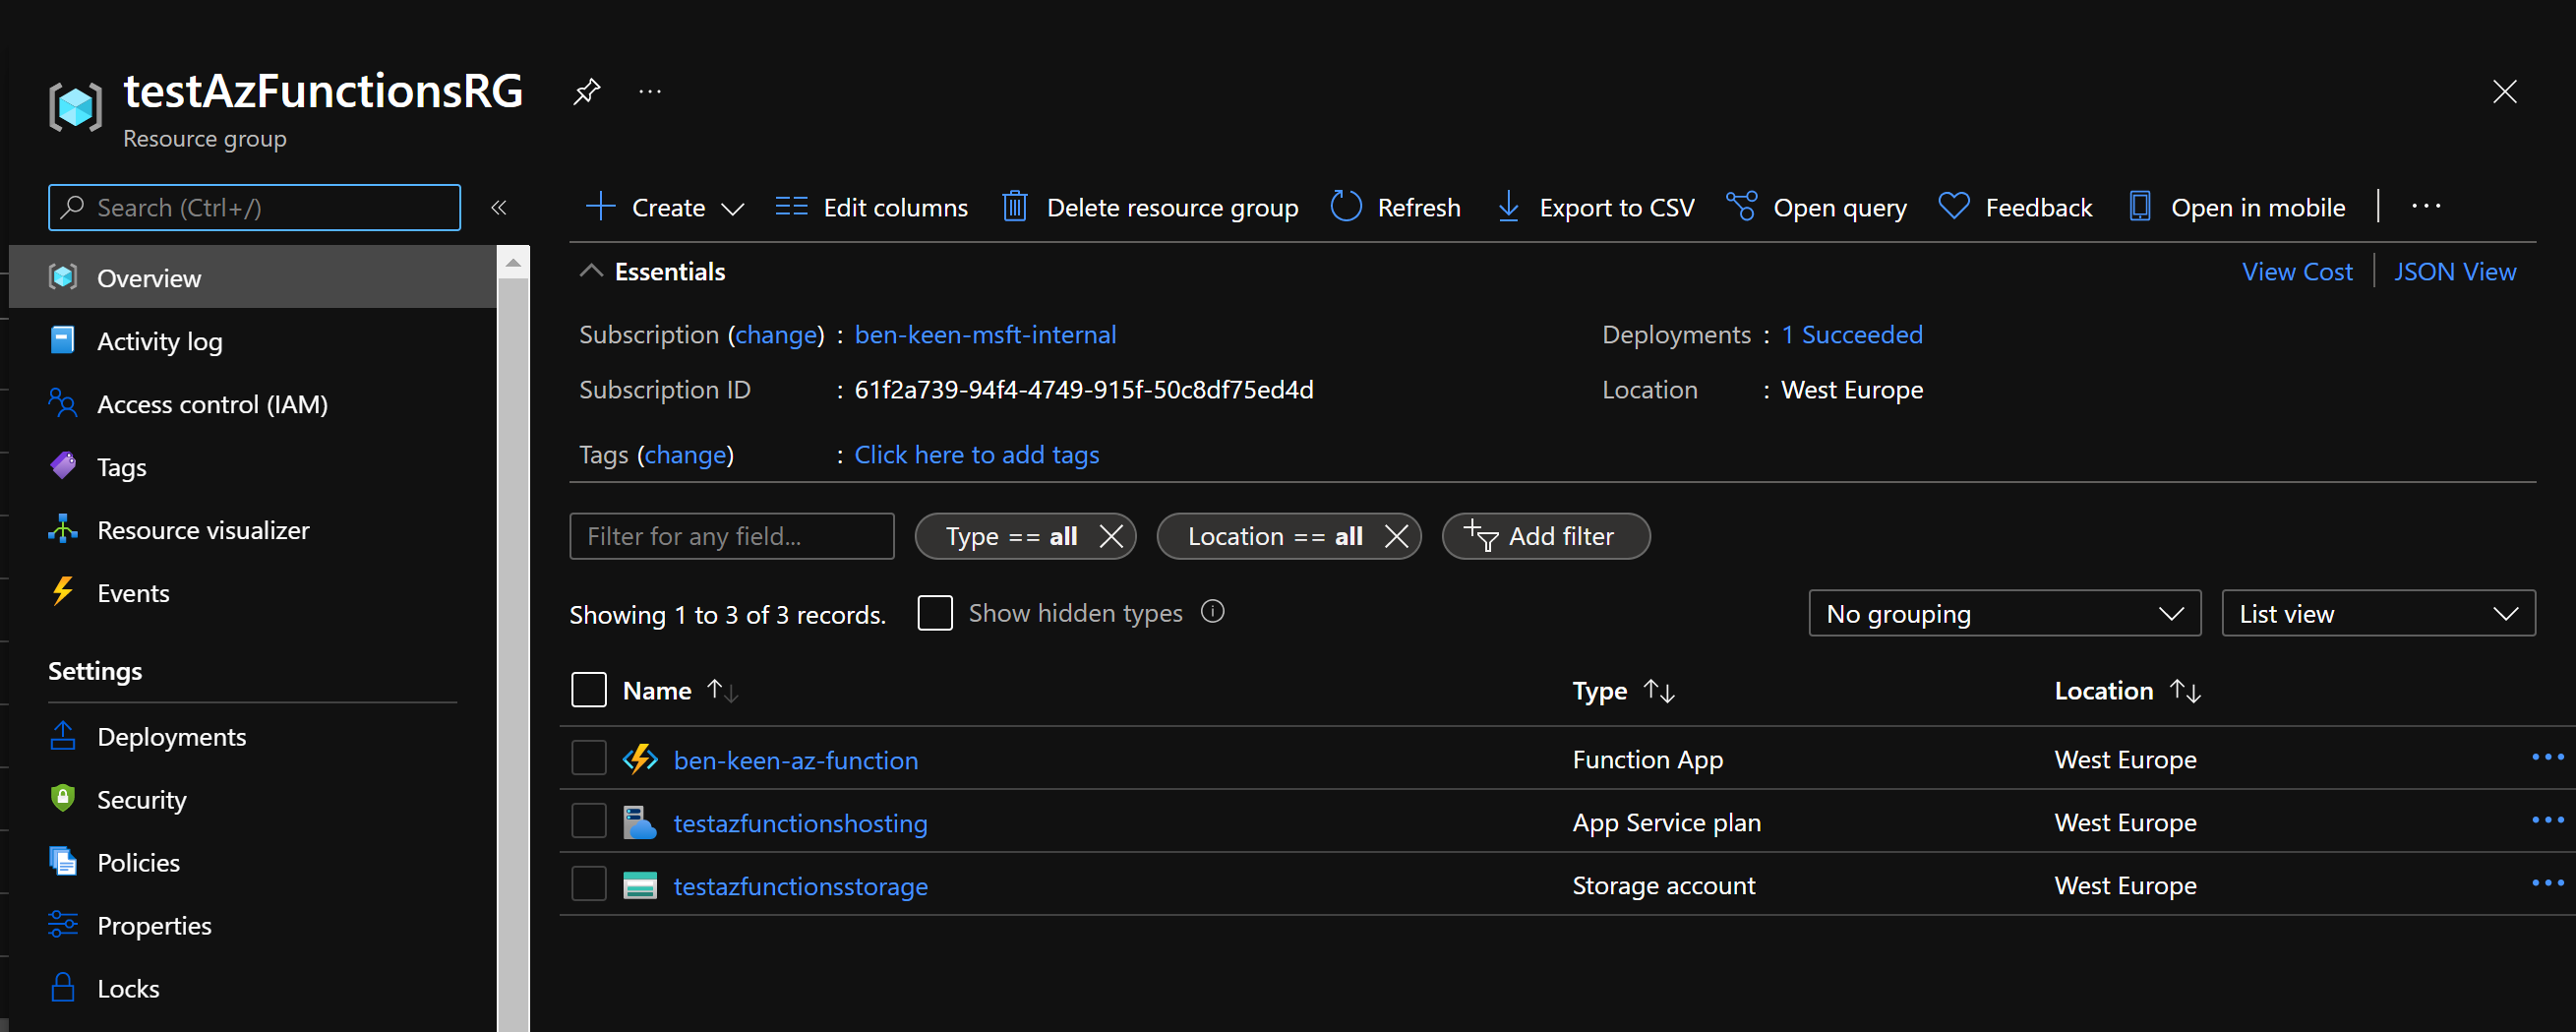
Navigate to the Function App resource in the Azure Portal and click on Functions in the left hand blade:
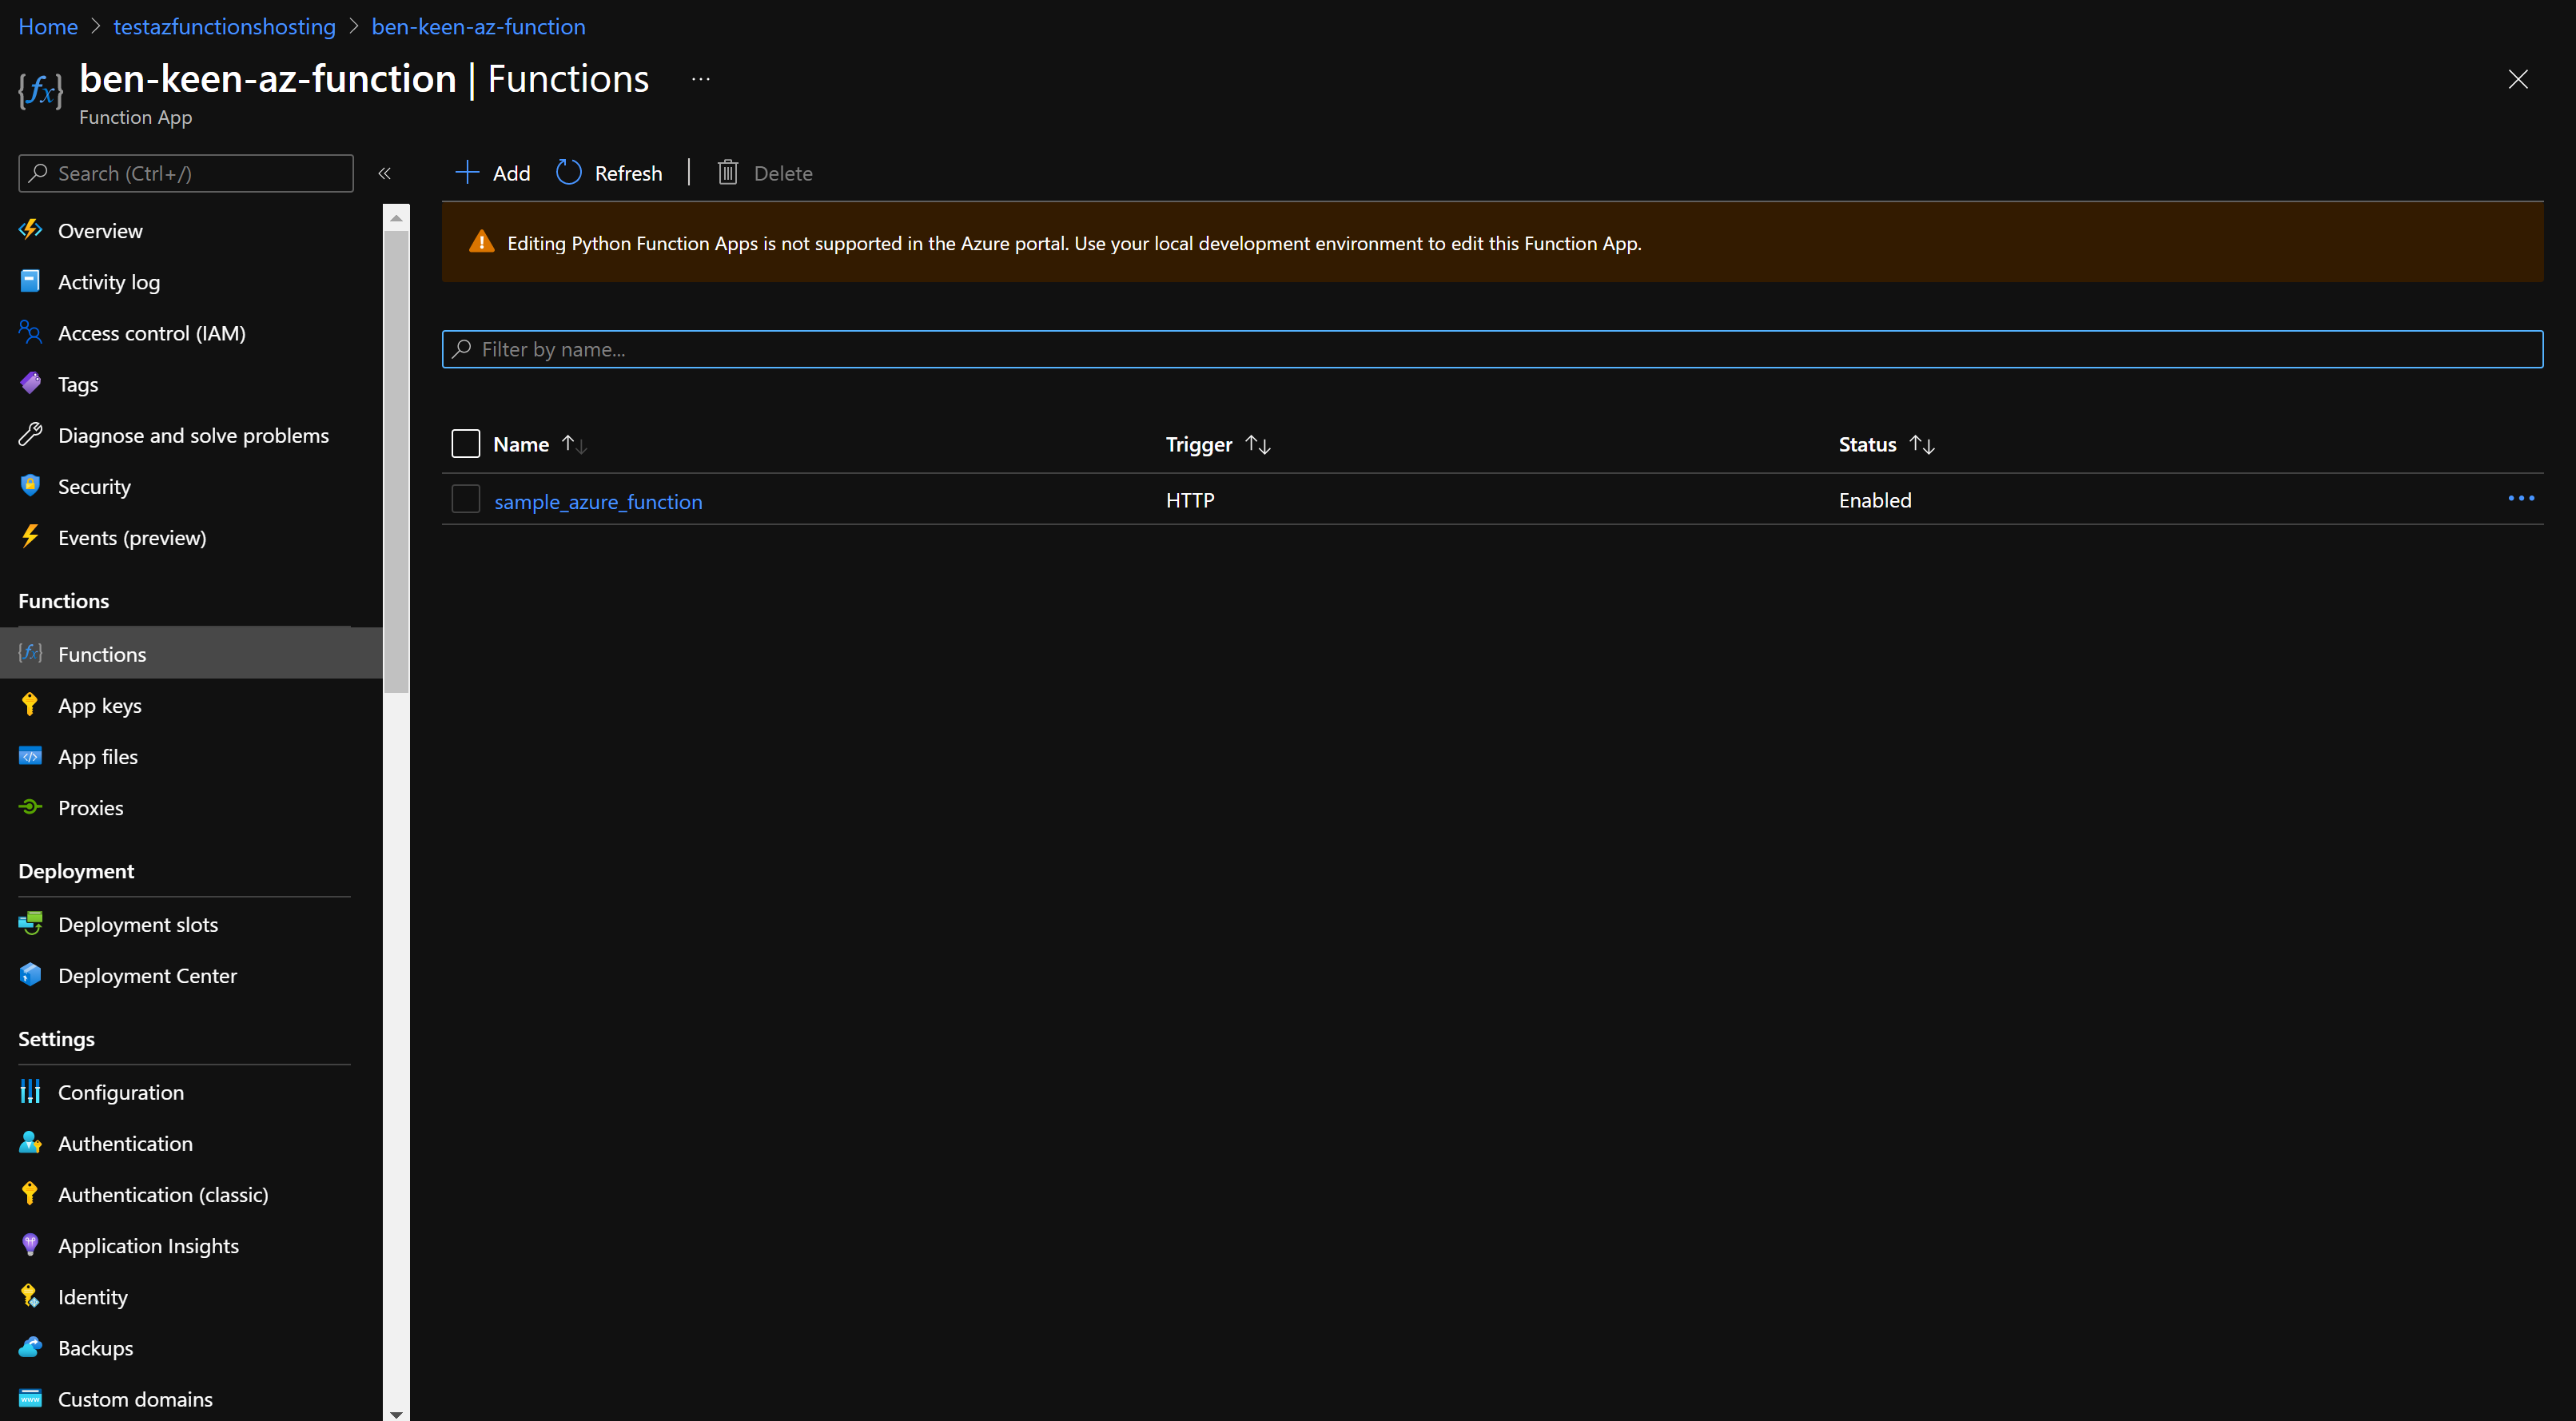
Now select the button that says “Get Function Url”

And make a note of your URL. You can then make a GET or POST HTTP request to this URL with a JSON payload of:
{
    "name": "<your_name>"
}
As shown here in Postman:

Or we can give it a go in Python:
app_name = "ben-keen-az-function"
function_name = "sample_azure_function"
key = "wXDvW8JF0VSN6TaQqpQJjBjEBg0fu7TVsAKI5UlUseXll5UaU5ezFg=="

url = f"https://{app_name}.azurewebsites.net/api/{function_name}?code={key}"
response = requests.get(url, json={'name': 'Ben Keen'})

response.text
'Hello, Ben Keen. This HTTP triggered function executed successfully.'
Conclusion
So there you have it – a deployment pipeline that will run each time you merge code into your master branch and deploy to a development environment.
If you wish to have higher environments, you can register your “Drop” zip file artifact to Azure Artifacts ready to be deployed to a higher environment when your happy with your current deployment and you’re ready to go – you’ll want to create a separate Azure Pipeline for that.